
Introduction: Implications of These Findings
导言:这些发现的意义
This piece details the development of a chain of three exploits intended to allow an individual to run a custom OS/unsigned code on the Chromecast with Google (CCwGTV) 1080P.
这篇文章详细介绍了三个漏洞的开发链,旨在允许个人在 Chromecast with Google (CCwGTV) 1080P 上运行自定义操作系统/未签名代码。
Security researchers Jan Altensen, Ray Volpe, and I developed this chain of vulnerabilities as a group effort.
安全研究人员 Jan Altensen、Ray Volpe 和我共同开发了这一系列漏洞。
Regarding the impact itself, it’s important to consider it from different perspectives. For hobbyists, the option to install a custom operating system is now available. However, to the average end user who doesn’t customize their device extensively, the primary concern lies in potential pre-installed malware or spyware affecting the device.
关于影响本身,重要的是要从不同的角度考虑它。对于业余爱好者,现在可以选择安装自定义操作系统。但是,对于没有广泛自定义其设备的普通最终用户来说,主要问题在于影响设备的潜在预装恶意软件或间谍软件。
Especially when purchasing from third-party resellers, such as eBay, where these products often undergo frequent resale due to flash sales, caution is advised. Many TV boxes circulating in these markets have been found to be intentionally pre-infected with malware, as highlighted in various videos that have recently been posted on YouTube.
特别是从第三方经销商处购买时,例如 eBay,这些产品经常因限时抢购而频繁转售,建议谨慎行事。正如最近在YouTube上发布的各种视频所强调的那样,在这些市场上流通的许多电视盒被发现故意预先感染了恶意软件。
For those seeking a secure option, the Chromecast is generally considered a safer choice. Nevertheless, it’s important to note that even with well-secured devices, there are potential vulnerabilities. By utilizing the vulnerabilities discussed in this blog, an attacker could pre-install malware or spyware while the device falsely reports as secure to the user while actively eavesdropping on their communications.
对于那些寻求安全选择的人来说,Chromecast 通常被认为是更安全的选择。然而,重要的是要注意,即使使用安全良好的设备,也存在潜在的漏洞。通过利用本博客中讨论的漏洞,攻击者可以预装恶意软件或间谍软件,同时设备错误地向用户报告安全,同时主动窃听他们的通信。
Another concern involves the remote control that remains paired with the device, equipped with a built-in microphone. It is possible that the Chromecast could initiate the microphone remotely, posing a privacy risk. With control over the remote, an attacker could intercept communications by exploiting the always-connected nature of the remote.
另一个问题涉及与设备保持配对的遥控器,该遥控器配备了内置麦克风。Chromecast 可能会远程启动麦克风,从而带来隐私风险。通过对遥控器的控制,攻击者可以通过利用遥控器始终连接的性质来拦截通信。
Beyond audio interception, the risk extends to capturing login credentials for various applications. Keyloggers could record all input, including passwords, presenting a significant threat to user privacy and security. Some of these vulnerabilities appear to affect multiple Nest devices, including Google Chromecast, Nest Wi-Fi Pro, and some Google Home series products. In fact, any smart product with an Amlogic chip is affected. These products include Android TVs, IP cameras, WIFI APs, routers, smart TVs, automotive components, smart speakers, and more.
除了音频拦截之外,风险还延伸到捕获各种应用程序的登录凭据。键盘记录器可以记录所有输入,包括密码,对用户隐私和安全构成重大威胁。其中一些漏洞似乎会影响多个 Nest 设备,包括 Google Chromecast、Nest Wi-Fi Pro 和一些 Google Home 系列产品。事实上,任何带有Amlogic芯片的智能产品都会受到影响。这些产品包括 Android 电视、IP 摄像头、WIFI AP、路由器、智能电视、汽车零部件、智能扬声器等。
These vulnerabilities exist in Chromecast with Google TV (1080P) devices not yet updated to the December 2023 build.
这些漏洞存在于装有 Google TV (1080P) 设备的 Chromecast 中,但尚未更新到 2023 年 12 月版本。
Standard Disclaimer: Any potential damage to your device by this exploit is not the responsibility of the authors of this paper.
标准免责声明:此漏洞对您的设备造成的任何潜在损害均不由本文作者负责。
Background: The Original and Next-Generation Secure-Boot Bypass
背景:原始和下一代安全启动旁路
In 2021, Jan Altensen and I released a persistent secure-boot bypass (sabrina-unlock) for the original CCwGTV (Chromecast with Google TV).
2021 年,Jan Altensen 和我为原始 CCwGTV(带有 Google TV 的 Chromecast)发布了持久的安全启动绕过 (sabrina-unlock)。
In September of 2022, Google released a “Full HD” (1080p) model of Chromecast with Google TV, rebranding the original CCwGTV as the Chromecast with Google TV 4K.
2022 年 9 月,谷歌发布了带有 Google TV 的 Chromecast 的“全高清”(1080p) 型号,将原来的 CCwGTV 更名为带有 Google TV 4K 的 Chromecast。
Given that the names of these devices are so similar, we’ll refer to them by their internal codenames, with the 4K model being “sabrina” and the 1080P model being “boreal”.
鉴于这些设备的名称非常相似,我们将用它们的内部代号来称呼它们,4K型号是“sabrina”,1080P型号是“boreal”。
sabrina utilized a high-end Amlogic S905D3G (SM1 family) chipset, while boreal utilizes a much lower end, but much newer Amlogic S805X2G (S4 family) chipset. This decision was likely made to hit a specific price point; and unlike SM1 series chips, the S4 series supports AV1 hardware decoding.
sabrina使用高端Amlogic S905D3G(SM1系列)芯片组,而boreal则使用低端但更新的Amlogic S805X2G(S4系列)芯片组。这个决定很可能是为了达到一个特定的价格点;与SM1系列芯片不同,S4系列支持AV1硬件解码。
So, of course we had to purchase a few to see if we could support it in LineageOS like we do sabrina.
所以,当然,我们必须购买一些,看看我们是否可以像 sabrina 一样在 LineageOS 中支持它。
Inquiring with Google ultimately led to the legally-required GPL license releases of kernel/modules/u-boot source code.
通过向 Google 咨询,最终导致了内核/模块/u-boot 源代码的法律要求 GPL 许可证发布。
The Nest team has since migrated to utilizing GoogleSource Git repositories instead of Google Drive tarball releases. All Nest products with relevant OSS licensed code can be found in that device’s specific manifest here.
此后,Nest 团队已迁移到使用 GoogleSource Git 存储库,而不是 Google Drive tarball 版本。所有具有相关 OSS 许可代码的 Nest 产品都可以在此处的设备特定清单中找到。
Mitigations Taken by Google
Google 采取的缓解措施
The first hurdle to overcome is that boreal’s development team learned from our work on its 4K sibling.
第一个需要克服的障碍是,北方汽车的开发团队从我们在其4K兄弟姐妹的工作中吸取了教训。
Both the injection vector in the form of the BootROM exploit, and the persistence method in unlocking the bootloader by writing to the env partition.
既有 BootROM 漏洞形式的注入向量,也有通过写入 env 分区来解锁引导加载程序的持久性方法。
The BootROM vulnerability is no longer viable, as this board utilizes a much newer BootROM version, and even has a fancy new low-level interface tool called adnl that replaces the old update tool.
BootROM漏洞不再可行,因为该板使用更新的BootROM版本,甚至有一个花哨的新低级接口工具,称为 adnl 替换旧 update 工具。
The ability to persistently write the env partition to change the lock and unlock_ability variables is mitigated by “force locking” the device, which I discuss in more detail below.
通过“强制锁定”设备来缓解持久写入 env 分区以更改 lock and unlock_ability 变量的能力,我将在下面更详细地讨论。
Understanding How We Gained Initial Access
了解我们如何获得初始访问权限
Firstly, we need an access venue to u-boot, or a similarly-privileged injection vector.
首先,我们需要一个 u-boot 的访问场所,或者一个类似特权的注入向量。
UART was easy to identify, though Amlogic got creative with their baud-rate, setting it to 921600, in contrast to previous Amlogic SoC’s which utilize 115200.
UART 很容易识别,尽管 Amlogic 在波特率方面很有创意,将其设置为 921600 ,与之前使用 115200 .
Unfortunately, Google has hardened both of the useful access venues UART offered before:
不幸的是,谷歌已经强化了UART之前提供的两个有用的访问场所:
- u-boot’s
CONFIG_AUTOBOOT_DELAYis set to-2, which should prevent us from interrupting the boot-sequence to access a u-boot shell over serial (more on that later…)
u-boot’sCONFIG_AUTOBOOT_DELAY设置为-2,这应该可以防止我们中断启动序列以通过串行访问 u-boot shell(稍后会详细介绍…… - Android’s console service is not started, and we have no privileged venue from which to start it, so we can’t access an Android shell over serial either.
Android 的控制台服务尚未启动,并且我们没有特权场所来启动它,因此我们也无法通过串行访问 Android shell。
We were stuck here for some months, until another researcher surfaced with precisely the injection vector we needed.
我们在这里被困了几个月,直到另一位研究人员带着我们需要的注射载体浮出水面。
By strategically shorting the eMMC D0 pin during boot when the device reaches a specific stage of u-boot, we can get u-boot to gracefully pause the progression of the boot sequence and create an artificial boot-delay that allows us to access a u-boot shell.
当设备达到 u-boot 的特定阶段时,通过在启动期间策略性地短接 eMMC D0 引脚,我们可以让 u-boot 优雅地暂停启动序列的进度,并创建一个人工启动延迟,允许我们访问 u-boot shell。
Given it was just shorted out, the eMMC is rightfully in an unusable state. This state can be fixed simply by running Amlogic’s useful built-in tool amlmmc rescan 1.
鉴于它刚刚短路,eMMC 理所当然地处于无法使用的状态。这种状态可以通过运行Amlogic的有用内置工具 amlmmc rescan 1 来修复。
We initially thought that the device would be easy to unlock from here – but there turned out to be more to the story.
我们最初认为该设备从这里很容易解锁——但事实证明,故事还有更多内容。
“The Device is Force Locked”
“设备被强制锁定”
We then tried to set the lock variable by hand as we did on sabrina. To discern what to set it to, we again looked at the LockData struct:
然后,我们尝试手动设置变量, lock 就像我们在 上 sabrina 所做的那样。为了辨别要设置它的内容,我们再次查看了结构: LockData
typedef struct LockData {
uint8_t version_major;
uint8_t version_minor;
uint8_t unlock_ability;
/* Padding to eight bytes. */
uint8_t reserved1;
/* 0: unlock 1: lock*/
uint8_t lock_state;
/* 0: unlock 1: lock*/
uint8_t lock_critical_state;
/* 0: enable bootloader version rollback 1: prevent bootloader version rollback*/
uint8_t lock_bootloader;
uint8_t reserved2[1];
} LockData_t;---- u-boot/include/emmc_partitions.h
So, just as we did on sabrina, we ran setenv lock 10100000 from u-boot shell, then attempted to continue the boot process.
因此,就像我们在 sabrina 上所做的那样,我们从 u-boot shell 运行 setenv lock 10100000 ,然后尝试继续启动过程。
Unfortunately, Google really learned from the last go around. We can’t usefully set variables relevant to the lock state, as when you try to set them, the runtime check loops and states “The device is force locked”, and won’t progress the boot process any further.
不幸的是,谷歌真的从上次的尝试中吸取了教训。我们无法有效地设置与锁定状态相关的变量,因为当您尝试设置它们时,运行时检查会循环并显示“设备被强制锁定”,并且不会进一步推进启动过程。
Let’s take a look at how “force locking” is handled:
让我们来看看“强制锁定”是如何处理的:
static AvbIOResult read_is_device_unlocked(AvbOps* ops, bool* out_is_unlocked)
{
    if (get_board_variant() != BOARD_VARIANT_DEV) {
        printf("The device is force locked\n");
        *out_is_unlocked = false;
        return AVB_IO_RESULT_OK;
    }
---- u-boot/cmd/amlogic/cmd_avb.c
During the AVB (Android Verified Boot) process, if get_board_variant doesn’t return BOARD_VARIANT_DEV, the device will forcibly report that it is locked regardless of the current env values.
在 AVB(Android Verified Boot)过程中,如果 get_board_variant doesn’t return BOARD_VARIANT_DEV ,无论当前 env 值如何,设备都将强制报告它已被锁定。
Diving a bit deeper into how get_board_variant works:
更深入地了解其工作原理 get_board_variant :
int get_board_variant(void)
{
#ifdef CONFIG_DEBUG_BOARD_VARIANT_PROD
return BOARD_VARIANT_PROD;
#else
static int board_variant = BOARD_VARIANT_UNKNOWN;
if (board_variant == BOARD_VARIANT_UNKNOWN) {
if (IS_FEAT_DIS_NORMAL_DEVICE_ROOTCERT_0() == 0 &&
IS_FEAT_DIS_DFU_DEVICE_ROOTCERT_0() == 0)
board_variant = BOARD_VARIANT_DEV;
else
board_variant = BOARD_VARIANT_PROD;
}
return board_variant;
#endif
}---- u-boot/board/amlogic/s4_t211/s4_t211.c
The board will only identify as BOARD_VARIANT_DEV when IS_FEAT_DIS_DFU_DEVICE_ROOTCERT_0 equals 0.
只有当等于 0 BOARD_VARIANT_DEV 时 IS_FEAT_DIS_DFU_DEVICE_ROOTCERT_0 ,板才会识别。
int IS_FEAT_DIS_DFU_DEVICE_ROOTCERT_0(void)
{
        // Do double-read to prevent hardware glitch attack
        if (OTP_BIT_CHECK(FEAT_DISABLE_DFU_DEVICE_ROOTCERT_0))
                return 1;
        if (OTP_BIT_CHECK(FEAT_DISABLE_DFU_DEVICE_ROOTCERT_0) == 0)
                return 0;
        return 1;
}
---- u-boot/arch/arm/mach-meson/s4/aml_efuse.c
Unfortunately, IS_FEAT_DIS_DFU_DEVICE_ROOTCERT_0 utilizes OTP_BIT_CHECK, which directly reads an EFUSE, which is a one-time writable software-programmable fuse that cannot be rewritten.
不幸的是, IS_FEAT_DIS_DFU_DEVICE_ROOTCERT_0 utilis OTP_BIT_CHECK 直接读取 EFUSE,这是一个一次性可写的软件可编程保险丝,无法重写。
This situation means that there is no direct way to disable signature checks on the device from the u-boot shell.
这种情况意味着没有直接的方法可以从 u-boot shell 禁用设备上的签名检查。
Now, in theory, from here we could just dump u-boot out of memory, calculate function offsets, and byte-patch u-boot in memory to bypass this signature check issue, but that would be a messy process that ultimately wouldn’t help make it persistent – and we shortly discovered something much more useful anyway.
现在,从理论上讲,我们可以从内存中转储 u-boot,计算函数偏移量,并在内存中字节补丁 u-boot 来绕过这个签名检查问题,但这将是一个混乱的过程,最终无助于使其持久化——无论如何,我们很快就发现了一些更有用的东西。
Amlogic’s Upgrade Process is Strange, but (Accidentally) Useful
Amlogic的升级过程很奇怪,但(意外地)有用
Let’s take a look at how the actual AVB checks are handled:
让我们看一下实际的 AVB 检查是如何处理的:
avb_init();
upgradestep = env_get("upgrade_step");
if (is_device_unlocked() || !strcmp(upgradestep, "3"))
flags |= AVB_SLOT_VERIFY_FLAGS_ALLOW_VERIFICATION_ERROR;
if (!strcmp(ab_suffix, "")) {
for (i = 0; i < AVB_NUM_SLOT; i++) {
if (requested_partitions[i] == NULL) {
requested_partitions[i] = "recovery";
break;
}
}
if (i == AVB_NUM_SLOT) {
printf("ERROR: failed to find an empty slot for recovery");
return AVB_SLOT_VERIFY_RESULT_ERROR_INVALID_ARGUMENT;
}
}
if (!strcmp(ab_suffix, ""))
result = avb_slot_verify(&avb_ops_, requested_partitions, ab_suffix,
flags,
AVB_HASHTREE_ERROR_MODE_RESTART_AND_INVALIDATE, out_data);
else
result = avb_slot_verify(&avb_ops_, requested_partitions_ab, ab_suffix,
flags,
AVB_HASHTREE_ERROR_MODE_RESTART_AND_INVALIDATE, out_data);
if (!strcmp(upgradestep, "3"))
result = AVB_SLOT_VERIFY_RESULT_OK;
return result;
}---- u-boot/cmd/amlogic/cmd_avb.c
For those of you who want to challenge yourself, look closely, the bug isn’t that hard to spot.
对于那些想要挑战自己的人来说,仔细观察,这个错误并不难发现。
If you asked, “what is upgradestep”, you’re on the right track.
如果你问,“ what is upgradestep ”,你就走在正确的轨道上。
The issue here is a logical operator misuse:
这里的问题是逻辑运算符误用:
if (is_device_unlocked() || !strcmp(upgradestep, "3"))
This function is intended to temporarily bypass AVB during step 3 of AML upgrades, but can be maliciously used to disable AVB while leaving the device in a state that it believes it is secure, and locked.
此函数旨在在 AML 升级的第 3 步期间暂时绕过 AVB,但可以恶意用于禁用 AVB,同时使设备处于其认为安全且锁定的状态。
Now, as we noted earlier, is_device_unlocked will always unconditionally return false unless we have a DEV unit.
现在,正如我们之前提到的,除非我们有一个单位, is_device_unlocked 否则将始终无条件返回 false 。 DEV
But upgradestep is simply controlled by the following function:
但 upgradestep 仅由以下函数控制:
upgradestep = env_get("upgrade_step")---- u-boot/cmd/amlogic/cmd_avb.c
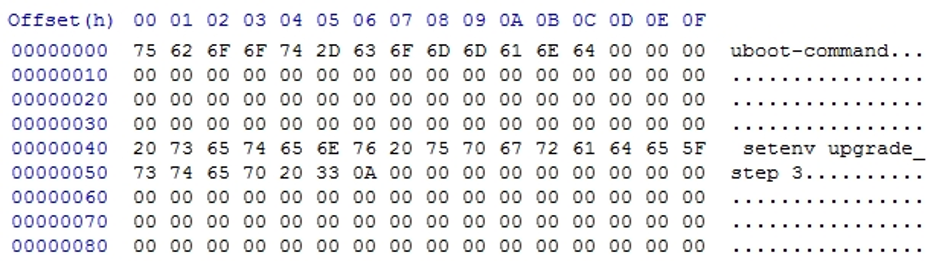
So, we can simply setenv upgrade_step 3, then saveenv, and continue the boot process by running run storeboot.
因此,我们可以简单地 setenv upgrade_step 3 ,然后 saveenv ,并通过运行 run storeboot 来继续引导过程。
By utilizing this command, u-boot will not only allow AVB verification errors (AVB_SLOT_VERIFY_FLAGS_ALLOW_VERIFICATION_ERROR), but also return a result of success (AVB_SLOT_VERIFY_RESULT_OK).
通过使用此命令,u-boot 不仅会允许 AVB 验证错误 ( AVB_SLOT_VERIFY_FLAGS_ALLOW_VERIFICATION_ERROR ),还会返回成功结果 ( AVB_SLOT_VERIFY_RESULT_OK )。
This result means that Android won’t believe it is unlocked, or that AVB checks have been violated/skipped – it will report as secure, and not wipe user data like typical bootloader unlock would for data security purposes.
这一结果意味着 Android 不会相信它已解锁,或者 AVB 检查已被违反/跳过——它将报告为安全,并且不会像典型的引导加载程序解锁那样出于数据安全目的擦除用户数据。
At this point, we could utilize the eMMC fault injection and the upgradestep bug to temporarily boot any kernel image we chose, but that process is “tethered” as with each boot, upgradestep is reset forcibly by u-boot, even if it’s written to the env partition.
在这一点上,我们可以利用 eMMC 错误注入和 upgradestep bug 来临时启动我们选择的任何内核映像,但该过程是“绑定”的,就像每次启动一样,被 u-boot 强制重置, upgradestep 即使它被写入 env 分区。
Making the Permanent Bypass of Secure-Boot Persistent
使安全启动的永久绕过持久化
If we want to run a full custom operating system, we need to find a method to permanently bypass secure-boot.
如果我们想运行一个完全自定义的操作系统,我们需要找到一种方法来永久绕过安全启动。
Now, we noted that u-boot lacks any whitelist or sanity checking surrounding data passed to it via Android’s misc partition BCB (Bootloader Control Block) data.
现在,我们注意到 u-boot 缺少任何白名单或围绕通过 Android misc 分区 BCB(Bootloader Control Block)数据传递给它的数据的健全性检查。
The BCB usually passes critical boot-state data, such as reboot-reason like rebooting to recovery for a factory data reset or bootloader mode, etc.
BCB 通常会传递关键的启动状态数据,例如重新启动原因,例如重新启动以恢复出厂数据重置或启动加载程序模式等。
u-boot interprets the data in the BCB as direct u-boot shell commands to be executed in the preboot stage of u-boot.
u-boot 将 BCB 中的数据解释为直接 u-boot shell 命令,以便在 u-boot preboot 阶段执行。
This inherent trust can be abused to feed malicious u-boot commands into the boot-sequence via root access Android-side.
这种固有的信任可能会被滥用,通过 root 访问权限 Android 端将恶意 u-boot 命令输入到启动序列中。
So, by dumping the misc partition, then examining and carefully writing data into the BCB to set the upgrade_step variable to 3, we can make the secure-boot bypass persist to at least the next boot, as shown below:
因此,通过转储 misc 分区,然后检查并仔细地将数据写入 BCB 以将 upgrade_step 变量设置为 3 ,我们可以使安全启动绕过至少持续到下一次启动,如下所示:
At this point, we can violate AVB on the next boot, and therefore introduce our own init script to continually set that variable at every boot, or more conveniently, root with Magisk, and introduce a module to do it easily for the end user.
在这一点上,我们可以在下次启动时违反 AVB,因此引入我们自己的 init 脚本以在每次启动时持续设置该变量,或者更方便的是,使用 Magisk 进行 root,并引入一个模块来为最终用户轻松完成。
This action means that as long as the BCB data isn’t cleared forcibly by the user, the device will bypass secure-boot persistently.
此操作意味着,只要用户未强制清除 BCB 数据,设备就会永久绕过安全启动。
A few caveats to this method:
此方法的一些注意事项:
- Factory Data Resetting, issuing
reboot recovery,reboot bootloader, or anything that would modify the BCB will reset this value, and AVB will be enforced on the next reboot, meaning you will need to re-do the eMMC fault injection and re-set the variable.
恢复出厂设置、发出reboot recovery、reboot bootloader或任何修改 BCB 的内容都将重置此值,并且 AVB 将在下次重新启动时强制执行,这意味着您需要重新执行 eMMC 故障注入并重新设置变量。 - There are no full factory images for boreal, so backup everything via an ADB root shell before modifying anything on the eMMC.
北方没有完整的出厂映像,因此在修改 eMMC 上的任何内容之前,请通过 ADB root shell 备份所有内容。
This process was enlightening. LineageOS currently boots, but as it is still broken, we’re hoping there is an ETA for improvement in the near future.
这个过程很有启发性。LineageOS 目前已启动,但由于它仍然损坏,我们希望在不久的将来有一个改进的 ETA。
How to Perform the Exploit on Your Own
如何自行执行漏洞利用
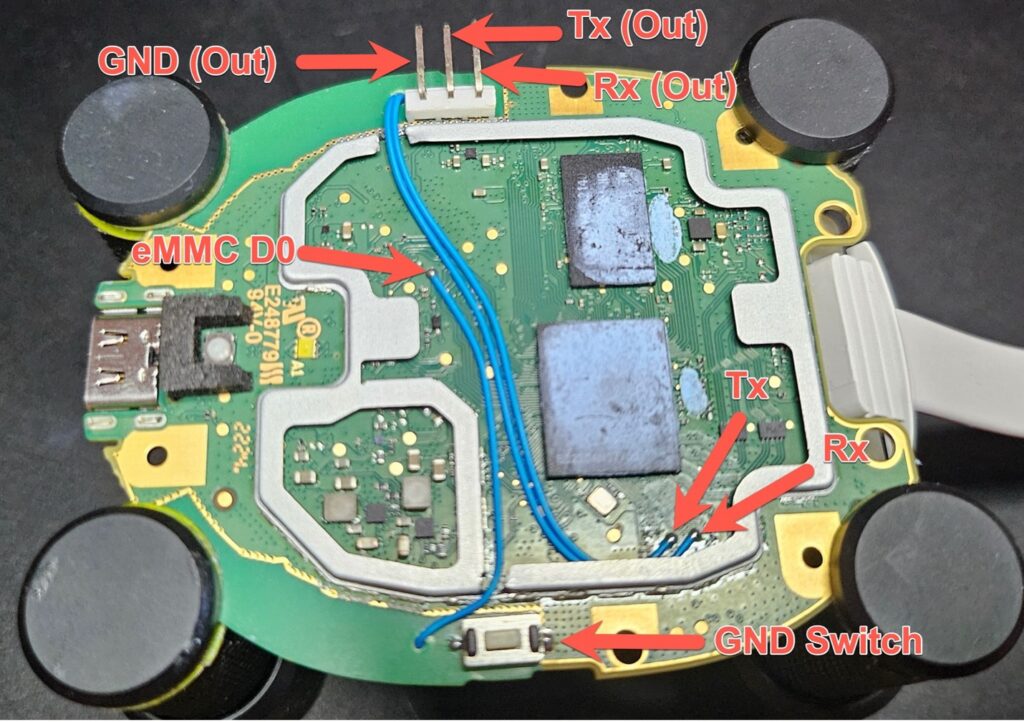
We significantly overcomplicated the eMMC fault injection and UART for convenience and testing purposes. Here is an annotated diagram of our setup:
为了方便和测试目的,我们大大简化了 eMMC 故障注入和 UART。以下是我们设置的注释图:
The bottom of the board:
板子底部:
The top of the board:
板顶:
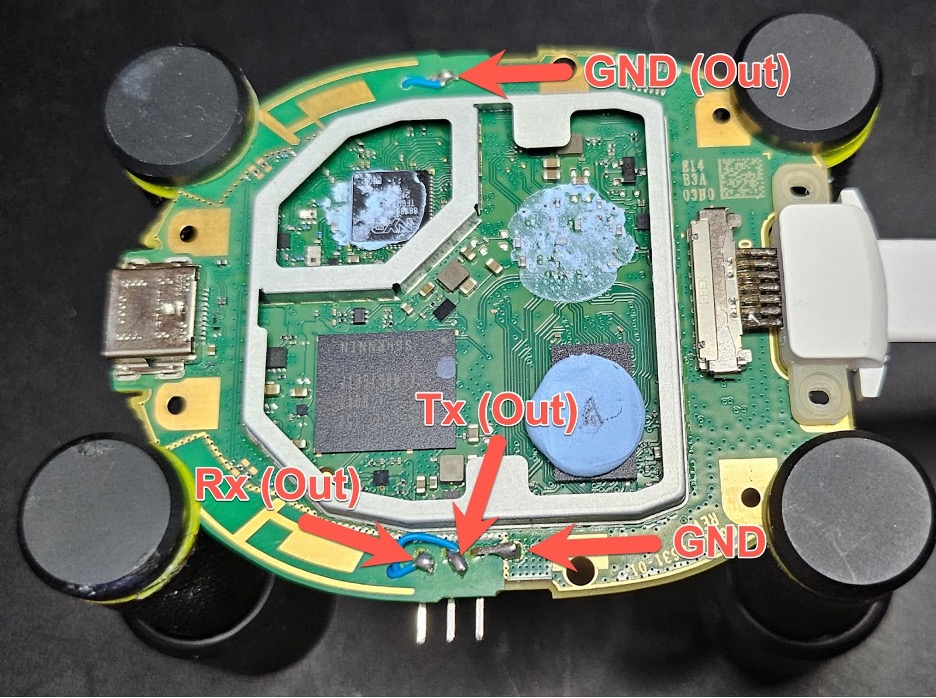
In short, we wired a header for UART to the side of the device, wiring both Rx and Tx from the exposed pins, and creating a ground by smearing solder from the nearby ground pad.
简而言之,我们将UART的接头连接到器件的侧面,从裸露的引脚连接Rx和Tx,并通过从附近的接地焊盘涂抹焊料来形成接地。
We then wired the eMMC D0 pin to a physical switch that we installed on the board for ease of use.
然后,我们将 eMMC D0 引脚连接到安装在板上的物理开关,以便于使用。
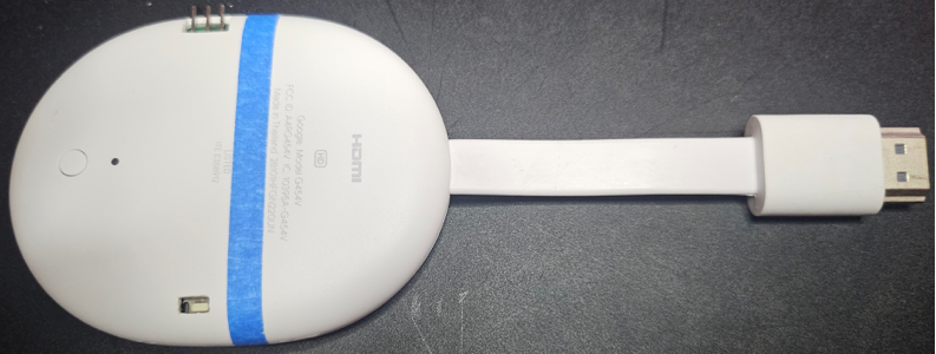
The final product is shown below:
最终产品如下图所示:
It isn’t as difficult to execute this exploit as one might expect, as it can be performed with the following supplies:
执行此漏洞并不像人们想象的那么困难,因为它可以使用以下电源来执行:
- A host machine with USB
带 USB 的主机 - FTDI UART adapter (or any equivalent)
FTDI UART 适配器(或任何等效产品) - 2* female to male jumper wires OR something like a PCBite kit
2 *母对公跳线或类似PCBite套件的东西 - 1* male to male jumper wire OR a paper clip
1 *公对公跳线或回形针
The only hard part of the exploit chain is the eMMC fault injection, so we’ve written up some instructions to help simplify it for the end user:
漏洞利用链中唯一困难的部分是 eMMC 故障注入,因此我们编写了一些说明来帮助最终用户简化它:
Hook the FTDI UART adapter to your machine and open a serial terminal with the baud rate set to 921600, and “Hardware Flow Control” disabled.
将 FTDI UART 适配器连接到您的机器,并打开一个串行终端,波特率设置为 921600 ,并禁用“硬件流量控制”。
Next, wire the pins labeled Rx on the board -> Tx on the adapter, and Tx on the board -> Rx on the adapter. At this point, you should be able to view full boot logs on power on.
接下来,将电路板上标记为 Rx 的引脚连接,在适配器上连接 -> Tx,在适配器上连接标记为 Tx> Rx。此时,您应该能够在开机时查看完整的启动日志。
Now, prepare a ground wire from the adapter (or a paper clip that is seated on a reasonable ground), and put it in a position that allows you to tap the D0 pin.
现在,从适配器(或固定在合理接地上的回形针)准备一根地线,并将其放在允许您敲击 D0 针脚的位置。
For some reason, it is easier to get a u-boot shell if the HDMI port is not connected, so unplug HDMI at this time.
出于某种原因,如果没有连接HDMI端口,更容易获得u-boot外壳,因此此时请拔掉HDMI。
Now, plug the device in, and shortly into the boot process you will see something akin to the following message via UART:
现在,插入设备,在启动过程中不久,您将通过 UART 看到类似于以下消息的内容:
2d-eye soc_vref 0039 0039 0039 0032 0034 0041 0037 0038 0035 0034 0040 0040 0036 0038 0036 0038 0038 0035 0036 0033 0032 0032 0035 0035 0034 0035 0035 0032 0033 0032 0032 0036 0032 0032 0032 0035 0035 0047 0035 0042 0035 0044 0035 0040 average_value_dec 0035 0765 mv
2d-eye dram_vref average_value_dec 0000 vref_ave_voltage 0720 mv range_0 0720 mv range_1 0540 mv
Have in mind a series of three presses done in a single sequence, each about a half-second apart.
请记住,在单个序列中完成一系列三次按压,每次间隔约半秒。
The first of the presses in this series should be done at the very tail end of the delay of the above-referenced text, or at the very beginning of when the text starts moving again, leaning toward the latter of these two.
本系列中的第一台印刷机应该在上述文本延迟的最后阶段完成,或者在文本再次开始移动的开头进行,倾向于这两者的后者。
One of the three presses should drop you into a shell that shows:
三台按压机中的一台应将您放入一个显示以下内容的外壳中:
boreal#If you see errors about earlier bootloader stages failing to load, or other errors, the presses were done too soon, but the device should reboot on its own so that you can try again safely.
如果您看到有关早期引导加载程序阶段无法加载的错误或其他错误,则说明按压过早,但设备应自行重新启动,以便您可以安全地重试。
Demo Video 演示视频
Video demonstrations of the exploit being performed here and the expected output here.
此处为正在执行的漏洞利用的视频演示,以及此处的预期输出。
Disclosure Timeline 披露时间表
- Early Q1-2023 – Initial chain of 3 exploits developed.
2023 年第一季度初 – 开发了 3 个漏洞利用的初始链。 - Mid Q2-2023 – Initial report filed with Google.
2023 年第二季度中期 – 向 Google 提交的初步报告。 - 07-JUN-2023 – Google flagged the issue as “Triaged” and stated that the issue may qualify for the Android and Google Devices Security Reward Program.
2023 年 6 月 7 日 – Google 将该问题标记为“分类”,并表示该问题可能符合 Android 和 Google 设备安全奖励计划的条件。 - 08-AUG-2023 – We offered to provide a pre-hacked device as a demonstration.
2023 年 8 月 8 日 – 我们提出提供预黑客设备作为演示。 - 16-AUG-2023 – Google alerts us that the VRP team awarded us with a bug bounty for the vulnerability.
2023 年 8 月 16 日 – Google 提醒我们,VRP 团队针对该漏洞向我们提供了漏洞赏金。 - 29-AUG-2023 – Google asks that we delay disclosure until the end of 2023 to allow the multiple low-level components to be patched by the relevant vendors.
2023 年 8 月 29 日 – Google 要求我们将披露时间推迟到 2023 年底,以便相关供应商对多个低级组件进行修补。 - 05-SEP-2023 – Google schedules a video call to discuss the proposed mitigations with us.
2023 年 9 月 5 日 – Google 安排了一次视频通话,与我们讨论拟议的缓解措施。 - 07-SEP-2023 – We discussed mitigation proposals with Google, and they offered to sponsor our team to attend hardwear.io NL 2023. We were also alerted that Thomas Roth of HexTree.io reported a similar eMMC fault injection bug on boreal around the same time we did. The disclosure date is set for 15-NOV-2023.
2023 年 9 月 7 日 – 我们与 Google 讨论了缓解建议,他们提出赞助我们的团队参加 NL 2023 hardwear.io。我们还被告知,HexTree.io 的托马斯·罗斯(Thomas Roth)与我们在同一时间报告了北方地区类似的eMMC故障注入错误。披露日期定为 2023 年 11 月 15 日。 - Q3-2023 – The bug bounty pays out.
2023 年第 3 季度 – 漏洞赏金支付。 - 10-OCT-2023 – Google’s VRP team asks us to extend the disclosure deadline to mid-December. We agreed on 06-DEC-2023, the day after the December ASB (Android Security Bulletin) is posted.
2023 年 10 月 10 日 – Google 的 VRP 团队要求我们将披露截止日期延长至 12 月中旬。我们在 2023 年 12 月 6 日,即 12 月 ASB(Android 安全公告)发布的第二天达成了一致。 - Early DEC-2023 – A build that patches all 3 vulnerabilities and enables ARB was deployed via OTA for boreal.
2023 年 12 月初 – 通过 OTA 为北方部署了一个修补所有 3 个漏洞并启用 ARB 的版本。 - 06-DEC-2023 – This writeup was published and CVE’s were published by MITRE.
2023 年 12 月 6 日 – 这篇文章已发布,CVE 由 MITRE 发布。
CVE Tracking CVE跟踪
Credits 学分
- Theorizing, developing, and chaining together these vulnerabilities into an exploit chain: Nolen Johnson (npjohnson), Jan Altensen (Stricted), and Ray Volpe (Functioner).
将这些漏洞理论化、开发并链接到一个漏洞利用链中:Nolen Johnson (npjohnson)、Jan Altensen (Stricted) 和 Ray Volpe (Functioner)。 - QA: Philip Valvo Schnotalla.
QA:菲利普·瓦尔沃·施诺塔拉。
Acknowledgments 确认
We extend special thanks to Angelina Sosa and the VRP team at Google. All are responsive and helpful, and enable security researchers to do this important work. Also, we can’t thank Google enough for the opportunity to attend hardwear.io.
我们特别感谢 Angelina Sosa 和 Google 的 VRP 团队。所有这些都是响应迅速和有帮助的,使安全研究人员能够完成这项重要的工作。此外,我们非常感谢 Google 让我有机会参加 hardwear.io。
原文始发于CSDN(0pr):Chromecast with Google TV (1080P) Secure-Boot Bypass
转载请注明:Chromecast with Google TV (1080P) Secure-Boot Bypass | CTF导航