When I investigated CVE-2022-41099, a BitLocker Drive Encryption bypass through the Windows Recovery Environment (WinRE), the fact that the latter was able to transparently access an encrypted drive without requiring the recovery password struck me. My initial thought was that there had to be a way to reproduce this behavior and obtain the master key from the Recovery Environment (WinRE). The outcome of a generic BitLocker bypass was too tempting not to explore this idea…
当我调查 CVE-2022-41099(通过 Windows 恢复环境 (WinRE) 绕过 BitLocker 驱动器加密)时,后者能够在不需要恢复密码的情况下透明地访问加密驱动器这一事实让我印象深刻。我最初的想法是,必须有一种方法来重现此行为并从恢复环境 (WinRE) 获取主密钥。通用 BitLocker 绕过的结果太诱人了,无法不探索这个想法……
How it all started 一切是如何开始的
First and foremost, reading the post CVE-2022-41099 – Analysis of a BitLocker Drive Encryption Bypass first is recommended for a better understanding of the context, but not strictly required. The gist of it is that BitLocker did not relock the volumes when performing certain recovery operations, thus allowing an attacker with physical access to pause the automatic decryption of the disk during a machine reset and extract the keys.
首先,建议先阅读文章 CVE-2022-41099 – 分析BitLocker驱动器加密绕过,以便更好地了解上下文,但并非严格要求。其要点是,BitLocker 在执行某些恢复操作时不会重新锁定卷,因此允许具有物理访问权限的攻击者在计算机重置期间暂停磁盘的自动解密并提取密钥。
This attack was only possible in a scenario where BitLocker is configured in “TPM-only” mode, which is the default since most PCs come equipped with a Trusted Platform Module (TPM) chip nowadays. Even more so, Microsoft made it non-trivial for users to configure an additional PIN or a startup key since you have to enable and edit (local) group policies to do so.
只有在 BitLocker 配置为“仅限 TPM”模式的情况下,才有可能进行此攻击,这是默认设置,因为现在大多数电脑都配备了受信任的平台模块 (TPM) 芯片。更重要的是,Microsoft使用户配置额外的PIN或启动密钥变得不容易,因为您必须启用和编辑(本地)组策略才能执行此操作。
In addition to the System Restore option that was previously exploited, we also have the possibility to open a command prompt.
除了以前被利用的系统还原选项外,我们还有可能打开命令提示符。
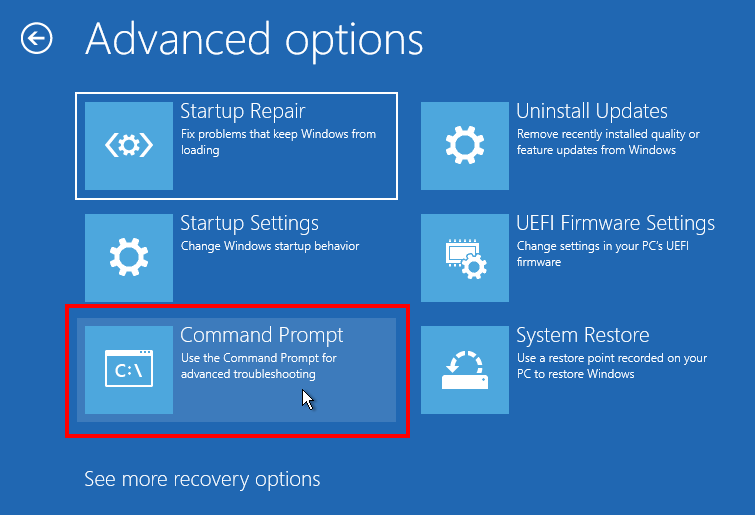 WinRE advanced options WinRE 高级选项
Of course, in this mode, WinRE prompts you to enter the recovery password. This was also true before the patch for CVE-2022-41099. You can choose to skip this step, but then the disk remains locked. And by “locked” I mean that BitLocker discarded the in-memory keys that were automatically obtained at boot time.
当然,在此模式下,WinRE 会提示您输入恢复密码。在 CVE-2022-41099 补丁之前也是如此。您可以选择跳过此步骤,但随后磁盘将保持锁定状态。通过“锁定”,我的意思是 BitLocker 丢弃了在启动时自动获取的内存中密钥。
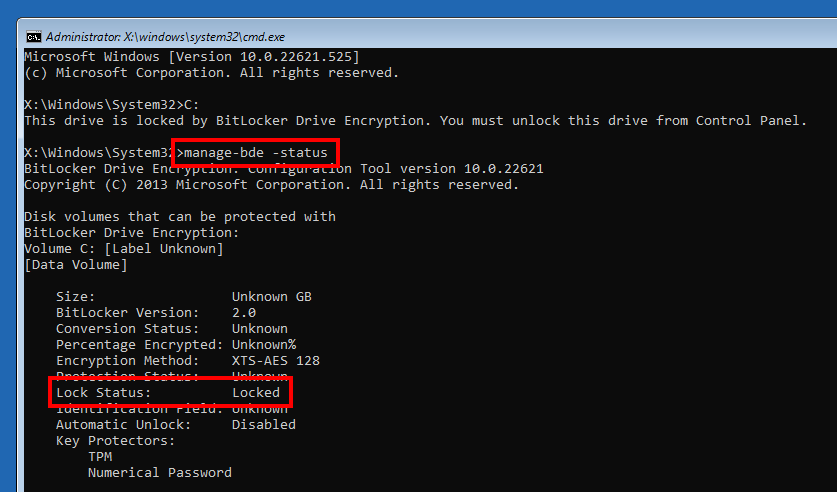 WinRE command prompt showing that the system drive is locked
显示系统驱动器已锁定的 WinRE 命令提示符
I also knew that the ability to obtain the master key using the TPM at boot time was closely tied to the machine’s hardware and firmware configuration, which is why the trust is broken when booting from an external drive for instance. However, when booting into the recovery environment tied to the installed OS, the boot sequence is not altered. So, by reimplementing the steps taken by BitLocker to obtain the master key at boot time, we should be able to unlock the disk, right? Let us find o…
我还知道,在启动时使用TPM获取主密钥的能力与机器的硬件和固件配置密切相关,这就是为什么从外部驱动器启动时信任被破坏的原因。但是,当引导到与已安装操作系统绑定的恢复环境时,引导顺序不会更改。因此,通过重新实现 BitLocker 在启动时获取主密钥的步骤,我们应该能够解锁磁盘,对吗?让我们找到…
BitLocker keys and the TPM
BitLocker 密钥和 TPM
First of all, there is a common misconception that the BitLocker keys are stored in the TPM. Although data can be pushed to the NVRAM of the TPM, the keys are actually stored encrypted in metadata blocks on the BitLocker-protected drive itself.
首先,有一个常见的误解,认为BitLocker密钥存储在TPM中。尽管数据可以推送到 TPM 的 NVRAM,但密钥实际上以加密方式存储在受 BitLocker 保护的驱动器本身的元数据块中。
 Simplified view of the BitLocker volume header
BitLocker 卷头的简化视图
A BitLocker volume header starts with a boot entry point consisting of a sequence of 3 fixed bytes, followed by the filesystem signature -FVE-FS-. Further in the header, you will find the BitLocker volume header version 1 (Vista) or 2 (7 and later). This structure contains 3 offsets to Full Volume Encryption (FVE) metadata blocks, as described in the diagram above. The 3 FVE metadata blocks all contain the same information. I assume this redundancy guarantees access to the cryptographic material in case of disk corruption.
BitLocker 卷头以启动入口点开头,该启动入口点由 3 个固定字节的序列组成,后跟文件系统签名 -FVE-FS- 。在标头中,您将找到 BitLocker 卷标头版本 1 (Vista) 或 2(7 及更高版本)。此结构包含对完整卷加密 (FVE) 元数据块的 3 个偏移量,如上图所述。3 个 FVE 元数据块都包含相同的信息。我认为这种冗余保证了在磁盘损坏的情况下对加密材料的访问。
An FVE metadata block may contain entries of various types, such as “Auto Unlock”, “Drive label”, “VMK”, or “FVEK”. This metadata can be partially read using ntfstool for instance. Nevertheless, I created my own one to have more control over what data is parsed and how.
FVE 元数据块可能包含各种类型的条目,例如“自动解锁”、“驱动器标签”、“VMK”或“FVEK”。例如,可以使用ntfstool部分读取此元数据。尽管如此,我还是创建了自己的数据,以便更好地控制解析哪些数据以及如何解析。
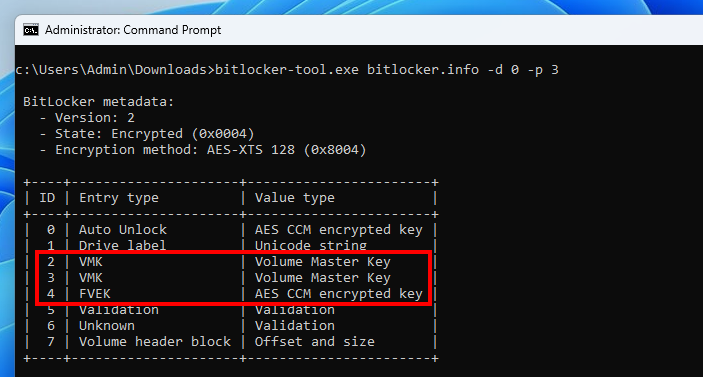 Enumeration of FVE metadata entries
FVE 元数据条目的枚举
My VM has only 1 “physical” drive, so it has the ID 0, and the BitLocker partition has the ID 3. You can see that the FVE metadata contains 8 entries. Most notably, there are 2 entries of type “VMK” and 1 entry of type “FVEK”.
我的 VM 只有 1 个“物理”驱动器,因此它的 ID 为 0,而 BitLocker 分区的 ID 为 3。您可以看到 FVE 元数据包含 8 个条目。最值得注意的是,有 2 个类型为“VMK”的条目和 1 个类型为“FVEK”的条目。
The Volume Master Key (VMK) is a 256-bit symmetric key that protects the Full Volume Encryption Key (FVEK). The FVEK is a 128 (default) or 256-bit symmetric key that is used to encrypt the data.
卷主密钥 (VMK) 是保护完整卷加密密钥 (FVEK) 的 256 位对称密钥。FVEK 是用于加密数据的 128(默认)或 256 位对称密钥。
The VMK is stored encrypted on the disk using “key protectors”. The documentation of GetKeyProtectorType (Win32_EncryptableVolume WMI class) lists the following possible protectors.
VMK 使用“密钥保护程序”加密存储在磁盘上。( Win32_EncryptableVolume WMI 类)的文档 GetKeyProtectorType 列出了以下可能的保护程序。
- Trusted Platform Module (TPM)
受信任的平台模块 (TPM) - External key 外部密钥
- Numerical password 数字密码
- TPM And PIN 胎压和密码
- TPM And Startup Key
TPM 和启动密钥 - TPM And PIN And Startup Key
TPM 和 PIN 以及启动密钥 - Public Key 公钥
- Passphrase 密码短语
- TPM Certificate TPM 证书
- CryptoAPI Next Generation (CNG) Protector
加密 API 下一代 (CNG) 保护程序
The previous screenshot showed 2 VMK entries because 2 key protectors are configured: “TPM” and “Numerical Password”. This information can be confirmed with the command manage-bde -status.
上一个屏幕截图显示了 2 个 VMK 条目,因为配置了 2 个密钥保护程序:“TPM”和“数字密码”。可以使用命令 manage-bde -status 确认此信息。
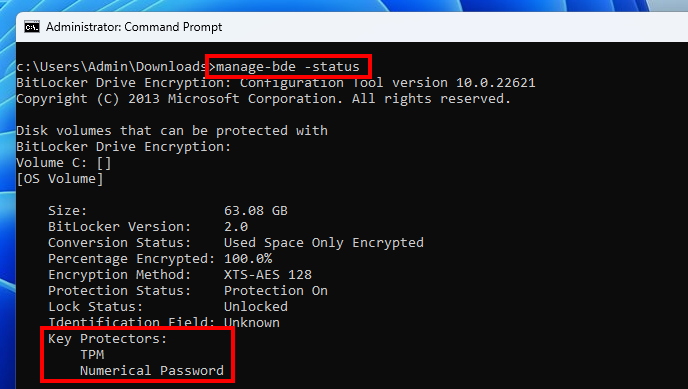 Output of the manage-bde showing 2 key protectors
显示 2 个密钥保护器的管理 bde 输出
In other words, there are two distinct ways of obtaining the master key, either through the TPM, or by using the recovery password. In this post, I will discuss only the TPM key protector.
换句话说,有两种不同的方法可以通过 TPM 或使用恢复密码获取主密钥。在这篇文章中,我将只讨论TPM密钥保护程序。
Further parsing is required for each protector. TPM-related data consists of a semi-opaque structure that can be broken down into 4 parts: a public part, a private part, a PCR digest, and a PCR bitmap.
每个保护程序都需要进一步分析。TPM 相关数据由半不透明结构组成,可分为 4 个部分:公共部分、私有部分、PCR 摘要和 PCR 位图。
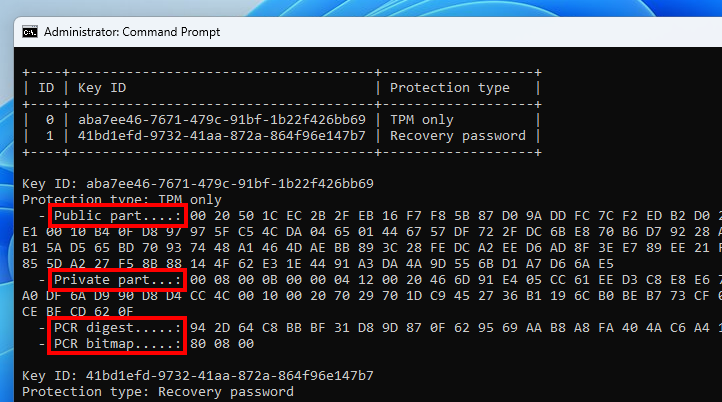 TPM-related metadata 与 TPM 相关的元数据
The public and private parts contain the material required to “unseal” the VMK. They are sent as is to the TPM to get the cleartext key, as we will see later in this post. What interests us here first is the PCR data.
公共和私人部分包含“解封”VMK所需的材料。它们按原样发送到 TPM 以获取明文密钥,我们将在本文后面看到。我们首先感兴趣的是PCR数据。
A TPM is composed of several PCR banks. A PCR bank consists of a set of 16 to 24 PCRs using the same hash algorithm, such as SHA1 or SHA256. A Platform Configuration Register (PCR) is a volatile memory location that can be freely read, but can only be written using a “PCR extend” command. As described in the documentation, an “extend” operation consists in providing an arbitrary value to the TPM that will be used to compute a new hash as follows: PCR[N] = HASHalg(PCR[N] || ArgumentOfExtend). This guarantees that a PCR state cannot be rolled back or set to an arbitrary value. This cryptographic property is the cornerstone of the TPM model.
TPM 由多个 PCR 库组成。PCR 库由一组 16 到 24 个 PCR 组成,使用相同的哈希算法,例如 SHA1 或 SHA256。平台配置寄存器(PCR)是一个易失性存储器位置,可以自由读取,但只能使用“PCR extend”命令写入。如文档中所述,“扩展”操作包括向 TPM 提供任意值,该值将用于计算新哈希,如下所示: PCR[N] = HASHalg(PCR[N] || ArgumentOfExtend) 。这保证了 PCR 状态不能回滚或设置为任意值。此加密属性是 TPM 模型的基石。
 TPM PCR banks
As I mentioned earlier, the FVE metadata contains a PCR digest and a PCR bitmap. The bitmap represents the registers that are currently used by Windows, as illustrated on the diagram below, and the digest represents the expected state of these registers when a request is sent to the TPM to unseal the VMK.
 Bitmap representing the profile “PCR7 + PCR11”
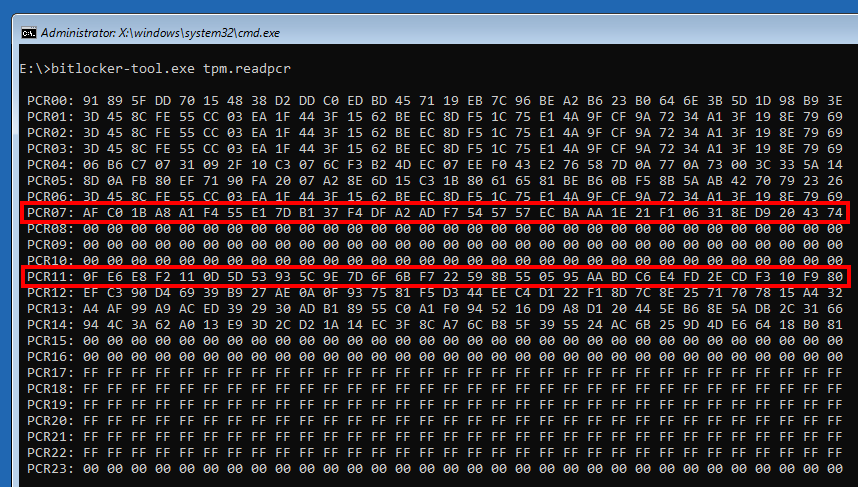
The value 80 08 00 indicates that the PCRs 7 and 11 are used. This can be confirmed with the command manage-bde -protectors -get C:. This is the default validation profile when Secure Boot is enabled. Otherwise, the PCRs 0, 2, 4 and 11 are used.
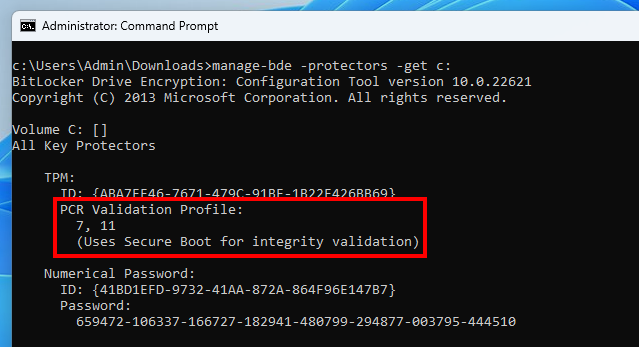 PCR validation profile shown by
 manage-bde
The TPM2 specification (see TCG PC Client Platform Firmware Profile Specification – Table 1) defines the following PCR usage.
- PCR0 – SRTM, BIOS, Host Platform Extensions, Embedded Option ROMs and PI Drivers
- PCR2 – UEFI driver and application Code
- PCR4 – UEFI Boot Manager Code (usually the MBR) and Boot Attempts
- PCR7 – Secure Boot Policy
- PCR8-15 – Defined for use by the Static OS
The PCRs 0 to 7 are “reserved”, whereas the PCRs 8 to 15 are free to use by the “static” operating system. In the case of Windows, the PCR 11 is used for “BitLocker access control”. We will see what this means later in this post.
In the TPM specification (see TCG PC Client Specific TPM Interface Specification (TIS)), the “static OS” is defined as “the operating system that is loaded during the initial boot sequence of the platform from its platform reset”. In our case, this would be the Windows Boot Manager.
In summary, when TPM-based BitLocker is enabled, some metadata containing a sealed version of the VMK is stored on the disk, alongside with a digest representing the expected state of a selection of PCRs. The TPM will only accept to unseal the VMK if this state is valid.
总之,启用基于 TPM 的 BitLocker 后,一些包含密封版本的 VMK 的元数据将存储在磁盘上,以及表示所选 PCR 的预期状态的摘要。仅当此状态有效时,TPM 才会接受解封 VMK。
Interacting with the TPM 与 TPM 交互
At this point, we know that if we do not alter the machine’s state, the PCR values will not be altered either, and thus we should be able to recover the VMK using the TPM from the Recovery Environment.
此时,我们知道,如果我们不更改计算机的状态,PCR值也不会更改,因此我们应该能够使用TPM从恢复环境中恢复VMK。
To do so, we first need to know how to interact with it. Fortunately, Windows provides a set of documented APIs exactly for that purpose, as part of the TPM Based Services (TBS). Three functions are required: Tbsi_Context_Create, Tbsip_Submit_Command, and Tbsip_Context_Close. These are basically wrappers for CreateFile, DeviceIoControl, and CloseHandle, that enable a userland caller to send commands to and receive responses from a TPM through a Kernel device object.
为此,我们首先需要知道如何与它交互。幸运的是,Windows 提供了一组专门用于此目的的文档 API,作为基于 TPM 的服务 (TBS) 的一部分。需要三个函数: Tbsi_Context_Create 、 Tbsip_Submit_Command 和 Tbsip_Context_Close 。这些基本上是 CreateFile、DeviceIoControl 和 CloseHandle 的包装器,使用户空间调用方能够通过内核设备对象向 TPM 发送命令和接收响应。
 Interaction with a TPM from a userland application on Windows
从 Windows 上的用户空间应用程序与 TPM 交互
As for the commands themselves, they are defined in the Trusted Platform Module Library, Part 3. As an example, the picture below shows the format of the command TPM2_PCR_Extend (and its associated response). Structures are defined in the Trusted Platform Module Library, Part 2.
至于命令本身,它们在可信平台模块库,第 3 部分中定义。例如,下图显示了命令 TPM2_PCR_Extend 的格式(及其关联的响应)。结构在受信任的平台模块库,第 2 部分中定义。
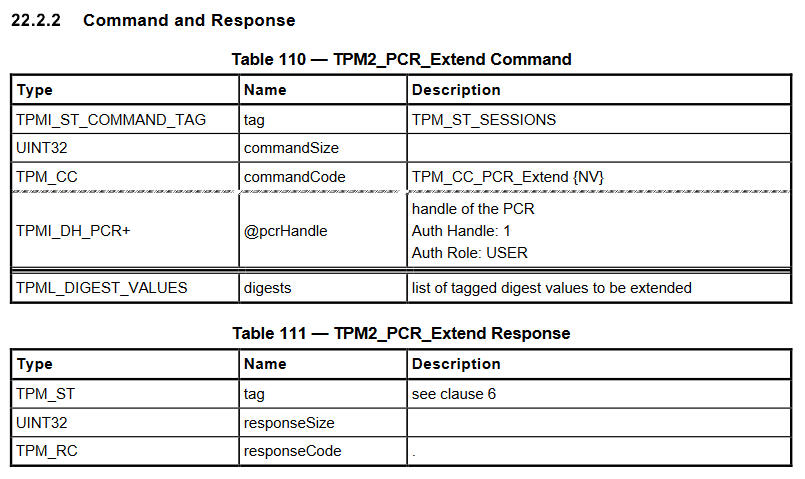 Format of a “PCR extend” command and response
“PCR 扩展”命令和响应的格式
Discussing all the fields in detail in this post would be of no interest, but there are a couple of things worth mentioning:
在这篇文章中详细讨论所有字段是没有兴趣的,但有几件事值得一提:
- Commands have a common header: a 2-byte tag, a 4-byte command size, a 4-byte command code.
命令有一个通用标头:2 字节标记、4 字节命令大小、4 字节命令代码。 - Responses have a common header: a 2-byte tag a 4-byte response size, a 4-byte response code.
- Big-endianness is used when encoding integers.
To make this a bit more concrete, here is a sample C code snippet that reads the value of the 24 PCRs.
1 2 3 4 5 6 7 8 9 10 11 12 13 14 15 16 17 18 19 20 21 22 23 |
// Custom structures representing command and resp messages for the // command TPM2_PCR_Read. TPM2_PCRREAD_COMMAND req; TPM2_PCRREAD_resp resp; // The limit is 8 registers per read, so we need 3 iterations to get the // value of all 24 PCRs. for (int selection = 0; selection < 3; selection++) { ZeroMemory(&req, sizeof(req)); // The output PE will use little endianness, so we need to convert // shorts, integers, longs and so on. req.tag = _byteswap_ushort(TPM_ST_NO_SESSIONS); req.commandSize = _byteswap_ulong((UINT32)sizeof(req)); req.commandCode = _byteswap_ulong(TPM_CC_PCR_Read); req.pcrSelectionIn.count = _byteswap_ulong(1); req.pcrSelectionIn.pcrSelections[0].hash = _byteswap_ushort(AlgorithmId); req.pcrSelectionIn.pcrSelections[0].sizeofSelect = sizeof(BYTE); req.pcrSelectionIn.pcrSelections[0].pcrSelect[selection] = 0xff; // SubmitCommand is my wrapper for Tbsip_Submit_Command. It takes care // of initializing the context when it is first called. SubmitCommand((PCBYTE)&req, sizeof(req), (PBYTE)&resp, &cbResult); } |
This next screenshot shows the execution of this code from an active user session, after a full boot of the OS, while the main drive is unlocked.
 PCR values read from a user session
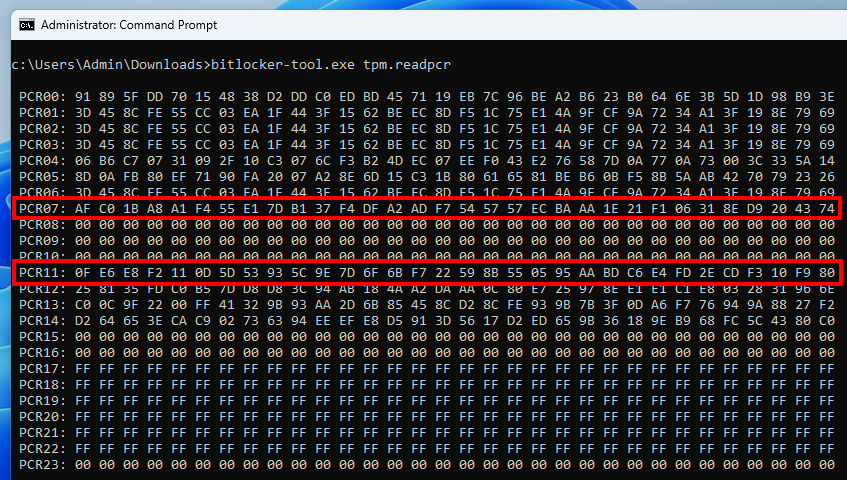
This second screenshot was taken from the Recovery Environment of the same machine, while the main drive is locked.
 PCR values read from the Recovery Environment
从恢复环境中读取的 PCR 值
In these two command outputs, we can see that the values of the PCRs 7 and 11 are identical! So, in theory, we should be able to unseal the VMK. Let us go further down the rabbit hole…
在这两个命令输出中,我们可以看到 PCR 7 和 11 的值是相同的!因此,从理论上讲,我们应该能够解封VMK。让我们进一步深入兔子洞…
BitLocker + TPM = VMK
Although the TPM2 specification is helpful to understand how to craft the messages and interpret the responses, it will not exactly tell us what sequence of commands must be sent to the TPM in order to recover the cleartext VMK.
尽管 TPM2 规范有助于了解如何创建消息和解释响应,但它不会确切地告诉我们必须向 TPM 发送哪些命令序列才能恢复明文 VMK。
Thankfully, we do not have to start from scratch as others have already paved the way. Seunghun Han, a researcher who specializes in areas such as firmware, hypervisor, and kernel security, gave a great talk at Black Hat Europe 2019 about a TPM vulnerability he found and exploited to bypass BitLocker Drive Encryption.
值得庆幸的是,我们不必从头开始,因为其他人已经铺平了道路。专门研究固件、虚拟机监控程序和内核安全等领域的研究员Seunghun Han在Black Hat Europe 2019上发表了精彩的演讲,讲述了他发现并利用的TPM漏洞绕过BitLocker驱动器加密。
During his research, he had to analyze how BitLocker interacts with the TPM in order to unseal the VMK. To do so, he used a custom boot loader based on grub2. The purpose of this bootloader was to hook some of the functions used by the firmware to interact with the TPM before handing over the control to the Windows Boot Manager.
在研究期间,他必须分析BitLocker如何与TPM交互,以便解封VMK。为此,他使用了一个基于 grub2 的自定义引导加载程序。此引导加载程序的目的是在将控制权移交给 Windows 启动管理器之前,挂钩固件用于与 TPM 交互的某些函数。
It was a bit of struggle to compile the project on a recent version of Ubuntu. I ended up installing the old version 18.04, which is probably the one the author used at the time. For reference, in case someone ever needs the commands, here is how I rebuilt the bootloader from the source.
在最新版本的 Ubuntu 上编译该项目有点困难。我最终安装了旧版本 18.04,这可能是作者当时使用的那个。作为参考,如果有人需要这些命令,以下是我从源代码重建引导加载程序的方法。
1 2 3 4 5 6 7 8 9 10 11 12 13 14 |
# On Ubuntu 18.04 sudo apt-add-repository universe # required for package xorriso sudo apt update sudo apt install -y git dh-autoreconf bison flex libdevmapper-dev libfreetype6-dev xorriso python git clone https://github.com/kkamagui/bitleaker-grub cd bitleaker-grub ./linguas.sh ./autogen.sh ./configure --with-platform=efi --disable-werror --enable-grub-mkfont make -j$(nproc) sudo make install sudo ln -s /usr/share/grub/unicode.pf2 /usr/local/share/grub/unicode.pf2 cd .. |
Once grub is built, a custom ISO can be generated as follows.
1 2 3 4 5 6 7 8 9 10 11 12 |
# Use -d to specify the location of the EFI binaries, otherwise it uses # /usr/local/lib/grub/i386-pc/ by default. # If the command fails with the error "grub-mkrescue: error: `mformat` # invocation failed'", run 'sudo apt install -y mtools'. grub-mkrescue -d /usr/local/lib/grub/x86_64-efi/ -o grub.iso # Make directories for the custom config mkdir -p iso/boot/grub # Generate template grub config file sudo grub-mkconfig -o iso/boot/grub/grub.cfg # Add a menuentry to grub.cfg # Update the ISO file grub-mkrescue -d /usr/local/lib/grub/x86_64-efi/ -o grub.iso iso |
Note that grub-mkconfig generates a default configuration file. Although it is recommended to use this file as a base template, and just add boot entries to it, I came up with the following stripped down version.
1 2 3 4 5 6 7 8 9 10 11 12 13 14 15 |
set timeout=30 terminal_input console terminal_output gfxterm insmod all_video set gfxmode=auto # To get the EFI partition's UUID, boot the machine using an Ubuntu # live ISO, execute the command "sudo blkid" and search for an entry # with the label "EFI system partition". menuentry "Windows 11 (chainloading)" { insmod part_gpt insmod chain search --no-floppy --set=root --fs-uuid DE43-AEFD chainloader /EFI/Microsoft/Boot/bootmgfw.efi } |
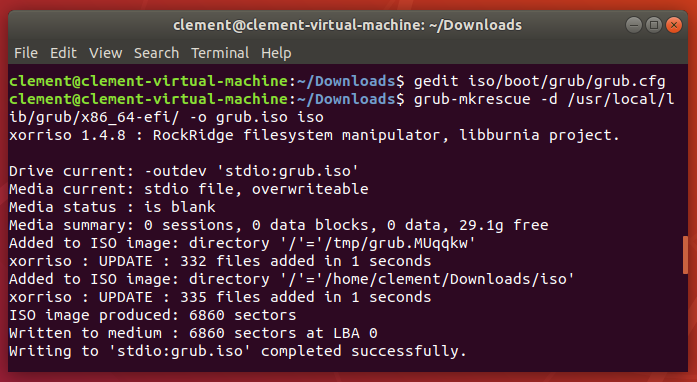 Creation of the bootloader ISO
创建引导加载程序 ISO
To use the grub ISO in VMware Workstation, you can do the following:
要在 VMware 工作站中使用 grub ISO,您可以执行以下操作:
- Shut down the Windows VM.
关闭 Windows VM。 - Edit the VM’s settings, go to CD/DVD and set the path to the ISO file.
编辑虚拟机的设置,转到 CD/DVD 并设置 ISO 文件的路径。 - Click VM > Power > Power On to firmware.
单击 VM > 打开电源>打开固件电源。 - In the firmware settings, increase the screen size (otherwise grub’s output will be truncated).
在固件设置中,增加屏幕大小(否则 grub 的输出将被截断)。 - Select the CD-ROM entry in the boot menu.
在引导菜单中选择 CD-ROM 条目。
Note that this grub is not compatible with Secure Boot. Therefore, you have to temporarily disable it in the machine’s configuration. However, it must be re-enabled before the next Windows boot, otherwise it will be identified as a change in the Secure Boot policy, and you will be prompted to enter the recovery password.
请注意,此 grub 与安全启动不兼容。因此,您必须在计算机的配置中暂时禁用它。但是,必须在下次 Windows 启动之前重新启用它,否则它将被标识为安全启动策略中的更改,并且系统将提示您输入恢复密码。
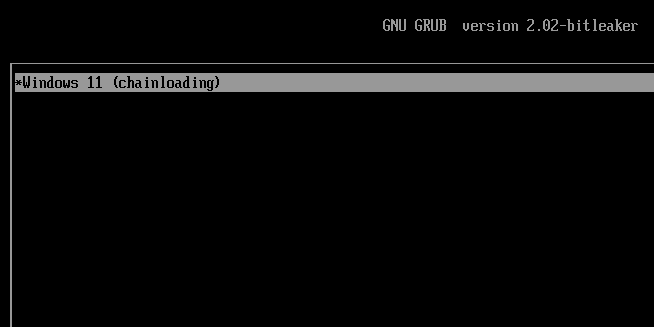 BitLeaker grub menu entry
BitLeaker grub 菜单项
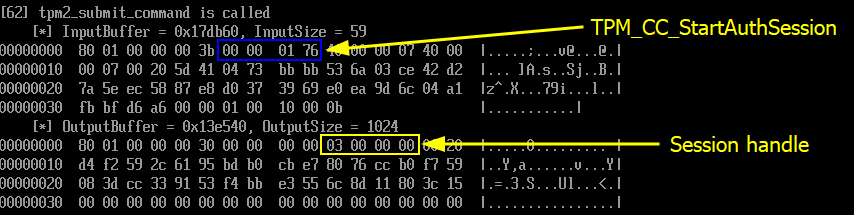
After installing its hooks, the bootloader starts intercepting the tpm2_submit_command calls. The interesting operations start at around event 60. As we will see on this next series of screenshots, unsealing the VMK is achieved in 5 steps.
TPM2_Load(handle, vmk_public_data, vmk_private_data)-> Object handleTPM2_StartAuthSession()-> Session handleTPM2_PolicyAuthValue(session_handle)TPM2_PolicyPCR(session_handle, pcr_digest, pcr_bitmap)- (
TPM2_Unseal(object_handle, session_handle)-> VMK) (TPM2_Unseal(object_handle, session_handle)-> VMK)
The TPM2_Load command is used to tell the TPM that we want to unseal an object that was previously sealed by it. As long as the format is correct, the TPM should not return any error at this stage. It should simply acknowledge the operation by returning an object handle.
该 TPM2_Load 命令用于告知 TPM 我们要解封以前由它密封的对象。只要格式正确,TPM 就不应在此阶段返回任何错误。它应该通过返回对象句柄来简单地确认操作。
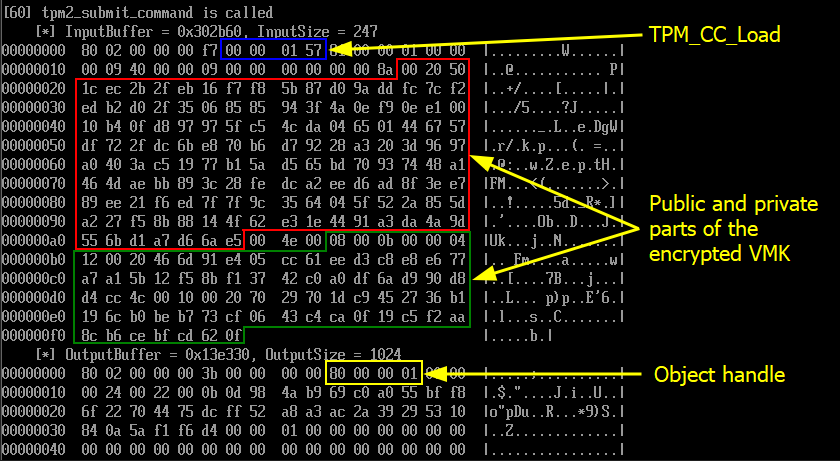
TPM2_Load command TPM2_Load 命令
Next, independently from the previous operation, the client starts a new authorization session with the TPM2_StartAuthSession command, to which the TPM replies with a session handle.
接下来,独立于上一个操作,客户端使用 TPM2_StartAuthSession 命令启动新的授权会话,TPM 使用会话句柄回复该会话。
TPM2_StartAuthSession command TPM2_StartAuthSession 命令
Then, the TPM2_PolicyAuthValue command is used to indicate that the authorization session does not require a password (as we solely rely on the state of the PCRs).
然后,该 TPM2_PolicyAuthValue 命令用于指示授权会话不需要密码(因为我们仅依赖于PCR的状态)。

TPM2_PolicyAuthValue command TPM2_PolicyAuthValue 命令
Finally, here is the crucial step of the whole process. This is where we tell the TPM that authorization must be performed based on the state of a selection of PCRs. To do so, we include the PCR digest and the PCR bitmap I described earlier.
最后,这是整个过程的关键步骤。在这里,我们告诉TPM必须根据所选PCR的状态执行授权。为此,我们包括 PCR 摘要和我之前描述的 PCR 位图。

TPM2_PolicyPCR command TPM2_PolicyPCR 命令
The TPM returns the error code 0x000001c4. We can use a tool such as tpm2_rc_decode (see tpm2-tools package) to interpret it. This way, we learn that it corresponds to the identifier TPM_RC_VALUE, which translates to the following in plain English: “value is out of range or is not correct for the context”.
TPM 返回错误代码 0x000001c4 。我们可以使用 tpm2_rc_decode 诸如(请参阅 tpm2-tools 包)之类的工具来解释它。这样,我们了解到它对应于 TPM_RC_VALUE 标识符 ,用简单的英语翻译为以下内容:“值超出范围或上下文不正确”。
This error is not surprising. The modification of the boot settings and the boot sequence impacted the value of PCR 7, and therefore the provided PCR digest is no longer valid in the current state of the TPM. Because of this error, we will not see the final call to TPM2_Unseal.
At this point, though, we have all the information we need to reproduce the first 4 steps of the process, and then attempt to unseal the VMK.
The “coup de grâce”
Reimplementing everything in C/C++ was tedious but not that complicated. Besides, I could rely on open source TPM tools for Linux when I was unsure about a specific format or structure.
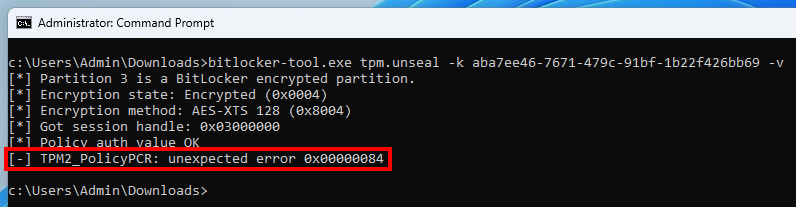
Eventually, I was able to implement a new command – tpm.unseal – that takes care of extracting all the required material from the BitLocker metadata on the disk, and sending it to the TPM in order to unseal the VMK.
TPM2_PolicyPCR error TPM2_PolicyPCR 错误
The outcome was not what I expected though. The command TPM2_PolicyPCR failed with the error code 0x00000084, which also translates to TPM_RC_VALUE, just in a different format.
结果并不是我所期望的。该命令 TPM2_PolicyPCR 失败,错误代码 ,该代码 0x00000084 也转换为 TPM_RC_VALUE ,只是格式不同。
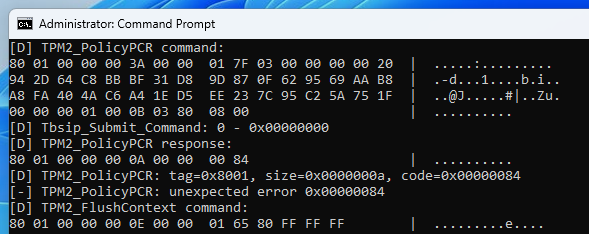
TPM2_PolicyPCR debug output TPM2_PolicyPCR 调试输出
The debug output of the command shows no particular issue. The format of the command seems correct. I went back and forth dozens of times between the specification and my code, but I could not spot any particular mistake.
该命令的调试输出没有显示任何特定问题。命令的格式似乎正确。我在规范和代码之间来回切换了数十次,但我无法发现任何特定的错误。
To confirm whether my implementation was correct, I ran several unit tests using different PCR validation profiles. The table below shows the results.
为了确认我的实现是否正确,我使用不同的PCR验证配置文件运行了几个单元测试。下表显示了结果。
The PCR validation profile can be modified by editing the GPO
Computer Configuration > Administrative Templates > Windows Components > BitLocker Drive Encryption > Operating System Drives.
可以通过编辑 GPOComputer Configuration > Administrative Templates > Windows Components > BitLocker Drive Encryption > Operating System Drives来修改 PCR 验证配置文件。
| PCR selection 聚合酶链反应选择 | Unseal result 解封结果 | Comment 评论 |
|---|---|---|
| 7, 11 | Default PCR selection for UEFI + Secure Boot. Error 0x00000084 (TPM2_PolicyPCR)UEFI + 安全启动的默认 PCR 选择。错误 0x00000084 ( TPM2_PolicyPCR ) |
|
| 0 | PCR 0 is not affected by a change of bootloader. PCR 0 不受引导加载程序更改的影响。 |
|
| 0, 1, 2, 3 | PCRs 0,1,2,3 are not affected by a change of bootloader. PCR 0,1,2,3 不受引导加载程序更改的影响。 |
|
| 11 | PCR 11 is used for “BitLocker Access Control”. Error 0x00000084 (TPM2_PolicyPCR).PCR 11用于“BitLocker访问控制”。错误 0x00000084 ( TPM2_PolicyPCR )。 |
|
| 7 | PCR 7 holds the Secure Boot state. PCR 7 保持安全启动状态。 |
|
| 0, 2, 4 | PCR selection for legacy BIOS mode without PCR11. Error 0x00000084 (TPM2_PolicyPCR).不带 PCR11 的传统 BIOS 模式的 PCR 选择。错误 0x00000084 ( TPM2_PolicyPCR )。 |
|
| 0, 2, 4, 11 | Default PCR selection for legacy BIOS mode. Error 0x00000084 (TPM2_PolicyPCR).传统 BIOS 模式的默认 PCR 选择。错误 0x00000084 ( TPM2_PolicyPCR )。 |
First of all, with an intentionally weak validation profile such as “PCR 0+1+2+3”, I could confirm that my tool was able to recover the cleartext VMK. So, the good news is that my code is fine. But it’s also bad news as it means that the error is probably due to an external factor, out of my control.
首先,使用故意较弱的验证配置文件(例如“PCR 0+1+2+3”),我可以确认我的工具能够恢复明文 VMK。所以,好消息是我的代码很好。但这也是个坏消息,因为这意味着错误可能是由于外部因素造成的,超出了我的控制范围。
Speaking of “control”, I previously mentioned that PCR 11 was used for “BitLocker access control”. At the time I did not know what this meant exactly. I did not find any resource discussing this mechanism in detail either. But this test summary table makes it very clear. Whatever the PCR selection, as long as PCR 11 is involved, the validation of the PCR policy fails.
说到“控制”,我之前提到过PCR 11用于“BitLocker访问控制”。当时我不知道这到底是什么意思。我也没有找到任何详细讨论此机制的资源。但是这个测试汇总表非常清楚地表明了这一点。无论PCR选择如何,只要涉及PCR 11,PCR策略的验证就会失败。
For this very reason, it is not possible to unseal the VMK from within the Recovery Environment. But still, it does not tell us how this access control works in practice.
因此,无法从恢复环境中解封 VMK。但是,它仍然没有告诉我们这种访问控制在实践中是如何工作的。
BitLocker access control BitLocker 访问控制
BitLocker Drive Encryption is usually enabled when the operating system is running. In this state, all the PCRs have their final value, including PCR 11. But, as we have seen, this value is apparently not the one used when sealing the VMK. So, what “magic” does BitLocker implement to seal the VMK using a PCR state that is different from the current one?
BitLocker 驱动器加密通常在操作系统运行时启用。在这种状态下,所有PCR都有其最终值,包括PCR 11。但是,正如我们所看到的,这个值显然不是密封 VMK 时使用的值。那么,BitLocker 实现了什么“魔法”来使用与当前状态不同的 PCR 状态密封 VMK?
This question can be answered by analyzing how the VMK is sealed when enabling BitLocker. To do so, my initial idea was to create a DLL proxy for tbs.dll so that I could intercept the calls to Tbsip_Submit_Command, but this only worked partially.
这个问题可以通过分析启用 BitLocker 时如何密封 VMK 来回答。为此,我最初的想法是创建一个 DLL 代理, tbs.dll 以便我可以拦截对 的 Tbsip_Submit_Command 调用,但这只能部分工作。
The only way to make sure I could intercept all the calls was by hooking the commands implemented in the TPM driver, at the Kernel level. This is not an easy task though, at least for me, so I searched for already existing tools that would just do that.
确保我可以拦截所有调用的唯一方法是在内核级别挂钩 TPM 驱动程序中实现的命令。不过,这不是一件容易的事,至少对我来说是这样,所以我搜索了已经存在的工具。
This first tool I found was IrpTracker, but it was last updated in 2010 and only supports Windows XP to Windows 7. And then, I came across the open source project IRPMon on GitHub. This turned out to be exactly the tool I needed!
我发现的第一个工具是IrpTracker,但它最后一次更新是在2010年,仅支持Windows XP到Windows 7。然后,我在GitHub上遇到了开源项目IRPMon。事实证明,这正是我需要的工具!
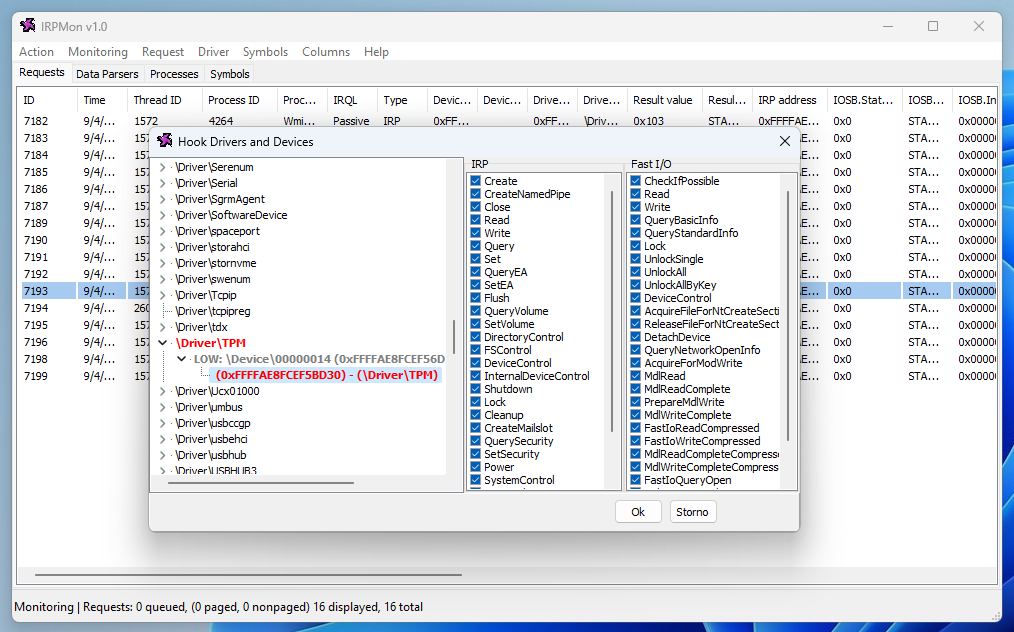 Hooking the TPM driver with IRPMon
使用 IRPMon 挂接 TPM 驱动程序
Here are some small issues to be aware of though:
以下是一些需要注意的小问题:
- The currently available release version is 0.8, but the pre-release versions bring essential features, such as packet inspection.
当前可用的发布版本是 0.8,但预发布版本带来了基本功能,例如数据包检测。 - It uses a custom driver that does not meet signing requirements (at least at the time of this research), and thus cannot be loaded if Driver Signature Enforcement (DSE) is enforced (default).
它使用的自定义驱动程序不符合签名要求(至少在进行本研究时),因此如果强制执行驱动程序签名强制 (DSE) (默认),则无法加载。
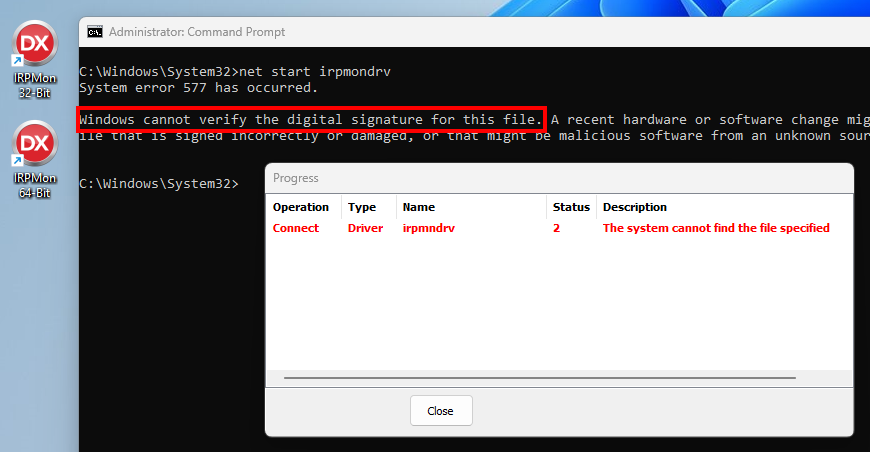 IPRMon driver failing to load because of DSE
由于 DSE 导致无法加载 IPRMon 驱动程序
Rather than disabling DSE altogether, which could have had an impact on the PCRs’ state, my solution was to temporarily patch it in memory. The screenshot below shows how I did that through the known vulnerable driver RTCore64 (which is still not part of Microsoft’s block list at the time of writing). Note that this only works as long as HVCI is not enabled.
我的解决方案不是完全禁用 DSE,这可能会对 PCR 的状态产生影响,而是暂时在内存中修补它。下面的屏幕截图显示了我如何通过已知的易受攻击的驱动程序RTCore64(在撰写本文时仍未包含在Microsoft的阻止列表中)执行此操作。请注意,这仅在未启用 HVCI 时才有效。
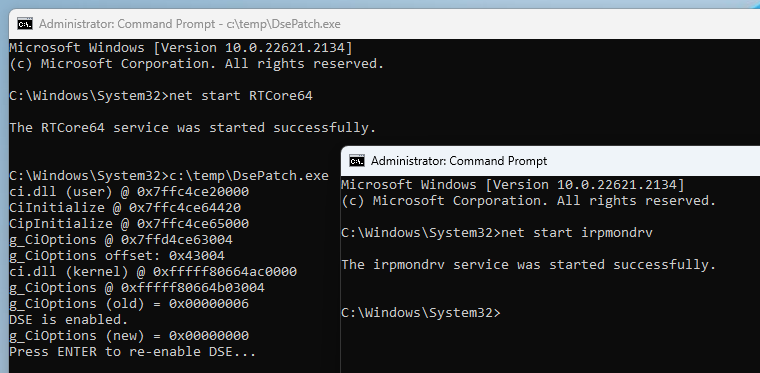 Temporarily disabling DSE and loading the IRPMon driver
暂时禁用 DSE 并加载 IRPMon 驱动程序
In its default configuration, IRPMon does not capture the content of each packet, so you have to make sure the “Data” option is checked when hooking a driver. Then, you can inspect a captured request or response and get a hexadecimal + ASCII representation of the packet.
在其默认配置中,IRPMon 不会捕获每个数据包的内容,因此您必须确保在挂钩驱动程序时选中“数据”选项。然后,您可以检查捕获的请求或响应,并获取数据包的十六进制 + ASCII 表示形式。
IRPMon has another really cool feature. It allows users to add custom parsers implemented as external DLLs.
IRPMon 还有另一个非常酷的功能。它允许用户添加作为外部 DLL 实现的自定义分析器。
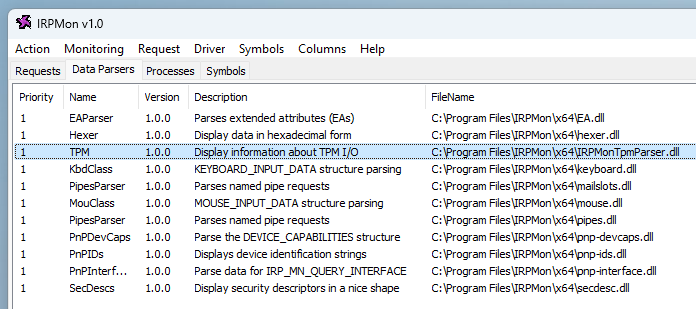 Custom parser for TPM packets
TPM 数据包的自定义分析器
For this project, I created a basic parser that displays the content of a TPM command or response in a readable format.
对于此项目,我创建了一个基本分析器,该分析器以可读格式显示 TPM 命令或响应的内容。
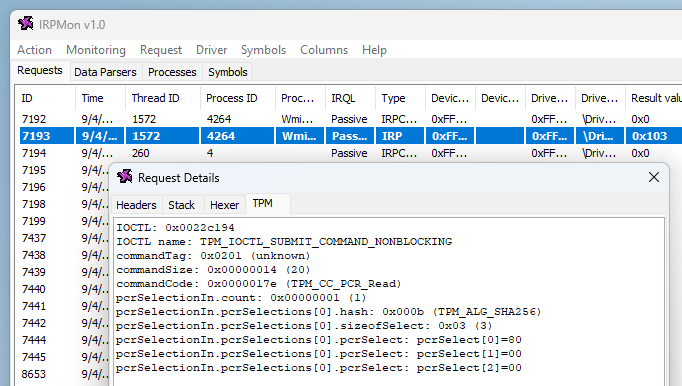 Sample
 TPM2_PCR_Read command packet
示例 TPM2_PCR_Read 命令包
For instance, the screenshot above shows that a TPM2_PCR_Read command was sent to the TPM to get the value of PCR 7.
例如,上面的屏幕截图显示向 TPM 发送了一个 TPM2_PCR_Read 命令以获取 PCR 7 的值。
Armed with this new tool, I proceeded to inspect the TPM commands used by BitLocker when it creates and seals the VMK. The diagram below summarizes my observations.
有了这个新工具,我继续检查 BitLocker 在创建和密封 VMK 时使用的 TPM 命令。下图总结了我的观察结果。
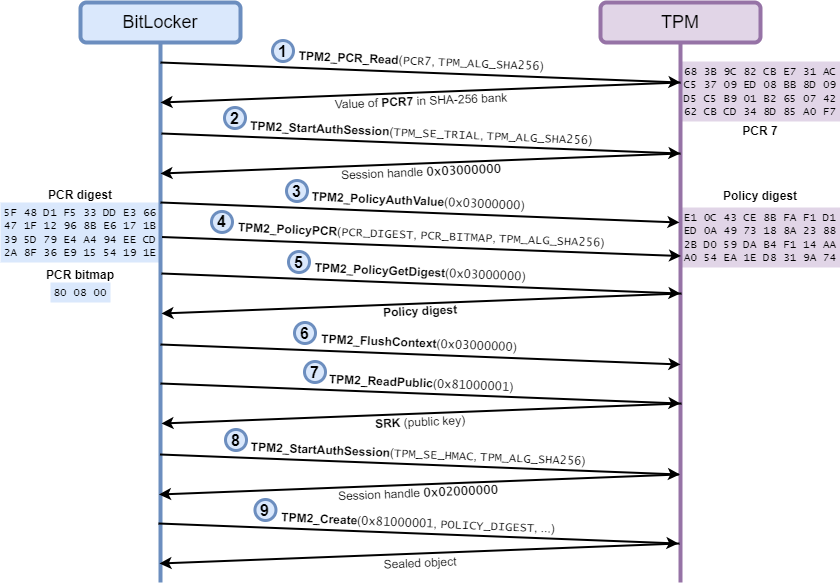 Diagram describing the interaction between BitLocker and the TPM
描述 BitLocker 和 TPM 之间交互的图表
BitLocker first queries the value of PCR 7 in the SHA-256 bank (1). Then, it starts a new “trial” authorization session (2) and specifies that no password is required (3). And here is the crucial step of the process, it tells the TPM that authorization must be performed using the validation profile PCR 7+11 (4), and it gives it the expected PCR digest. In an actual authorization session, this command would have failed because this PCR digest is not correct in the current state of the selected PCRs, but since this a trial session, the TPM accepts the command and simply updates its internal policy digest accordingly.
BitLocker 首先查询 SHA-256 库中 PCR 7 的值 (1)。然后,它启动一个新的“试用”授权会话 (2) 并指定不需要密码 (3)。这是该过程的关键步骤,它告诉TPM必须使用验证配置文件PCR 7 + 11(4)执行授权,并为其提供预期的PCR摘要。在实际授权会话中,此命令将失败,因为此 PCR 摘要在所选 PCR 的当前状态下不正确,但由于这是试用会话,TPM 接受该命令并相应地更新其内部策略摘要。
After that, BitLocker queries the internal policy digest of the TPM for the current session (5), and ends the session by flushing the context (6). Finally, it reads the Storage Rook Key (SRK) (7), starts a new authorization session (8), and creates a new sealed object that is tied to the previously obtained policy digest (9).
之后,BitLocker 查询当前会话的 TPM 的内部策略摘要 (5),并通过刷新上下文 (6) 结束会话。最后,它读取存储 Rook 密钥 (SRK) (7),启动新的授权会话 (8),并创建一个与以前获取的策略摘要 (9) 绑定的新密封对象。
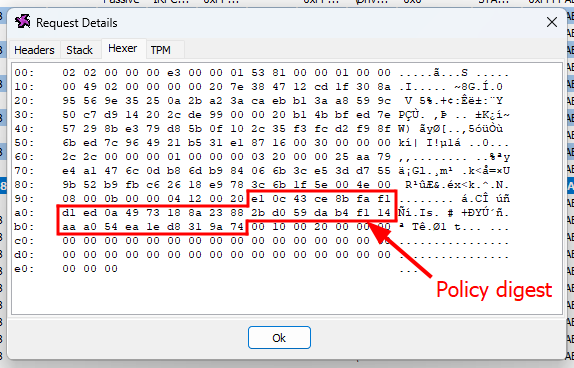 Hexadecimal representation of a
 TPM2_Create command
a TPM2_Create command 的十六进制表示形式
You can think of the policy digest as a way of keeping track of all the authorization checks and steps the caller must pass before being allowed to unseal a given object. When BitLocker sends the command TPM2_PolicyAuthValue, it affects the policy digest in a certain way. When it specifies the expected PCR digest with the command TPM2_PolicyPCR, it also updates the policy digest.
您可以将策略摘要视为一种跟踪调用方在允许解封给定对象之前必须通过的所有授权检查和步骤的方法。当 BitLocker 发送命令 TPM2_PolicyAuthValue 时,它会以某种方式影响策略摘要。当它使用命令 TPM2_PolicyPCR 指定预期的 PCR 摘要时,它还会更新策略摘要。
The only remaining question is: how does BitLocker calculate the PCR digest? We already know that it uses the final value of PCR 7, as illustrated on the previous diagram. This was also confirmed empirically through the various PCR validation profile experiments. So, what value does it use for PCR 11?
唯一剩下的问题是:BitLocker如何计算PCR摘要?我们已经知道它使用 PCR 7 的最终值,如上图所示。这也通过各种PCR验证曲线实验进行了经验证实。那么,它对PCR 11有什么价值呢?
Thanks to the tool TBSLogGenerator from the Windows Hardware Lab Kit, we can decode the Measured Boot logs that are stored in C:\Windows\Logs\MeasuredBoot\, and obtain a trace showing all the values of the PCRs during the boot sequence. If you search for PCR 11 in those logs, you should see only 2 values:
借助 Windows 硬件实验室工具包中的工具 TBSLogGenerator,我们可以解码存储在 中的 C:\Windows\Logs\MeasuredBoot\ 测量启动日志,并获得显示启动序列期间 PCR 所有值的跟踪。如果在这些日志中搜索 PCR 11,则应该只看到 2 个值:
PCR[11] = 7366e3e017f2a466c909c2f4c2419b0a1587f07b3085218fc5790181786d6c4a PCR[11] = 0fe6e8f2110d5d53935c9e7d6f6bf722598b550595aabdc6e4fd2ecdf310f980 |
So, if we compute SHA256( PCR07 || PCR11 ) with these two values, we should be able to find which one was used to obtain the policy digest by comparing the resulting hashes, right?
因此,如果我们使用这两个值进行计算 SHA256( PCR07 || PCR11 ) ,我们应该能够通过比较生成的哈希值来找到用于获取策略摘要的值,对吗?
PCR[07] = "683B9C82CBE731ACC53709ED08BB8D09D5C5B901B265074262CBCD348D85A0F7" PCR[11] = "7366e3e017f2a466c909c2f4c2419b0a1587f07b3085218fc5790181786d6c4a" EXPECTED_DIGEST = "5F48D1F533DDE366471F12968BE6171B395D79E4A494EECD2A8F36E91554191E" COMPUTED_DIGEST = "7a6a33a4f28e201ae8a109fe2ca4b09d73dbaa9406f0f4d48902bab664f1660c" // -> Digests do not match PCR[07] = "683B9C82CBE731ACC53709ED08BB8D09D5C5B901B265074262CBCD348D85A0F7" PCR[11] = "0fe6e8f2110d5d53935c9e7d6f6bf722598b550595aabdc6e4fd2ecdf310f980" EXPECTED_DIGEST = "5F48D1F533DDE366471F12968BE6171B395D79E4A494EECD2A8F36E91554191E" COMPUTED_DIGEST = "e1ab66599e9cfce99271a030793282b9483378a639351a11774436a5988f3f8a" // -> Digests do not match |
Well, I did that, and it did not work. It turns out I was just overthinking it, and the solution was actually very simple. I completely omitted the fact that, in their initial state, all the bits of the PCRs are set to zero. If you calculate SHA256( PCR07 || 00000...00 ), you will indeed find the expected PCR digest.
好吧,我这样做了,但它没有用。事实证明,我只是想多了,解决方案实际上非常简单。我完全忽略了这样一个事实,即在初始状态下,PCR 的所有位都设置为零。如果你计算 SHA256( PCR07 || 00000...00 ) ,你确实会找到预期的PCR摘要。
PCR[07] = "683B9C82CBE731ACC53709ED08BB8D09D5C5B901B265074262CBCD348D85A0F7" PCR[11] = "0000000000000000000000000000000000000000000000000000000000000000" EXPECTED_DIGEST = "5F48D1F533DDE366471F12968BE6171B395D79E4A494EECD2A8F36E91554191E" COMPUTED_DIGEST = "5f48d1f533dde366471f12968be6171b395d79e4a494eecd2a8f36e91554191e" // -> Digests match! |
In conclusion, BitLocker uses the PCR 11 as a “lock”. When the machine boots, this lock is open. The Windows Boot Manager sends the necessary commands to the TPM to unseal the VMK. This works as long as PCR 7 is in its expected state. Then, BitLocker extends PCR 11, thus effectively closing the “lock”. From this point on, any subsequent piece of software that would try to unseal the VMK would fail as the state of this PCR is no longer valid in regards to the authorization policy tied to the sealed VMK.
总之,BitLocker使用PCR 11作为“锁”。当机器启动时,此锁处于打开状态。Windows 启动管理器将必要的命令发送到 TPM 以解封 VMK。只要 PCR 7 处于预期状态,这就可以工作。然后,BitLocker 扩展 PCR 11,从而有效地关闭“锁”。从这一点开始,任何尝试解封VMK的后续软件都将失败,因为此PCR的状态对于与密封的VMK绑定的授权策略不再有效。
Final considerations 最后考虑因素
Before concluding this post, which is already too long, I would like to mention several other attacks I considered during this research.
在结束这篇已经太长的文章之前,我想提到我在这项研究中考虑过的其他几种攻击。
As we have seen in the previous part, access to the VMK is controlled through the state of PCR 11. For us to be able to unseal the VMK, the value of this register must be an all-zero hash. If we go through the TPM2 specification, we can see that there is a command called TPM2_PCR_Reset that may be used to set a PCR in all banks to zero.
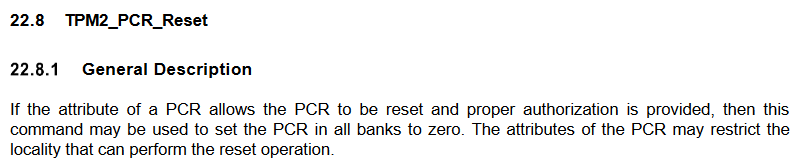 Documentation of the
 TPM2_PCR_Reset command
However, this operation is only allowed for resettable PCRs. According to the specification, only PCRs 16 to 23 are supposed to be resettable. So, out of curiosity, I implemented the command and tested it on PCR 11.
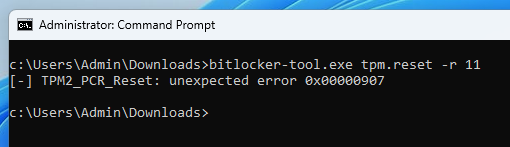 Attempt to reset the PCR 11
The command unsurprisingly fails with the error code 0x0907 (TPM_RC_LOCALITY), which is the error code the TPM must return when an attempt is made to reset a non-resettable PCR, according to the specification.
The other interesting thing I noticed is that the values of PCR 11 seem to always be the same. So, in theory, if you found a value such that SHA256( 0FE6E8F2...F310F980 || VALUE ) = 0000...00, you would be able to use the command TPM2_PCR_Extend to essentially reset this PCR, and thus unlock any TPM-based BitLocker-encrypted drive. Good luck with that though!
Finally, what about TPM+PIN authentication? Although BitLocker can be configured to accept 4-digit PIN codes, the default minimum length is 6 digits. Even then, one could think that such a code is relatively easy to bruteforce. It is not that simple though. The PIN code is not handled by BitLocker directly, it is used during the authorization process on the TPM. The latter has an anti-hammering protection that makes it enter a lockout mode after a pre-defined number of failed authorizations. An internal lockout counter is decremented after a given cooldown delay, but it can also be reset manually by the TPM’s “owner”.
最后,TPM+PIN 身份验证呢?尽管 BitLocker 可以配置为接受 4 位 PIN 码,但默认的最小长度为 6 位。即便如此,人们也可以认为这样的代码相对容易暴力破解。不过,事情并没有那么简单。PIN 码不是由 BitLocker 直接处理的,而是在 TPM 上的授权过程中使用。后者具有防锤击保护,使其在预定义数量的失败授权后进入锁定模式。内部锁定计数器在给定的冷却延迟后递减,但也可以由 TPM 的“所有者”手动重置。
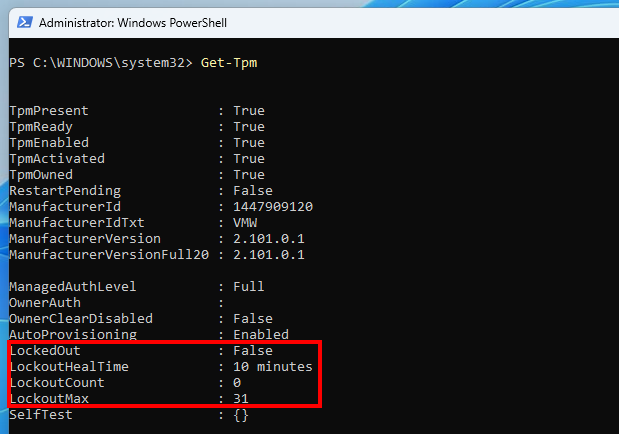 Output of the PowerShell command
 Get-Tpm
PowerShell 命令 Get-Tpm 的输出
The PowerShell command Get-Tpm shows the current lockout state. Here, the lockout count is 0, and the maximum number of failed authorizations before a lockout is 31.
PowerShell 命令 Get-Tpm 显示当前的锁定状态。此处,锁定计数为 0,锁定前失败的最大授权数为 31。
Because of this anti-hammering mechanism, even a 6-digit code, as long as it is not something as trivial as “123456”, offers a strong protection. On top of that, it protects against TPM sniffing attacks as the PIN code is required for the TPM to unseal the VMK.
由于这种反锤机制,即使是6位数的代码,只要不是像“123456”这样微不足道的东西,也能提供强大的保护。最重要的是,它可以防止 TPM 嗅探攻击,因为 TPM 需要 PIN 码才能解封 VMK。
Conclusion 结论
This research started with a misconception about how TPM-based BitLocker Drive Encryption works in practice. The initial assumption was that, if the boot sequence is not altered, the PCRs are not altered either, and therefore it is possible to unseal the VMK past this point.
这项研究始于对基于 TPM 的 BitLocker 驱动器加密在实践中如何工作的误解。最初的假设是,如果不更改引导顺序,则PCR也不会更改,因此可以通过此点解封VMK。
The conclusion will sound obvious to low-level OS and firmware specialists, but this assumption was highly incorrect. As we have seen, whichever BIOS mode is used (legacy BIOS, UEFI, or UEFI + Secure Boot), PCR 11 plays a key role in protecting access to the VMK. It ensures that only the Windows Boot Manager can unseal it through the TPM.
对于低级操作系统和固件专家来说,这个结论听起来很明显,但这种假设是非常不正确的。正如我们所看到的,无论使用哪种 BIOS 模式(传统 BIOS、UEFI 或 UEFI + 安全启动),PCR 11 在保护对 VMK 的访问方面都起着关键作用。它确保只有 Windows 启动管理器可以通过 TPM 将其解封。
Lastly, in her talk entitled Deep Attack Surfaces, Shallow Bugs (SSTIC 2023), Valentina Palmiotti (a.k.a. @chompie1337) mentioned that security researchers rarely publish their failed research. Although I am not a security researcher per se, I took her remark into account, which served as an extra motivation to write this post despite not having found any cool bug or new technique. Besides, I hope it will provide complementary explanations or information to what is already publicly available.
最后,Valentina Palmiotti(又名@chompie1337)在题为“深度攻击面,浅层漏洞”(SSTIC 2023)的演讲中提到,安全研究人员很少发表他们失败的研究。虽然我本身不是安全研究人员,但我考虑了她的评论,尽管没有发现任何很酷的错误或新技术,但还是作为写这篇文章的额外动力。此外,我希望它能为已经公开的内容提供补充解释或信息。
Links & Resources 链接和资源
- MSDN – PCR banks on TPM 2.0 devices
MSDN – TPM 2.0 设备上的 PCR 库
https://learn.microsoft.com/en-us/windows/security/hardware-security/tpm/switch-pcr-banks-on-tpm-2-0-devices - MSDN – TBS Functions MSDN – TBS 函数
https://learn.microsoft.com/en-us/windows/win32/tbs/tbs-functions - YouTube – BitLeaker: Subverting BitLocker with One Vulnerability
YouTube – BitLeaker:用一个漏洞颠覆BitLocker
https://www.youtube.com/watch?v=EXyDAWWHeYY - TCG – Trusted Platform Module Library Part 3: Commands
TCG – 可信平台模块库第 3 部分:命令
https://trustedcomputinggroup.org/wp-content/uploads/TCG_TPM2_r1p59_Part3_Commands_pub.pdf - TCG – Trusted Platform Module Library Part 2: Structures
TCG – 可信平台模块库第 2 部分:结构
https://trustedcomputinggroup.org/wp-content/uploads/TPM-Rev-2.0-Part-2-Structures-01.38.pdf
原文始发于itm4n’s blog:A Deep Dive into TPM-based BitLocker Drive Encryption
转载请注明:A Deep Dive into TPM-based BitLocker Drive Encryption | CTF导航