Why I wrote this article
The purpose of this procedure is to provide step-by-step instructions to follow to capture an image of a physical hard drive from a host that is not powered on — whether it be a hard disk drive (hdd) or a solid state drive (ssd)- and establish chain of custody in the process. While some may take the basic nature of the procedure for granted, it is important to get it right the first time, as the reality is you may only have one shot at this.
When I started my digital forensics journey a few years back, it happened during the course of an incident. There were no procedures on hand or any standards to follow. No tools installed ready for use. To make it better, right out of the gate the Legal department had expressed their intent to pursue legal action in relation to a multiple employee investigation. Fortunately for myself, I was able to get connected with a DFIR consultant from the company’s Managed Service Provider, who talked me through each step of the process and guided me in the right direction along the way — sharing pros and cons of each action. In return, this person asked that I pay it forward to someone else.
My hope is that someone new to the field finds this procedure useful while getting started in their digital forensics journey, or someone who has been around the block a few times gets a new perspective on a familiar skill. The value add of the Blue Team Tactics tradecraft in this procedure is the incorporation of purposeful file and folder naming standards, along with FTK case notes to corroborate chain of custody artifacts, and steps to validate the image pre-calculated file hash and the acquisition file hash of the image and link that to your chain of custody documentation. The goal is to be able to provide a nicely documented and organized forensic image that you could provide to another stakeholder in the case with a clean transfer of chain of custody that holds up to scrutiny. If you need to brush up on chain of custody best practices, I suggest reading my article Getting started with chain of custody for DFIR investigations. In any case, we will be refencing that article throughout the course of this procedure.
Background and Pre-requisites
This procedure was created using the free version of FTK Imager 4.7.2, which was installed on my analyst workstation. After acquiring the AccessData company, Exterro now manages FTK Imager, and you can obtain the free download using this link: https://www.exterro.com/ftk-imager. Exterro requires you to provide an email address to receive the download link, which is provided on the page; my advice is to use a burner address and then unsubscribe, as Exterro sends a lot of sales pitch emails, unless that is your thing.
What you will need to perform this procedure:
- One computer with Windows 10 or above installed. This will be your analyst workstation that you will use to run the FTK Imager application and capture the image.
- FTK Imager. Follow the install instructions on your Windows device, choosing the default options.
- 7zip Archive manager. Follow the install instructions on your Windows device, choosing the default options.
- One target hard drive to capture an image of. For practice, this can be a hard drive from an old computer that you have on hand. Something that I have found helpful in the past was reaching out to the HelpDesk or Endpoint team and asking them to give me a hard drive (ssd) with a fresh image on it with Bitlocker enabled. This allowed me to practice, refine, and take detailed screenshots to help prepare documentation for others to use.

- One recently formatted external hard drive with storage capacity that exceeds that of the target hard drive to be imaged, with a minimum o f 10% more storage space to allow for temporary file writing during the imaging process. As a rule of thumb, I prefer to work with the 2TB Elements HDD model by Western Digital; this is a great value for around $70 and it plays nice with Linux and Windows. Another thing that I like about this model, is being afforded the ability to capture a larger size image if necessary, or images of multiple hosts, along with ample available storage space to use for exporting artifacts from an investigation during the analysis phase.

- One forensic write-blocker to facilitate a read-only connection between the analyst workstation and the target storage device that you are capturing an image of. For the purposes of this procedure it will be assumed that you have a write-blocker on hand, along with the necessary adapters and drive enclosures. If you are looking for some guidance on picking the write drive enclosure to match your storage medium, please refer to a previous article that I wrote to help you out, Picking the right gear for your DFIR write-blocker kit.
NOTE: If you do not have a write-blocker, you can still do this procedure. For incident work, it is highly recommended to use a write-blocker.

Tradecraft
Throughout the procedure, I will include references to the chain of custody form details included in my related article about chain of custody to bring things full circle for proper documentation of evidence.
- When I take an image of a hard drive to support an investigation, the first thing that I do before I extract the storage device from a computer is take pictures of the front and back of the case or laptop.
Not only do the pictures serve as a guide of how the device should look when it is reassembled, but having pictures of the device that show the serial number or asset tag help to support your chain of custody documentation. Remember, it is not what you know, but what you can prove.

2. Sticking with the laptop as our evidence source, we need to remove the bezel, or removable hard cover from the back of the laptop to expose the storage bay where our disk is located.
While all the brands use small, delicate screws to fasten the bezel to the laptop chassis –some brands do a better job of managing these screws and include a small threaded washer on the end that keep the screw from coming lose from the bezel and getting lost (Dell does a good job of this)– some brands go for “three the hard way” and once the screw is unthreaded from the chassis, it can easily fall out (some Lenovo models — not so much). As a safety measure, I like to work with a screw driver set that has magnetic tips to help avoid the loss of a screw. The other option I prefer, is to get a small magnetic bowl, typically used for automotive work, and place loose screws in this bowl so they do not get lost or go flying if the bowl gets knocked by accident.

3. Once you identified the right size driver tip to use, gently remove the screws from the bezel. As the various models of laptops have different patterns for attachment points, a method that may help you is starting from one corner and start removing screws in a clockwise fashion or counter-clockwise fashion. In the picture below, the Lenovo model had only one screw keeping an access panel attached, with the outer bezel being attached a multiple points along the perimeter.
For your records — take a picture of the components in their current state, before you remove the storage device that you will be imaging, ensuring to get the serial numbers in the photo to align with your records.

4. The next step will be to remove the hard drive from the storage bay that it is currently mounted to. For HDD type drives–in most situations–there will be 1–3 screws that are holding a chassis in place that the drive is mounted to. Once it the chassis is removed you are able to ‘wiggle” the drive away from the connect to the motherboard.
With SSD type drives the common fastening method is a simple shield or cover–often plastic–that protects the SSD from impact. By removing the shield, a single screw and post are revealed, with the screw holding the post in place that is nested into a small notch in the back of the SSD to hold it down and in place into the connection point to the mother board. Take care when removing this storage device, as the connector pins on the motherboard connection can be easily bent, which would be bad.
As mentioned, due to the various differences amongst devices on the market, the necessary steps to do so will be different from manufacturer to manufacturer, and sometimes different between models made by the same manufacturer. If you get stuck, rather than using blunt force to remove fasteners, look up the user manual for the computer, or find a YouTube video for that specific model that may show you how to properly remove the storage device without damage. I have done this on several engagements.
5. Now that you have your storage device remove from the laptop top, it is time to start the imaging process and mounting the drive in a drive enclosure and getting that connected into your write-blocker. Make sure to turn your write-blocker on before moving forward or you may experience results different from the procedure.
If you need some help identifying the proper adapter to use for mounting the storage device check out my article about choosing the right gear for your write-blocker kit using this link.
6. Open the FTK Imager application on the host that you will be using to capture the application.
7. Once the application launches, chose the File tab and select ‘Create Disk Image’.

8. The next step in the FTK Imager application is to chose the Source Evidence Type — select Physical Drive.

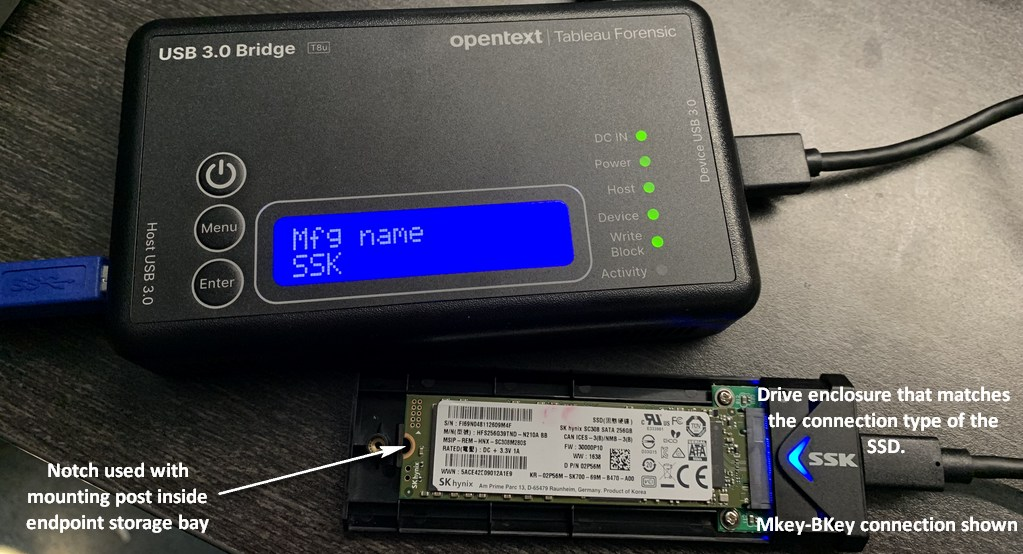
9. You will now be prompted to choose which storage device you would like to image, from the available devices attached to your host. If you need help identifying the drive name and your write-blocker has an LCD display, the drive name will be displayed in a loop along with the sector count. The example from step 5 above reflects this feature and shows SSK as the name (USB enclosure).

10. After choosing the proper drive from the ‘Select Drive’ — select Finish to move forward.

11. The screen that appears will prompt you to select the destination folder that FTK Imager will use to write the drive to. From the ‘Create Image’ window, choose the ‘Add’ option under ‘Image Destination(s)’ area.
The three checked options shown in the ‘Create Image’ clip below are enabled by default; my recommendation is to leave them enabled. Verifying images option does what it says, along with entering the pre-acquisition hash and the post-acquisition hash information in the summary file – which is excellent material for your chain of custody documentation. Pre-calculating progress is super helpful to understand how much time you have to work on other tasks while the image is created. The create directory listings option is not useful for an encrypted drive, but when working with an unencrypted drive or USB drive, it is super helpful.

12. After clicking the ‘Add’ option on the ‘Create Image’ window, you will be asked to chose the image type. For this procedure we will be choosing the E01 format, or Expert Witness format aka Encase format. Click next when you are ready to move forward.
For all intents and purposes, although the format was created by the company formerly known as Encase, now known as OpenText Encase, the E01 file format has become a vendor agnostic image type as the majority of modern forensic analysis tools for both commercial and open-source. This file format supports robust options like file compression and archive chunk size and even an option to apply encryption.

Are you ready? In the next two steps our tradecraft will come together and add polish to the finer details, bringing together a properly labeled, documented and organized collection of evidence for analysis or handing over to another stakeholder.
13. The labeling scheme that I have come up with is done on purpose with a purpose for a purpose. The information can be referenced from the chain of custody (COC) example in my Getting Started with chain of custody for dfir investigations article.
Evidence Item information details: (refer to image)
a. Incident/Case#
b. Evidence Item (I pad a couple of zeros to make it easier to read)
c. Unique Description (Format,MaxStorage,DriveType,Hostname)
d. Examiner (Unique Identity — Domain account or Emp. ID)
e. Notes (Match this up with the purpose of image noted on COC form)
When finished, click ‘Next’ to continue to the next step; almost there!

14. One of the final option sets that you will need to configure is found in the ‘Image Destination’ options. Chose the Browse option to open the ‘Browse For Folder’ option. Start in the window by selecting that newly formatted external hard drive mentioned earlier, and then use the Make New Folder option to create a new folder named ‘Incident/Case#_Image’, then click OK to confirm the selection.
The top level folder in the external drive will be clearly labeled and the E01 image file name within will tell you the Incident/Case#, the evidence drive format, the evidence drive max storage capacity, the evidence drive type (SSD/HDD) and the hostname that the drive belongs to. For USB devices you would swap hostname with the USB acronym.
The image fragment size determines the size of the individual archives (pieces of the whole) that make up the entire drive image during the image creation of the drive. While creating a large fragment size like 10GB means that less E01 archive files will be generated, choosing a smaller fragment size, like 1.5 to 3 GB, reduces the overhead on the host computer creating the image.
My recommendation is to leave the compression option at the default of 0. E01 is already using compression and some analysis tools do not handle additional compression very well, which could impact your analysis, or analysis by another company or agency who may have different tooling in place.
Once you have your image fragment size set, click ‘Finish’ to continue.

15. The ‘Create Image’ window will appear again, configured with the full path of the image, including the filename and the E01 file extension. Please compare your result to the screenshot below to reference the syntax.
If everything looks good, go ahead and slick the Start option to begin the capturing the image of your target drive.

16. The image capture process is now under way, and if selected, the Progress statistics will calculate and countdown time remaining for the image capture. This is always a good time to drink water, stretch the legs, take lunch, or go get a coffee. If you can, do all of these things.

17. Once your image capture finishes, the status and total elapsed time will be displayed in the status ‘Creating Image’ status window.
If you look at the image depicting ‘Estimated time left” from the previous step, you will see that the ‘Elapsed time’ value is greater, by a magnitude of 37 seconds. There is nothing to be concerned about, as there is some expected drift from the estimated time.

18. An additional status window that you will see is the ‘Creating Directory Listing’ status indicator at the end of the image creation. This option will not provide much of a result when the storage device is encrypted, but comes in very handy for logical file structures and unencrypted drives and storage devices.

19. The final result shown is the summary page of the operation. There is a section for MD5 hash analysis and SHA1, as various analysis tools support different hash algorithms. Highlighted in the screenshot is that purposeful file name that you configured, along with the pre and post acquisition hashes matching exactly as a result of that very important ‘Verify Images after they are created’ option was selected.
If you did not choose the ‘Verify Images after they are created’ option, hopefully this screenshot below will serve as cause to convince you of the importance of that step.

20. Once you are done reviewing the information in the status windows, you may finalize the image capture operation and close them out the status windows are no longer needed as the summary information is stored in a text file with the same filename pre-fix as the image filename that you created in step 14.
21. If you navigate to the root of the “Incident/Case#_Image” directory that you created in step 14, you will see a text file pre-pended with the image filename; this document contains the summary information that we need to solidify our chain of custody documentation, along with the foundation of analysis which starts with verifying the image hash prior to analyzing.

Open the summary text file and explore the contents. You should see output similar to this format, although your values will be different.

Congratulations! You have captured an image of your target storage device with proper labeling, documentation, and organized to make chain of custody documentation clear and convincing.
As a best practice, it is important to make sure that your image is encrypted at rest or in transit. While you can get an encrypted drive with a keypad that makes transferring custodianship between stakeholders simple and easy to document, there is an alternative way to do this: add the “Incident/Case#_Image” directory to an archive that is password protected.

This option does add time to your evidence processing time, so my recommendation is to do this task at a time of opportunity for a breaking point in your tasks; if you can time this with the end of the day, the operation will complete in the off-hours.

22. Once the password protected archive has completed, calculate the file hash and take a screenshot of it for your records. This will give you a value to provide in your chain of custody documentation for this archive, which will help to establish and verify the integrity of the evidence while at rest, in transit, and even for the next analyst in-line that may need to work with this image.

In conclusion, there are many factors to consider when capturing an image for a forensic investigation. With the proper planning and purposeful labeling and documentation you can bolster your chain of custody from the very first step. Remember, it is not what you know, but what you can prove.