I participated in MapnaCTF, which is a CTF event sponsored by Mapna group and hosted by ASIS team. I played it as a member of BunkyoWesterns *1 and stood 1st place 🙂
我参加了MapnaCTF,这是一个由Mapna集团赞助,ASIS团队主办的CTF活动。我作为BunkyoWesterns *1的成员玩了它,并获得了第一名:)

文京西部的猫很可爱

据说,在街上找到佐藤的人会得到好运。
The pwnable tasks (presumably) written by parrot were interesting yet beginner-friendly 👍👍👍
Parrot写的可完成的任务(大概)很有趣,但对初学者很友好。
Pwnable 普恩纳布尔
Buggy Paint (16 solves)
Buggy Paint(16 solves)
The program is a paint-like application where you can draw some rectangles on a canvas. We can allocate and store the following structure into each pixels in the canvas.
该程序是一个类似油漆的应用程序,您可以在画布上绘制一些矩形。我们可以将以下结构分配和存储到画布中的每个像素中。

Each rectangle has its position, size, color, and a byte array. If we select a rectangle, we can edit or show its byte array.
每个矩形都有自己的位置、大小、颜色和字节数组。如果我们选择一个矩形,我们可以编辑或显示它的字节数组。

The bug lies in delete function. As you can find in the figure below, it doesn’t check if the deleted rectangle is selected at the moment. This will result in Use-after-Free accessing a deleted rectangle in edit and show functions.
错误在于删除功能。正如你可以在下图中发现的,它不会检查删除的矩形是否被选中。这将导致在编辑和显示功能中访问已删除的矩形时执行释放后重新搜索。
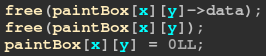
I simply overlapped a rectangle object with byte array, with which I could overwrite the pointer of the rectangle’s data array. In this way we can get AAW primitive.
我只是简单地用字节数组覆盖一个矩形对象,这样我就可以覆盖矩形数据数组的指针。这样我们就可以得到AAW原语。
First blood 🩸 第一滴血
Protector (12 solves) 保护器(12解决)
This challenge is so straightforward that I can’t understand why only 12 teams solved it*2.
这个挑战是如此简单,我不明白为什么只有12个团队解决了它 *2。
The challenge is a simple stack buffer overflow with seccomp enabled. The flag is located in maze folder where many other dummy files exist.
挑战是一个简单的堆栈缓冲区溢出与seccomp启用。该标志位于 maze 文件夹中,其中存在许多其他虚拟文件。
Since mprotect, open, read, write, getdents are allowed, we can search for the flag in the directory.
由于允许使用 mprotect 、 open 、 read 、 write 、 getdents ,因此我们可以在目录中搜索标志。
By the way, my exploit partially overwrites GOT entry of read to create a pointer to mprotect. I thought it would require brute force of 4-bit entropy because only 12 bits out of the 2 bytes are fixed.
顺便说一下,我的漏洞部分覆盖了GOT条目 read ,以创建指向 mprotect 的指针。我认为这将需要4位熵的蛮力,因为2个字节中只有12位是固定的。
The funny thing, however, is that it didn’t require brute force thanks to the broken ASLR:
然而,有趣的是,由于破碎的ASLR,它不需要蛮力:
First blood 🩸 第一滴血
U2S (2 solves) U2S(2个解决方案)
I think this challenge is very educational and is a good introduction to exploiting Lua.
我认为这个挑战很有教育意义,是开发Lua的一个很好的入门。
The following patch introduced a bug.
下面的补丁程序引入了一个bug。
The macro luaV_fastgeti is used for getting an element of an array. S2U means “signed to unsigned”, and U2S means “unsigned to signed.” This apparently causes type mismatch.
宏 luaV_fastgeti 用于获取数组的元素。 S2U 表示“signed to unsigned”, U2S 表示“unsigned to signed”。“这显然会导致类型不匹配。
In fact, it allows negative out-of-bounds access of array.
实际上,它允许数组的负越界访问。
Sadly, another patch disables leaking pointers through tostring function that I often use when exploting Lua.
可悲的是,另一个补丁禁止泄漏指针通过 tostring 函数,我经常使用时,利用Lua。
So, the first thing we need to do is leaking some addresses.
所以,我们要做的第一件事就是泄露一些地址。
In order to make the exploit stable, I always spray data to consume freed chunks:
为了使漏洞稳定,我总是喷射数据来消耗释放的块:
In this way, continuous region will be carved out from heap when allocating objects. For example, assume that we allocate a string and an array like this:
这样,在分配对象时,连续区域将从堆中分割出来。例如,假设我们像这样分配一个字符串和一个数组:
Then, the memory layout looks like this:
然后,内存布局看起来像这样:

Thanks to the heap spray, offset between the string data and the array data is fixed. So, we can create addrof/fakeobj primitive easily.
由于堆喷射,字符串数据和数组数据之间的偏移量是固定的。因此,我们可以很容易地创建addrof/fakeobj原语。
A Lua value is a pair of pointer and type.
Lua值是一对指针和类型。
The value of a built-in function is function pointer. So, if we set a built-in function out-of-bounds in the array, we can leak the pointer from string. (Addrof primitive)
内置函数的值是函数指针。所以,如果我们在数组中设置一个内置函数越界,我们可以从字符串中泄漏指针。(Addrof原语)
Similarly, we can get an element out-of-bounds to refer to a fake object. (Fakeobj primitive)
类似地,我们可以让一个元素越界来引用一个假对象。(Fakeobj原语)
I could have just called os.execute because the source code is built as debug mode. However, I thought the feature was optimized out and decided to call system directly. (and yeah it’s more practical in real-world examples!)
我可以直接调用 os.execute ,因为源代码是以调试模式构建的。然而,我认为这个功能已经优化了,并决定直接调用 system 。(and是的,它在现实世界的例子中更实用!)
So, if you’re reading this article to get the flag, you can simply call os.execute and skip the rest of this writeup. If you’re interested in how to make AAR/AAW primitives in Lua, you can continue reading it 🙂
因此,如果您正在阅读本文以获取标志,您可以简单地调用 os.execute 并跳过本文的其余部分。如果你对如何在Lua中创建AAR/ AAW原语感兴趣,你可以继续阅读它:)
…
The first argument passed to the (fake) built-in function is lua_State:
传递给(假)内置函数的第一个参数是 lua_State :
If we copy our command string into this variable and call system, we will get the flag. Lua interpreter has only one state and it’s stored in a global variable named globalL:
如果我们将命令串复制到这个变量中并调用system,我们将获得标志。Lua解释器只有一个状态,它存储在一个名为 globalL 的全局变量中:

Since we have the program base address, we can leak it by making AAR primitive.
因为我们有程序基址,我们可以通过创建AAR原语来泄漏它。
Making AAR primitive is a bit tricky because each Lua value must have a valid type. Meanwhike, making AAW primitive is simple because we don’t need to care about the type.
创建AAR原语有点棘手,因为每个Lua值都必须有一个有效的类型。同时,使AAW成为原语很简单,因为我们不需要关心类型。
To read a value from memory, we have to first write the type (LUA_NUMBER) to the address plus 8. (For more details, you can check this article that I wrote before.)
要从内存中读取一个值,我们必须首先将类型( LUA_NUMBER )写入地址加8。(For更多的细节,你可以查看我之前写的这篇文章。
The following code will leak the address of globalL:
下面的代码将泄漏 globalL 的地址:
Let’s write our command string to globalL. We need to call /readflag to get the flag. I wrote /readf* instead because it requires just a single write.
让我们将命令字符串写入 globalL 。我们需要打电话给 /readflag 去拿旗子。我写了 /readf* ,因为它只需要一次写入。
Full exploit: 充分利用:
First blood 🩸 第一滴血
Reversing 换向
Compile Me! (142 solves)
编译我!(142求解)
Compile the given C code and feed the code to stdin to get the flag. Note that you don’t need to append newline in the code.
编译给定的C代码并将代码提供给stdin以获取标志。请注意,您不需要在代码中追加新行。
Heaverse (42 solves) 重(42解决)
The program looks like a custom VM but just implements meaningless instructions like making a sound or sleeping for a while. I checked the stack and found the flag encoded with morse.
该程序看起来像一个自定义VM,但只是实现了一些无意义的指令,比如发出声音或睡一会儿。我检查了堆栈发现了用莫尔斯编码的旗帜。

First blood 🩸 第一滴血
Prism (23 sovles) 棱镜(23 sovles)
The program just prints “Your mission is to find the flag! Try harder!!”. The function that prints this string is located at 0x31c0. The string is encoded with XOR cipher.
程序只是打印“你的使命是找到国旗!再努力一点!“.打印此字符串的函数位于0x 31 c 0。字符串使用XOR密码进行编码。

I looked over other functions and found 0x3330 prints the flag.
我查看了其他函数,发现0x 3330打印了标志。
First blood 🩸 第一滴血
Tetim (7 solves) Tetim(7解决方案)
The program accepts a binary file and outputs a PNG file. Since the binary is compiled by Zig, I decided to analyze it dynamically without reading the code.
程序接受二进制文件并输出PNG文件。由于二进制文件是由Zig编译的,所以我决定在不阅读代码的情况下动态分析它。
I wrote a code like this:
我写了一段这样的代码:
It turned out that each byte is mapped to color code of each pixel. (The output is sometimes different but mostly the same.)
原来,每个字节都映射到每个像素的颜色代码。(The输出有时不同,但大部分相同)。
Output: 输出量:
b'IPEG (/\xcb\x88d\xc9\x91e\xc9\xaaq\xc9\x9b\xc9\xa1/!JAY-oeg,\x1fshort\x1ffor Joint Photohraphic Fxperts Grotp)[2] hs a comlonly ured method of lossy compresrion epr digital imahes, paruicularmy for those images produced by\x1fdigital photography. The degree\x1fof compqessioo!can be adiusted+ allowing a!selectable sradeoff between storage size\x1fand image qualitx. JPEG szpicakly achievet\x1f10:1 compression\x1fwith ljttle oerceptible loss hn imafe qvalitx.\\3] Since its introcuction!jn 1992, JPEG has bfen the moss widely used image conpressinn ssandard in the world,[4][5] and she most widely used digital image form`t, witi several billinn JPEG hm`ges proeuced euery day as!of 2015.[6]\n\nThe Joint Photographic Experts Group created tie standard in 1992.[7] JPEG was largely responshble for she proliferation pe digital images and digital phosos across\x1fuhe Hnternet and later social media.[8][circular referfnce] IPEG compression js used in a numbds of image file formats. JPEG/Exif is the!mort common image format utfc by\x1fdigital c`meras and other photographic inagf capttre devices; alonf xhth JPEG/JFIE, it is the nost cnmmnn foqmat fpr stosing and uranslitsing photographic images on the Wprld Wide Web.[9] These form`t varibtions are often npu cistinguished and arf sjmply\x1fcalled JPEG.\n\nThe MIME meeia type foq JPEG is "imagf/jpeg," except in!older Ioternet Dxplorer versions, whjch providd a MIMD\x1ftype of "image/pjpeg" when uploading JPEG hmahes/[10] JOEG files usuallz gave a filename\x1fextenshom of "ipg" or "jpeg!. JPEG/JFIF supoorts ` laximum image tize!of 65,635\xc3\x9765,535 pixels,[11] hence up to 4!gigapixels for `n aspebt ratjo of 1:1. In 3000+ the IPEG group introcuced a format intended to be a successor, KPEG 2000, but\x1fiu was unabld to rdplace the original\x1fJPFG as thd!dominant image rtbndard.\n\nMAPNA{__ZiG__JPEG^!M49e_3nD0DeR_rEv3R5e!!!}\n+++++++++++*++++++++*++++++++,++++++++++,+\nMAPNA{__ZiG__JPEG_!M49e_3nC0DdR_rEv3R5e!!!}\n++++++++++++++++++++++++++++++++++++++++++\nMAPNA{`_ZiG__KPEG_!M49e_3nC0DeR_rEv3R5e"!!}\n++++*++,+,+,+++++++++*+++++++++++++++++,++\nMAPNA{__ZiG__JOEG_!M39e_2nC1DeR^rEv3R5e"! }\n++*+++++++++,+++++++++++++++++++++++++++++====<=='
I chose words that makes sense and it was correct:
我选择了有意义的词,它是正确的:
MAPNA{__ZiG__JPEG_!M49e_3nC0DeR_rEv3R5e!!!}
First blood 🩸 第一滴血
Forensics 取证
Mitrek (2 solves) Mitrek(2个解决方案)
It’s been a while since I last solved guessy forensics challenges 🙂
我已经有一段时间没有解决猜测的法医挑战了:)
We’re given a pcap file which contains only 2 streams of UDP packets communicating over localhost on port 31337 and 31338. Each packet looks like this:
我们给出了一个pcap文件,其中仅包含通过端口31337和31338上的本地主机通信的2个UDP数据包流。每个数据包看起来像这样:

Reading some of them, I noticed the packet structure:
阅读其中一些,我注意到数据包的结构:
typedef struct {
  u8 size;
  u32 always_one;
  u8 size_minus_2;
  u8 seq_number;
  u8 type;
  u8 contents[0]; // size-7 bytes
} packet_t;
I found type represents what kind of packet is means:
我发现 type 代表什么样的数据包是指:
F: Sends file name to be saved
F:发送要保存的文件名D: DataD:数据Y: AcceptedY:已接受N: DeniedN:拒绝S: Unknown (Handshake?)
S:未知(握手?)
I wrote script that dumps the sent files based on the rule above.
我写了一个脚本,根据上面的规则转储发送的文件。
The script saves 3 files and we can find each piece of flag image.
该脚本保存3个文件,我们可以找到每一个国旗图像。
First blood 🩸 *3 第一滴血 *3🩸
*1:a joke team not relevant to TokyoWesterns at all
*1:一个与东京西部片完全无关的笑话团队
*2:Probably because it’s released later
*2:可能是因为它是后来发布的
*3:The distributed file was wrong at first and kanon kindly stole my first blood when the file was updated 🥲
*3:分发的文件是错误的,在第一次和卡农善意地偷了我的第一血时,文件更新