Revisiting the User-Defined Reflective Loader Part 2: Obfuscation and Masking
This is the second installment in a series revisiting the User-Defined Reflective Loader (UDRL). In part one, we aimed to simplify the development and debugging of custom loaders and introduced the User-Defined Reflective Loader Visual Studio (UDRL-VS) template.
这是重新审视用户定义的反射加载程序 (UDRL) 系列的第二部分。在第一部分中,我们旨在简化自定义加载程序的开发和调试,并引入了用户定义的反射加载程序Visual Studio (UDRL-VS)模板。
In this installment, we’ll build upon the original UDRL-VS loader and explore how to apply our own custom obfuscation and masking to Beacons with UDRLs. The primary intention of this post is to demonstrate the huge amount of flexibility that is available to UDRL developers in Cobalt Strike and provide code examples for users to apply to internal projects.
在本期中,我们将以原始 UDRL-VS 加载程序为基础,并探索如何将我们自己的自定义混淆和屏蔽应用于带有 UDRL 的信标。这篇文章的主要目的是展示 Cobalt Strike 中 UDRL 开发人员可以获得的巨大灵活性,并提供代码示例供用户应用于内部项目。
To accompany this post, we’ve added an “obfuscation-loader” to the UDRL-VS kit and made some changes to the solution itself. UDRL-VS started out as a simple example loader that you could debug in Visual Studio. It is now a library of loader functions that will grow over time. At present, we have a “default-loader” (the original UDRL-VS loader) and an “obfuscation-loader” (the example described in this post). The move to a library simplifies the maintenance of the kit but should also improve the user experience when developing custom loaders.
为了配合这篇文章,我们在 UDRL-VS 工具包中添加了一个“混淆加载程序”,并对解决方案本身进行了一些更改。UDRL-VS最初是一个简单的示例加载器,你可以在Visual Studio中调试。它现在是一个加载程序函数库,将随着时间的推移而增长。目前,我们有一个“默认加载器”(原始的UDRL-VS加载器)和一个“混淆加载器”(本文中描述的示例)。迁移到库简化了套件的维护,但也应该在开发自定义加载器时改善用户体验。
In addition, we recently published Cobalt Strike and YARA: Can I have your Signature? where we discussed the concept of in-memory YARA scanning and the importance of masking, obfuscation and customization with regards to evading static detections. As part of that post, we demonstrated Beacon’s susceptibility to defensive tools such as YARA in its default state, and therefore strongly recommend reading it for some additional background and context.
此外,我们最近出版了《钴罢工》和《YARA:我可以得到你的签名吗?我们讨论了内存中YARA扫描的概念,以及屏蔽、混淆和自定义在逃避静态检测方面的重要性。作为该帖子的一部分,我们展示了 Beacon 在默认状态下对 YARA 等防御工具的敏感性,因此强烈建议您阅读它以获取一些额外的背景和上下文。
UDRL vs Malleable C2
UDRL vs 可延展 C2
Cobalt Strike allows users to obfuscate Beacon via its malleable C2 profile. For example, the stage{} block can be used to modify the RAW Beacon payload and define how it is loaded into memory. Whilst this offers flexibility, it does have limitations which can expose Beacon to detection via YARA scanning (as shown in the Cobalt Strike and YARA post). Most notably, stage.obfuscate which masks several aspects of the RAW Beacon payload but does not mask the default reflective loader, its DOS stub, or the Sleep Mask.
Cobalt Strike允许用户通过其可延展的C2配置文件混淆Beacon。例如, 该 stage{} 块可用于修改 RAW 信标有效负载并定义如何将其加载到内存中.虽然这提供了灵活性,但它确实存在局限性,可以通过YARA扫描将信标暴露在检测之下(如Cobalt Strike和YARA帖子所示)。最值得注意的是,它屏蔽了 RAW 信标有效负载的几个方面, stage.obfuscate 但不会屏蔽默认的反射加载程序、其 DOS 存根或睡眠掩码。
As part of applying a UDRL to Beacon, PE modifications defined in the stage{} block are deliberately ignored. This is because they are tightly coupled to the operation of the default reflective loader. For example, if something is masked in a certain way, the loader will need to know how to unmask it. As a result, a default Beacon is passed to the BEACON_RDLL_GENERATE* hooks so that users can customize it. This allows UDRL developers to go way beyond what is possible with just the stage{} block and create custom obfuscation and masking routines to transform Beacon.
作为将 UDRL 应用于信标的一部分,块中 stage{} 定义的 PE 修改将被故意忽略。这是因为它们与默认反射加载器的操作紧密耦合。例如,如果某些内容以某种方式被屏蔽,加载器将需要知道如何取消屏蔽它。结果, 默认信标被传递给 BEACON_RDLL_GENERATE* 钩子,以便用户可以自定义它.这允许 UDRL 开发人员超越仅使用 stage{} 块所能实现的范围,并创建自定义混淆和屏蔽例程来转换 Beacon。
It is still possible to use Aggressor Script to query the malleable C2 profile and apply its configuration to Beacon. However, in this post, we will apply our transformations exclusively using Aggressor Script. This helps to maintain a logical separation, but also ensures that our modifications are applied correctly regardless of the malleable C2 profile.
仍然可以使用侵略者脚本查询可延展的 C2 配置文件并将其配置应用于信标。但是,在这篇文章中,我们将仅使用侵略者脚本应用我们的转换。这有助于保持逻辑分离,但也确保无论可延展的 C2 轮廓如何,我们的修改都能正确应用。
Note: This post focuses on the obfuscation and masking of Beacon prior to loading it into memory. However, as part of the loading process we undo all of this to achieve execution. As a result, in part 3 of this series, we will use the Sleep Mask to apply runtime masking to Beacon to complete the coverage outlined in the Cobalt Strike and YARA post. It is also important to highlight that obfuscation and masking is only one aspect of the “evasion-in-depth” approach. The content of these posts (part2/part3) and the example provided in the UDRL-VS kit is solely focused on addressing static signatures and tools such as YARA. It will not help to evade all of the various features of PE malware models, different types of behavioural analysis or other more advanced detection techniques, such as those that look for thread creation trampolines or inspect kernel call stacks, etc.
注意:这篇文章重点介绍在将 Beacon 加载到内存之前对其进行混淆和屏蔽。但是,作为加载过程的一部分,我们撤消所有这些以实现执行。因此,在本系列的第 3 部分中,我们将使用睡眠掩码将运行时掩码应用于信标,以完成钴罢工和 YARA 帖子中概述的覆盖范围。同样重要的是要强调,混淆和掩盖只是“深度规避”方法的一个方面。这些帖子的内容(第2/part3)和UDRL-VS工具包中提供的示例仅侧重于解决静态签名和YARA等工具。逃避 PE 恶意软件模型的所有各种功能、不同类型的行为分析或其他更高级的检测技术(例如寻找线程创建蹦床或检查内核调用堆栈的技术等)无济于事。
Setting The Stage{} 设置舞台{}
In the following sections we will expand upon what’s available in the stage{} block and use it as a starting point to transform Beacon.
在以下部分中,我们将扩展 stage{} 块中可用的内容,并将其用作转换 Beacon 的起点。
stage.magic_mz stage.magic_mz
There are several options within the stage{} block that allow users to modify obvious PE file markers in Beacon’s header. However, whilst these options offer the flexibility to customize Beacon, they are limited to specific aspects of its header. For example, stage.magic_mz_x** which allows users to overwrite the first 4 bytes of the RAW Beacon payload (the MZ header).
块 stage{} 中有几个选项允许用户修改信标标头中明显的 PE 文件标记。但是,虽然这些选项提供了自定义 Beacon 的灵活性,但它们仅限于其标头的特定方面。例如, stage.magic_mz_x** 允许用户覆盖 RAW 信标有效负载的前 4 个字节 (MZ 标头).
As part of UDRL development, we are not limited to modifying specific bytes at specific locations. Instead, we can modify any value at any location. This means we can extend the idea behind options like stage.magic_mz and use Aggressor Script to completely transform Beacon’s PE header.
作为 UDRL 开发的一部分,我们不仅限于修改特定位置的特定字节。相反,我们可以修改任何位置的任何值。这意味着我们可以扩展选项背后的想法, stage.magic_mz 并使用侵略者脚本来完全转换信标的 PE 标头。
To demonstrate this idea, we replaced Beacon’s original PE header with the custom PE_HEADER_DATA and SECTION_INFORMATION structures shown below. These structures only contain a subset of the information available in a PE header, but still have everything our reflective loader needs to load a DLL. More information on custom executable formats can be found in Hasherezade’s excellent From Hidden Bee To Rhadamanthys – The evolution of custom executable formats.
为了演示这个想法,我们将 Beacon 的原始 PE 标头替换为如下所示的自定义 PE_HEADER_DATA 和 SECTION_INFORMATION 结构。这些结构仅包含 PE 标头中可用信息的子集,但仍包含反射加载程序加载 DLL 所需的一切。有关自定义可执行格式的更多信息可以在Hasherezade的优秀作品中找到 从隐藏的蜜蜂到Rhadamanthys – 自定义可执行格式的演变。
Note: Due to the significant number of signatures targeting the reflective loader’s DOS stub. We chose to use the “Double Pulsar” approach for the obfuscation-loader. The same techniques described here could be expanded to work with the “Stephen Fewer” style loaders, but this can be left as an exercise for the reader.
注意:由于针对反射加载程序的 DOS 存根的签名数量众多。我们选择使用“双脉冲星”方法进行混淆加载。这里描述的相同技术可以扩展为与“Stephen Fewer”风格的加载器一起使用,但这可以留给读者练习。
|
1
2
3
4
5
6
7
8
9
10
11
12
13
14
15
16
17
18
19
20
21
|
typedef struct _SECTION_INFORMATION { DWORD VirtualAddress; DWORD PointerToRawData; DWORD SizeOfRawData;} SECTION_INFORMATION, *PSECTION_INFORMATION;typedef struct _PE_HEADER_DATA { DWORD SizeOfImage; DWORD SizeOfHeaders; DWORD entryPoint; QWORD ImageBase; SECTION_INFORMATION Text; SECTION_INFORMATION Rdata; SECTION_INFORMATION Data; SECTION_INFORMATION Pdata; SECTION_INFORMATION Reloc; DWORD ExportDirectoryRVA; DWORD DataDirectoryRVA; DWORD RelocDirectoryRVA; DWORD RelocDirectorySize;} PE_HEADER_DATA, *PPE_HEADER_DATA; |
To create the above header structure, we used Aggressor Script’s pedump() function to generate a map of Beacon’s PE header (%pe_header_map). We then “packed” the information we needed into a byte sequence with Sleep’s pack() function. In the code example below, the first three values of the PE_HEADER_DATA structure are queried from %pe_header_map and “packed” into a byte sequence called $pe_header_data. The format string “I-I-I-“ specifies three 4-byte unsigned integer values (DWORDs) in little endian byte order.
为了创建上述标头结构,我们使用 Aggressor 脚本的 () 函数生成 Beacon 的 PE 标头 ( %pe_header_map ) 的 pedump 映射。然后,我们将所需的信息“打包”到带有 Sleep pack() 函数的字节序列中。在下面的代码示例中, PE_HEADER_DATA 从中查询 %pe_header_map 结构的前三个值并将其“打包”到名为 的 $pe_header_data 字节序列中。格式字符串“I-I-I-”以小端字节顺序指定三个 4 字节无符号整数值 (DWORD)。
Note: Sleep uses the concept of “Scalars” which are universal data containers. Variables in Sleep are Scalars indicated by a $ and can hold strings, numbers or even references to Java objects. %pe_header_map is a “Hash Scaler” indicated by the % sign. This is a data type that can hold multiple values associated with a key.
注意:睡眠使用“标量”的概念,标量是通用数据容器。睡眠中的变量是由 表示 $ 的标量,可以保存字符串、数字甚至对 Java 对象的引用。 %pe_header_map 是由 % 标志指示的“哈希缩放器”。这是一种可以保存与键关联的多个值的数据类型。
|
1
2
3
4
5
6
|
$pe_header_data = pack( "I-I-I-", %pe_header_map["SizeOfImage.<value>"], %pe_header_map ["SizeOfHeaders.<value>"], %pe_header_map ["AddressOfEntryPoint.<value>"]); |
To replace Beacon’s original PE header, we used Sleep’s substr("string", start, [end]) function to extract a byte sequence that contained only Beacon’s PE sections. It was then possible to append it to our newly created $pe_header_data structure.
为了替换 Beacon 的原始 PE 标头,我们使用 Sleep 的 substr("string", start, [end]) 函数提取仅包含 Beacon 的 PE 部分的字节序列。然后可以将其附加到我们新创建 $pe_header_data 的结构中。
|
1
2
3
4
5
6
7
8
9
10
11
|
# create custom header structure$pe_header_data = create_header_content(%pe_header_map); # determine size of Beacon’s Pe header$size_of_pe_headers = %pe_header_map["SizeOfHeaders.<value>"];# remove Beacon's original PE header$beacon_pe_sections = substr($beacon, $size_of_pe_headers);# append PE sections to newly created header structure$modified_beacon = $pe_header_data . $beacon_pe_sections; |
For clarity, the above has been illustrated in the following diagram:
为清楚起见,下图说明了上述内容:
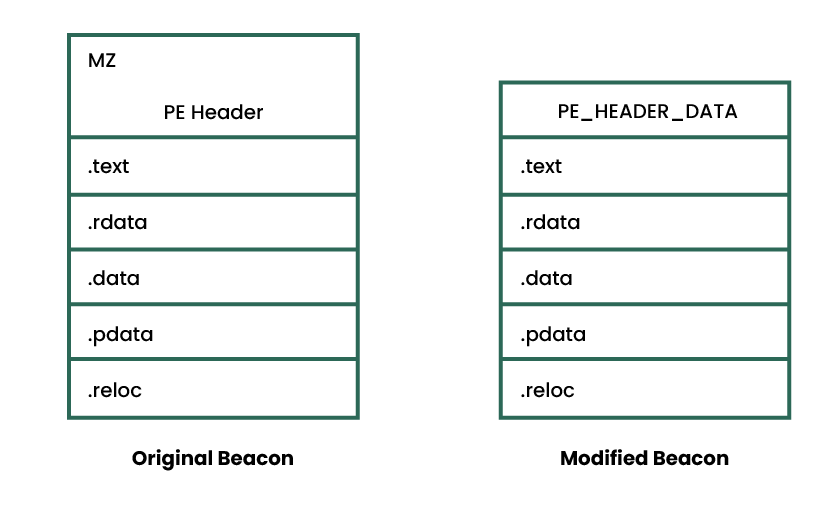
图1.原始信标与修改后的信标。
To support the above change, we had to make several modifications to the loader. Most importantly, we had to remove references to the original PE header and update it to parse the PE_HEADER_DATA structure. Additionally, as we removed a considerable chunk of data from Beacon, we had to ensure that the loader could still copy it correctly.
为了支持上述更改,我们必须对加载器进行一些修改。最重要的是,我们必须删除对原始 PE 标头的引用并更新它以解析 PE_HEADER_DATA 结构。此外,由于我们从 Beacon 中删除了大量数据,我们必须确保加载程序仍然可以正确复制它。
The PointerToRawData value in the SECTION_INFORMATION structure shown previously is a “file pointer”. A file pointer is a location within a given PE file as stored on disk (before it has been loaded). Therefore, after removing Beacon’s PE Header, the PointerToRawData values were incorrect as they were SizeOfHeaders (0x400) too large. Put simply, in Beacon’s original PE header, the .text section’s PointerToRawData value is 0x400. However, after removing the header, the .text section started at 0x0. As a result, the loader would have to subtract 0x400 (the size of the PE header) from the original value to correctly identify the section. It would have been possible to perform this subtraction for each of these PointerToRawData values, but a much simpler approach was to offset the base address of the RAW Beacon itself. For example, if the base address was offset to -0x400, then when we can use the original PointerToRawData value (0x400) to find the start of the .text section at 0x0. This offset can be seen in the following code example.
前面显示的结构 SECTION_INFORMATION 中的 PointerToRawData 值是“文件指针”。文件指针是给定 PE 文件中存储在磁盘上(加载之前)的位置。因此,在删除信标的 PE 标头后, PointerToRawData 值不正确,因为它们 SizeOfHeaders ( 0x400 ) 太大。简而言之,在 Beacon 的原始 PE 标头中,该 .text 部分 PointerToRawData 的值为 0x400 。但是,删除标头后,该 .text 节从 开始。 0x0 因此,加载器必须从原始值中减去 0x400 (PE 标头的大小)才能正确识别该部分。本来可以对这些 PointerToRawData 值中的每一个执行此减法, 但更简单的方法是偏移 RAW 信标本身的基址.例如,如果基址偏移为 -0x400 ,那么我们可以使用原始 PointerToRawData 值 ( 0x400 ) 在 处 0x0 查找 .text 该部分的开头。可以在下面的代码示例中看到此偏移量。
|
1
2
3
4
5
6
|
// Identify the start address of BeaconPPE_HEADER_DATA peHeaderData = (PPE_HEADER_DATA)bufferBaseAddress;char* rawDllBaseAddress = bufferBaseAddress + sizeof(PE_HEADER_DATA);// Offset the start address by SizeOfHeadersrawDllBaseAddress -= peHeaderData->SizeOfHeaders; |
The above modification ensured that the loader was able to successfully identify each section and load them into memory. However, the loaded image still contained a considerable amount of space between its start address and its .text section. This was because our loader copied the RAW Beacon DLL into the newly allocated memory at the locations specified by VirtualAddress in the SECTION_INFORMATION structures. VirtualAddress is a Relative Virtual Address (RVA) which means the address of an item after it is loaded into memory. This value is “relative” to the image’s base address which means it accounts for the PE header. Once again, we could have subtracted the virtual size of the PE header (0x1000) from each of these values, but a much simpler option was to offset the base address of the loaded image as well. This ensured that the that the memory region containing the loaded Beacon image began with the .text section rather than a PE header or any empty space.
上述修改确保加载器能够成功识别每个部分并将它们加载到内存中。但是,加载的图像在其起始地址和 .text 部分之间仍包含大量空间。这是因为我们的加载程序将 RAW 信标 DLL 复制到结构中指定位置的新分配内存 VirtualAddress 中 SECTION_INFORMATION 。 VirtualAddress 是一个相对虚拟地址 (RVA),表示项目加载到内存后的地址。此值与映像的基址“相对”,这意味着它占 PE 标头。再一次,我们可以从每个值中减去PE标头( 0x1000 )的虚拟大小,但更简单的选择是偏移加载图像的基址。这确保了包含加载的信标映像的内存区域以 .text 部分开头,而不是 PE 标头或任何空格。
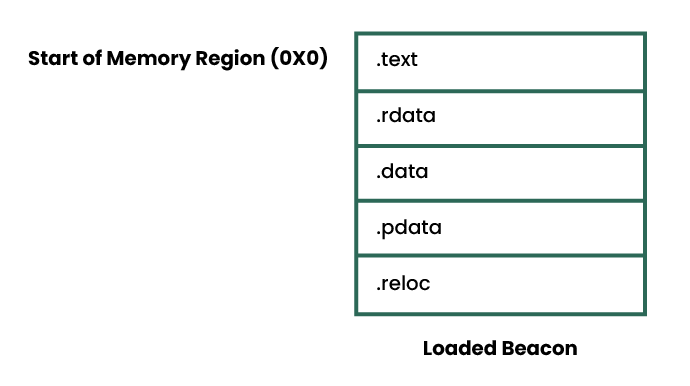
图2.内存中加载的信标图像的布局。
Note: The stage.obfuscate malleable C2 option instructs the default loader to use a similar approach when copying Beacon into memory.
注意:可 stage.obfuscate 延展 C2 选项指示默认加载程序在将信标复制到内存时使用类似的方法。
stage.transform stage.transform
By default, Beacon contains some widely known strings that are considered low hanging fruit for static detections. The malleable C2 profile makes it trivial to modify them with its transform-x**{} blocks and even allows users to add new strings with its string/stringw commands.
默认情况下, Beacon 包含一些广为人知的字符串,这些字符串被认为是静态检测的低挂果实.可延展的 C2 配置文件使得使用其块修改它们变得微不足道,甚至允许用户使用其 transform-x**{} string / stringw 命令添加新字符串。
It is possible to use the strrep() function in Aggressor Script to replace strings. However, it is native to Sleep, which means it operates slightly differently to the one in the malleable C2 profile. For example, Sleep’s func_strrep() uses Java’s replace() method, which means it completely replaces the original string with the new one. This can be seen in the following screenshot.
可以使用 strrep 侵略者脚本中的 () 函数来替换字符串。但是,它是 Sleep 的原生版本,这意味着它的操作方式与可延展 C2 配置文件中的操作略有不同。例如, func_strrep() Sleep’s 使用 Java replace() 的方法,这意味着它用新字符串完全替换了原始字符串。这可以在以下屏幕截图中看到。

replace() method.图3.Java的方法
replace() 。This type of modification is problematic when modifying a PE file, as it could change the size of the affected section and cause either the loader or the PE file to crash during execution. To overcome this, we created a simple wrapper around Sleep’s strrep() called strrep_pad(). This function was used to pad the input string with NULL bytes prior to replacing it (in a similar fashion to the malleable C2’s strrep command). We then replaced “beacon.x64.dll” and “ReflectiveLoader” with “udrl.x64.dll” and “customLoader” as shown in CFF Explorer below.
修改 PE 文件时,这种类型的修改是有问题的,因为它可能会更改受影响部分的大小,并导致加载程序或 PE 文件在执行过程中崩溃。为了克服这个问题,我们在 Sleep 周围创建了一个名为 strrep() . strrep_pad() 此函数用于在替换输入字符串之前用 NULL 字节填充输入字符串(以类似于可延展 C2 strrep 命令的方式)。然后,我们将“beacon.x64.dll”和“ReflectiveLoader”替换为“udrl.x64.dll”和“customLoader”,如下面的CFF Explorer所示。

图4.修改后的信标字符串。
Note: It is possible to apply the contents of a malleable C2 profile’s transform-x** block in Aggressor Script via setup_transformations(). In addition, strings defined in the malleable C2 profile can be applied with setup_strings(). However, as described at the start of this post, we opted to apply our transformations solely in Aggressor Script
注意:可以通过 在 setup_transformations() 侵略者脚本中应用可延展 C2 配置文件块 transform-x** 的内容。此外,在可延展 C2 配置文件中定义的字符串可以使用 setup_strings() .但是,如本文开头所述,我们选择仅在侵略者脚本中应用我们的转换
stage.obfuscate stage.obfuscate
As part of the Cobalt Strike and YARA post, we discussed the stage.obfuscate malleable C2 option and highlighted that despite masking some aspects of Beacon, it still left a lot exposed. In the previous sections we implemented some of stage.obfuscate’s functionality in the sense that we removed Beacon’s PE header as part of loading it into memory. However, it also masks Beacon’s .text section and its Import Address Table (IAT) which is important due to the significant number of YARA rules that target them.
作为Cobalt Strike和YARA帖子的一部分,我们讨论了可 stage.obfuscate 延展的C2选项,并强调尽管掩盖了Beacon的某些方面,但它仍然暴露了很多。在前面的部分中,我们实现了 stage.obfuscate 的一些功能,即我们删除了 Beacon 的 PE 标头,将其加载到内存中。但是,它也掩盖了信标的部分 .text 及其导入地址表 (IAT),这很重要,因为针对它们的 YARA 规则数量众多。
There is an existing Aggressor Script function called pe_mask_section() that makes it trivial to mask a section with a single byte key. In addition, Bobby Cooke has demonstrated in BokuLoader that it is possible to use Aggressor Script to mask each string in the IAT.
有一个现有的 Aggressor 脚本函数调用 pe_mask_section () ,它使得使用单个字节键屏蔽部分变得微不足道。此外,Bobby Cooke 在 BokuLoader 中证明,可以使用 Aggressor 脚本来屏蔽 IAT 中的每个字符串。
Whilst masking Beacon’s .text section and its IAT would provide feature parity with the malleable C2 profile, we know from Cobalt Strike and YARA that this would still leave parts of Beacon exposed. As a result, we wanted to create a more generic capability that could mask these vulnerable sections (.text, .rdata .data) with randomly generated variable length keys.
虽然屏蔽信标 .text 的部分及其 IAT 将提供与可延展 C2 轮廓相同的特征,但我们从 Cobalt Strike 和 YARA 中得知,这仍然会使信标的部分暴露在外。因此,我们希望创建一个更通用的功能,可以用随机生成的可变长度键来掩盖这些易受攻击的部分( .text .rdata , .data )。
At a high-level, our approach was to append a buffer of XOR keys to the PE_HEADER_DATA structure and dynamically retrieve them at runtime. This allowed us to add variation to each exported artefact without re-compiling the loader. The following diagram provides an illustration of this approach.
在高级别上,我们的方法是将 XOR 键的缓冲区附加到结构中 PE_HEADER_DATA ,并在运行时动态检索它们。这使我们能够为每个导出的工件添加变体,而无需重新编译加载器。下图提供了此方法的说明。

图5.修改后的工件的高级概述。
To ensure that we could retrieve the XOR keys from this buffer, we updated the PE_HEADER_DATA structure to include the lengths of each XOR key.
为了确保我们可以从这个缓冲区中检索 XOR 密钥,我们更新了 PE_HEADER_DATA 结构以包含每个 XOR 密钥的长度。
|
1
2
3
4
5
6
|
typedef struct _PE_HEADER_DATA { […SNIP…] DWORD TextSectionXORKeyLength; DWORD RdataSectionXORKeyLength; DWORD DataSectionXORKeyLength;} PE_HEADER_DATA, *PPE_HEADER_DATA; |
It was then possible to use these values to index the buffer and determine the start address of each key. This also meant that the key length could change dramatically between each exported payload and the loader would still be able to retrieve them.
然后可以使用这些值为缓冲区编制索引并确定每个键的起始地址。这也意味着每个导出的有效负载之间的密钥长度可能会发生巨大变化,加载程序仍然能够检索它们。
To simplify using the XOR keys in the loader at runtime, we created a KEY_INFO structure to provide an abstract representation of each key and its length. We then added XOR_KEYS to do the same for each KEY_INFO structure.
为了简化运行时在加载器中使用 XOR 键,我们创建了一个 KEY_INFO 结构来提供每个键及其长度的抽象表示。然后,我们为每个 KEY_INFO 结构添加 XOR_KEYS 相同的操作。
|
1
2
3
4
5
6
7
8
9
10
|
typedef struct _KEY_INFO { size_t KeyLength; char* Key;} KEY_INFO, *PKEY_INFO;typedef struct _XOR_KEYS { KEY_INFO TextSection; KEY_INFO RdataSection; KEY_INFO DataSection;} XOR_KEYS, *PXOR_KEYS; |
The following code example demonstrates the approach described above. Initially, the size of PE_HEADER_DATA is used to find the start address of the first XOR key. Then, the XOR key lengths in peHeaderData are used to identify the start address of each subsequent key.
下面的代码示例演示上述方法。最初,大小 PE_HEADER_DATA 用于查找第一个 XOR 密钥的起始地址。然后,XOR peHeaderData 密钥长度用于标识每个后续密钥的起始地址。
|
1
2
3
4
5
6
7
8
|
PPE_HEADER_DATA peHeaderData = (PPE_HEADER_DATA)rawDllBaseAddress;XOR_KEYS xorKeys;xorKeys.TextSection.key = rawDllBaseAddress + sizeof(PE_HEADER_DATA);xorKeys.TextSection.keyLength = peHeaderData->TextSectionXORKeyLength;xorKeys.RdataSection.key = xorKeys.TextSection.key + peHeaderData->TextSectionXORKeyLength;xorKeys.RdataSection.keyLength = peHeaderData->RdataSectionXORKeyLength;xorKeys.DataSection.key = xorKeys.RdataSection.key + peHeaderData->RdataSectionXORKeyLength;xorKeys.DataSection.keyLength = peHeaderData->DataSectionXORKeyLength; |
Obfuscation vs YARA 混淆与亚拉
In the previous sections, we described our approach to obfuscation and masking Beacon. We can now test the modified artefact against Elastic’s collection of open-source YARA rules for Cobalt Strike (as previously used in the Cobalt Strike and YARA post).
在前面的部分中,我们描述了混淆和屏蔽 Beacon 的方法。现在,我们可以根据 Elastic 的 Cobalt Strike 开源 YARA 规则集合(之前在 Cobalt Strike 和 YARA 帖子中使用)测试修改后的工件。
Once again, we’d like to credit Elastic for its comprehensive rule set. In addition, we’d also like to reiterate that this is not intended to be a guide to evade a specific vendor. We are focusing on publicly available static detections, which is undoubtedly only one aspect of the defence-in-depth approach employed by modern EDRs. In the following screenshot, we have scanned the default RAW Beacon payload followed by our modified artefact. We can see that the default payload was trivial to detect, but the obfuscated Beacon did not trigger any of the YARA rules.
我们再次感谢 Elastic 全面的规则集。此外,我们还想重申,这不是逃避特定供应商的指南。我们专注于公开可用的静态检测,这无疑只是现代 EDR 采用的纵深防御方法的一个方面。在以下屏幕截图中,我们扫描了默认的 RAW 信标有效负载,然后是修改后的伪影。我们可以看到默认有效负载很容易检测到,但混淆的信标没有触发任何 YARA 规则。
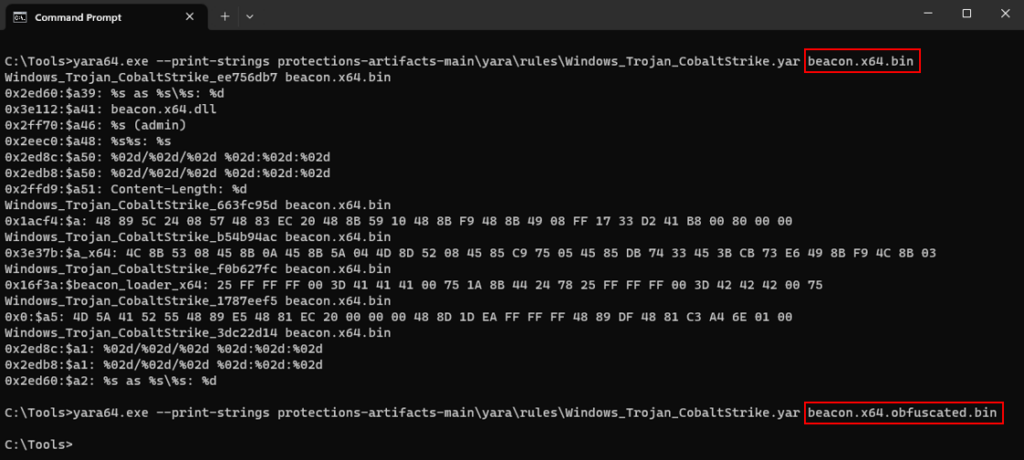
图6.YARA扫描RAW信标有效载荷和修改后的伪影。
The Extra Mile 额外里程
In the previous sections we built upon the existing malleable C2 options available in Cobalt Strike to create a Beacon payload that was robust against static detections. Whilst the transformations detailed above were found to be effective, there are many examples of modern malware that utilises multiple layers of obfuscation and masking as part of their defence evasion strategy. For example, the Roshtyak malware strain uses 14 layers of obfuscation.
在前面的部分中,我们以Cobalt Strike中现有的可延展C2选项为基础,创建了一个对静态检测具有鲁棒性的信标有效载荷。虽然上面详述的转换被发现是有效的,但有许多现代恶意软件的例子,它们利用多层混淆和掩蔽作为其防御规避策略的一部分。例如,Roshtyak恶意软件使用14层混淆。
The process of applying 14 layers of obfuscation is understandably outside the scope of this post. However, Elastic’s Security Labs recently published a fantastic walkthrough of the Blister loader which uses compression and encryption to add layers of obfuscation. Applying these two felt like a more realistic goal for our example loader.
可以理解的是,应用 14 层混淆的过程超出了本文的范围。然而,Elastic 的安全实验室最近发布了一个很棒的 Blister 加载器演练,它使用压缩和加密来添加混淆层。对于我们的示例加载器来说,应用这两个感觉像是一个更现实的目标。
In the following sections, we will adapt the Blister loader’s approach and demonstrate how to build these layers of obfuscation into the UDRL itself. Therefore, we will apply both compression and encryption to the modified Beacon via Aggressor Script. This helps to simplify the process of embedding Beacon into different stage0 shellcode runners, but also fits nicely into the Cobalt Strike workflow. For example, when spawning or injecting Beacon. Additionally, in Cobalt Strike 4.9 we have made it possible for users to apply UDRLs to postex DLLs which means that they can benefit from the obfuscation and masking as well.
在以下各节中,我们将调整 Blister 加载程序的方法,并演示如何将这些混淆层构建到 UDRL 本身中。因此, 我们将通过侵略者脚本对修改后的信标应用压缩和加密。这有助于简化将 Beacon 嵌入不同 stage0 shellcode 运行器的过程,但也非常适合 Cobalt Strike 工作流程。例如,生成或注入信标时。此外,在Cobalt Strike 4.9中,我们允许用户将UDRL应用于postex DLL,这意味着他们也可以从混淆和屏蔽中受益。
Note: This layered approach to obfuscation could also provide an excellent opportunity to apply Defence Evasion techniques. For example, Execution Guard Rails or Virtualisation/Sandbox Evasion
注意:这种分层的混淆方法也可以提供应用防御规避技术的绝佳机会。例如,执行护栏或虚拟化/沙盒规避.
Applying Compression 应用压缩
A full description of compression is outside the scope of this blog post. Fundamentally though, compression is the process of encoding information using fewer bits than the original.
压缩的完整描述超出了本博客文章的范围。但从根本上说,压缩是使用比原始比原始比较少的位对信息进行编码的过程。
To demonstrate using compression as part of a reflective loader, we implemented Microsoft’s LZNT1 compression algorithm in Aggressor Script. We primarily chose LZNT1 because it is supported by RtlDecompressBuffer(). This simplified the loader as we were able to use it to decompress the buffer instead of implementing the decompression logic ourselves. In addition, Nakatsuru You had already ported Jeffrey Bush’s C implementation of LZNT1 to Python, which made it trivial to port it once more to Aggressor Script.
为了演示使用压缩作为反射加载器的一部分,我们在 Aggressor 脚本中实现了 Microsoft 的 LZNT1 压缩算法。我们之所以选择 LZNT1,主要是因为它受 . RtlDecompressBuffer () 这简化了加载器,因为我们能够使用它来解压缩缓冲区,而不是自己实现解压缩逻辑。此外,Nakatsuru You已经将Jeffrey Bush的LZNT1的C实现移植到Python上,这使得再次将其移植到Aggressor Script变得微不足道。
Note: It would have been possible to execute the Python implementation directly from Aggressor Script, but for the sake of simplicity and so that we could provide an example without any other dependencies, we spent some time re-writing it in Sleep. As part of some (very) limited testing that the LZNT1 compression algorithm compressed the default Beacon shellcode (CS 4.8) from roughly ~296kb to ~178kb. The compression algorithm was not quite as effective on the obfuscated Beacon due to the transformations described in the previous section.
注意:可以直接从 Aggressor 脚本执行 Python 实现,但为了简单起见,为了我们可以提供一个没有任何其他依赖项的示例,我们花了一些时间在 Sleep 中重写它。作为一些(非常)有限测试的一部分,LZNT1 压缩算法将默认的信标外壳代码 (CS 4.8) 从大约 ~296kb 压缩到 ~178kb。 由于上一节中描述的转换,压缩算法在混淆的信标上不太有效。
The function prototype for RtlDecompressBuffer() has been provided below.
下面提供了函数 RtlDecompressBuffer() 原型。
|
1
2
3
4
5
6
7
8
|
NT_RTL_COMPRESS_API NTSTATUS RtlDecompressBuffer( [in] USHORT CompressionFormat, [out] PUCHAR UncompressedBuffer, [in] ULONG UncompressedBufferSize, [in] PUCHAR CompressedBuffer, [in] ULONG CompressedBufferSize, [out] PULONG FinalUncompressedSize); |
As described above, it was possible to decompress the compressed buffer with a single call to RtlDecompressBuffer(). However, as shown in its function prototype, it required the size of both the compressed and the decompressed buffer. It was not possible to retrieve these sizes from the existing PE_HEADER_DATA structure as we had compressed it. Therefore, to pass this information to the loader, we used the same approach described at the start of this post and created a new custom header structure to hold this information called UDRL_HEADER_DATA.
如上所述,只需调用 RtlDecompressBuffer() 即可解压缩压缩缓冲区。但是,如其函数原型所示,它需要压缩缓冲区和解压缩缓冲区的大小。由于我们已经压缩了这些大小,因此无法从现有 PE_HEADER_DATA 结构中检索这些大小。因此,为了将此信息传递给加载程序,我们使用了本文开头描述的相同方法,并创建了一个新的自定义标头结构来保存此信息,称为 UDRL_HEADER_DATA .
|
1
2
3
4
5
|
typedef struct _UDRL_HEADER_DATA { DWORD CompressedSize; //the size of the compressed artefact DWORD RawFileSize; //the size of the RAW DLL DWORD LoadedImageSize; // the size of the loaded image} UDRL_HEADER_DATA, * PUDRL_HEADER_DATA; |
The high-level layout at this stage has been illustrated in the following diagram.
下图说明了此阶段的高级布局。

图7.压缩后修改后的工件的高级概述。
In the original UDRL-VS example, we allocated a block of memory and copied Beacon into it as part of the loading process. However, to support compression, we were required to allocate another block of temporary memory to store the decompressed Beacon DLL prior to loading it.
在原始 UDRL-VS 示例中,我们分配了一个内存块,并将 Beacon 复制到其中作为加载过程的一部分。但是,为了支持压缩,我们需要在加载之前分配另一个临时内存块来存储解压缩的信标 DLL。
The decompression workflow can be seen in the following diagram. The term “loader memory” refers to the original allocation of memory for the UDRL. We have not included the loader itself in this diagram for simplicity.
解压缩工作流如下图所示。术语“加载程序内存”是指 UDRL 的原始内存分配。为简单起见,我们没有在此图中包含加载器本身。
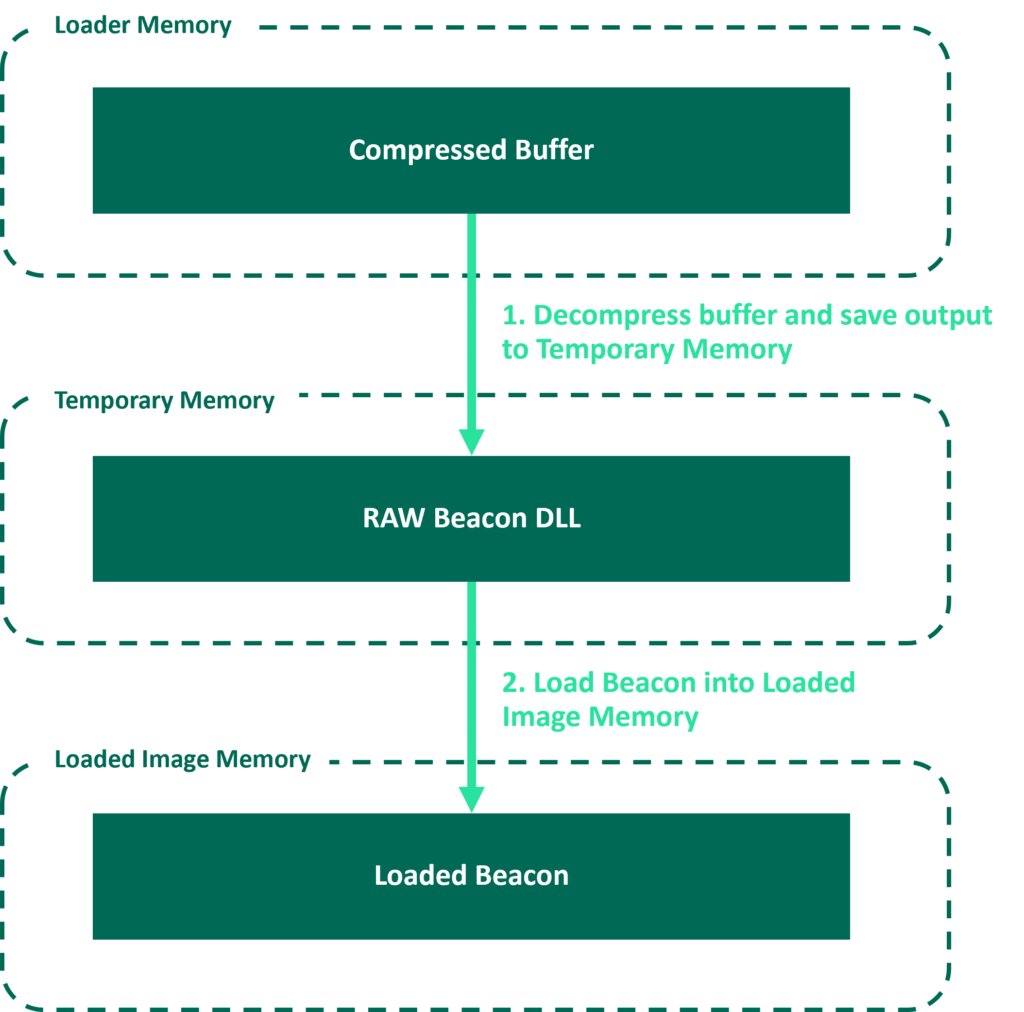
图8.解压缩工作流。
Note: Here we are allocating an additional region of memory to handle the decompression. This is obviously a trade-off, as perhaps a large allocation of memory could be considered suspicious. It is therefore up to the UDRL developer to decide if compression is worth the additional allocation of memory. As stated at the start of this post, this is intended as an example.
注意:在这里,我们分配了一个额外的内存区域来处理解压缩。这显然是一种权衡,因为可能大量内存分配可能被认为是可疑的。因此,由 UDRL 开发人员决定压缩是否值得额外分配内存。如本文开头所述,这只是一个例子。
Applying Encryption 应用加密
To demonstrate encryption, we opted for simplicity and used the RC4 encryption algorithm. We considered it simple because an RC4 encryption/decryption routine can be written in very few lines of code. In addition, there are a number of public examples of the algorithm. For example, @_EthicalChaos_ (ccob) has already shown how to encrypt a buffer with RC4 via Java in Sleep and Austin Hudson used RC4 as part of Titanldr-ng.
为了演示加密,我们选择了简单性并使用了RC4加密算法。我们认为这很简单,因为 RC4 加密/解密例程可以用很少的代码行编写。此外,该算法还有许多公开示例。例如,@_EthicalChaos_(ccob)已经展示了如何在睡眠中通过Java使用RC4加密缓冲区,Austin Hudson使用RC4作为Titanldr-ng的一部分。
In the following example, an encryption key is randomly generated and used to encrypt the previously compressed buffer. The length of the encryption key is then added to the UDRL_HEADER_DATA structure and in a similar fashion to the XOR keys, the encryption key is appended to it.
在以下示例中,随机生成加密密钥,用于加密以前压缩的缓冲区。然后将加密密钥的长度添加到结构中 UDRL_HEADER_DATA ,并以与 XOR 密钥类似的方式将加密密钥附加到其中。
|
1
2
3
4
5
6
7
8
9
10
11
12
|
$rc4_key_length = 11;$rc4_key = generate_random_bytes($rc4_key_length);[…SNIP…]$encrypted_buffer = rc4_encrypt($compressed_buffer, $rc4_key);$udrl_header_data = pack( “I-I-I-I-“, $compressed_file_size, $raw_file_size, $loaded_image_size, $rc4_key_length,);return $udrl_header_data . $rc4_key . $encrypted_buffer; |
This approach has been illustrated in the following diagram.
下图说明了此方法。

图9.压缩和加密后修改的项目的高级概述。
To ensure that the loader was independent of whatever executed it, we had to assume that it would not have the required permissions to decrypt the buffer in place (as it is highly likely the loader would be running in PAGE_EXECUTE_READ memory). As a result, we modified the original workflow and decided to use Loaded Image Memory twice (this also helped to avoid allocating another region of memory).
为了确保加载器独立于执行它的任何内容,我们必须假设它没有就地解密缓冲区所需的权限(因为加载程序很可能在内存中 PAGE_EXECUTE_READ 运行)。因此,我们修改了原始工作流程,并决定使用两次加载的图像内存(这也有助于避免分配另一个内存区域)。
As shown in the following diagram, the compressed and encrypted buffer was first copied into the Loaded Image Memory so that it could be decrypted (in PAGE_READWRITE memory). The decrypted buffer was then decompressed and stored in Temporary Memory. Once the buffer had been decrypted/decompressed, it was possible for the loader to continue its original workflow and load Beacon back into Loaded Image Memory (hence the name Loaded Image Memory).
如下图所示,首先将压缩和加密的缓冲区复制到加载的图像内存中,以便可以对其进行解密(在内存中 PAGE_READWRITE )。然后,解密的缓冲区被解压缩并存储在临时内存中。一旦缓冲区被解密/解压缩, 加载程序可以继续其原始工作流程并将信标加载回加载的图像内存 (因此称为加载的图像内存).
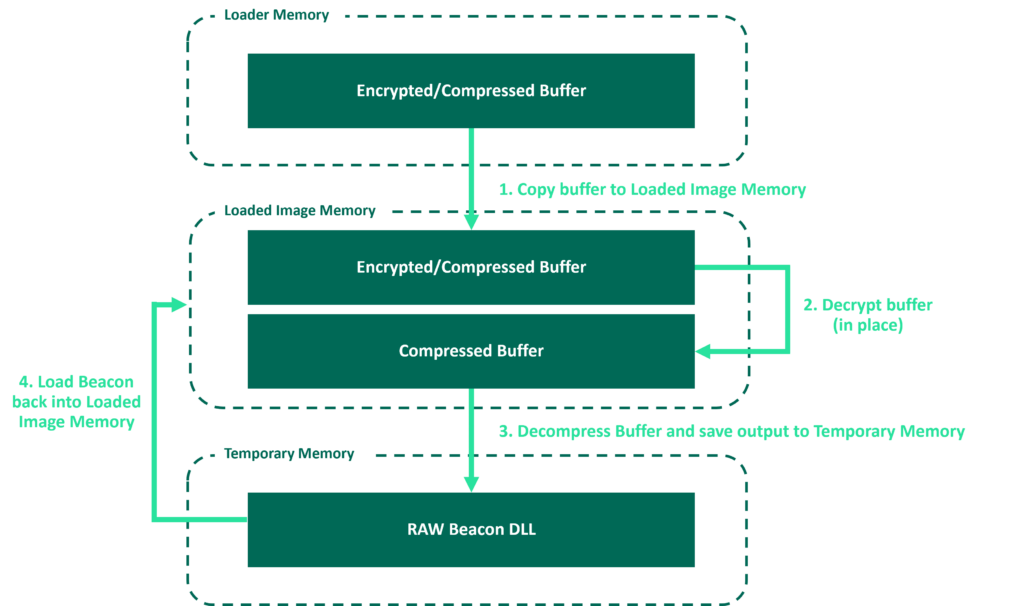
图 10.解密/解压缩工作流。
Entropy 熵
In the previous sections we heavily obfuscated Beacon. However, in doing so, we significantly increased its entropy which can be problematic when trying to evade PE malware models. A full description of all the various features of PE malware models is outside the scope of this post. However, we have experienced modern EDR highlighting even benign files as suspicious if they contain too much randomness. As a result, we thought it would be helpful to (very) briefly demonstrate the effect of the above obfuscation on entropy as it may be something to consider when creating stage0 shellcode runners.
在前面的部分中,我们对 Beacon 进行了大量混淆。但是,在这样做的过程中,我们显着增加了其熵,这在尝试逃避 PE 恶意软件模型时可能会出现问题。PE 恶意软件模型的所有各种功能的完整描述不在本文的讨论范围之内。但是,我们经历过现代 EDR 将即使是良性文件突出显示为可疑文件,如果它们包含太多随机性。因此,我们认为(非常)简要演示上述混淆对熵的影响会有所帮助,因为在创建 stage0 shellcode 运行器时可能需要考虑这一点。
There are some excellent resources online that talk about Threat Hunting with File Entropy and Using Entropy in Threat Hunting. In addition, there is a section on Binary Entropy in Sektor7’s Windows Evasion course. As a result, this post will not delve into it in much detail. Fundamentally though, when people talk about binary entropy, they are typically referring to a measure of randomness.
网上有一些优秀的资源,讨论使用文件熵进行威胁搜寻和在威胁搜寻中使用熵。此外,在Sektor7的Windows Evasion课程中还有一个关于二进制熵的部分。因此,这篇文章不会深入探讨它。从根本上说,当人们谈论二元熵时,他们通常指的是随机性的度量。
In the following example, we calculated the entropy of a default RAW Beacon, the obfuscated Beacon and then finally the compressed/encrypted version. We can see that these transformations have significantly increased the entropy. Therefore, any PE malware model that considers high entropy a suspicious feature would likely trigger on it.
在下面的示例中, 我们计算了默认 RAW 信标的熵, 混淆信标,最后是压缩/加密版本.我们可以看到,这些变换显著增加了熵。因此,任何将高熵视为可疑功能的 PE 恶意软件模型都可能会触发。
|
1
2
3
4
5
6
|
C:\Tools>sigcheck.exe -a beacon.x64.bin | findstr /I entropy Entropy: 6.188C:\Tools>sigcheck.exe -a beacon.x64.obfuscated.bin | findstr /I entropy Entropy: 7.535C:\Tools>sigcheck.exe -a beacon.x64.obfuscated.lznt1.rc4.bin | findstr /I entropy Entropy: 7.999 |
0xPat has published an excellent series of posts on malware development. We recommend reading all of it, but as part of their fourth post about anti-static analysis they recommend using Base64 encoding to reduce entropy as its 64 character alphabet reduces the randomness.
0xPat 发布了一系列关于恶意软件开发的优秀文章。我们建议阅读所有这些内容,但作为他们关于反静电分析的第四篇文章的一部分,他们建议使用 Base64 编码来减少熵,因为它的 64 个字符的字母表降低了随机性。
Aggressor Script provides a built-in base64_encode() function which makes it easy to test this hypothesis. We can see that Base64 encoding brings the entropy down considerably.
侵略者脚本提供了一个内置 base64_encode() 函数,可以轻松测试此假设。我们可以看到 Base64 编码大大降低了熵。
|
1
2
3
|
C:\Tools>sigcheck.exe -a beacon.x64.obfuscated.lznt1.rc4.b64.bin | findstr /I entropy Entropy: 6.001 |
Note: One drawback to Base64 encoding is that it increases the length of the artefact. However, in our limited testing the obfuscated/compressed/encrypted/encoded buffer was not much larger than the original RAW Beacon payload (~305kb vs ~296kb in CS 4.8).
注意:Base64 编码的一个缺点是它增加了工件的长度。然而,在我们有限的测试中,混淆/压缩/加密/编码缓冲区并不比原始 RAW Beacon 有效载荷大多少(~305kb vs CS 4.8 中的 ~296kb)。

图 11.压缩、加密和编码后修改后的工件的高级概述。
To handle this transformation in the example loader, we added Base64Decode() to Obfuscation.cpp. It was then possible to use the existing approach to decompression/decryption but simply Base64 decode the buffer as part of the copy operation. The updated workflow has been illustrated in the following diagram.
为了在示例加载器中处理此转换,我们添加了 Base64Decode() Obfuscation.cpp。然后可以使用现有的解压缩/解密方法,但只需 Base64 解码缓冲区作为复制操作的一部分。下图说明了更新后的工作流。
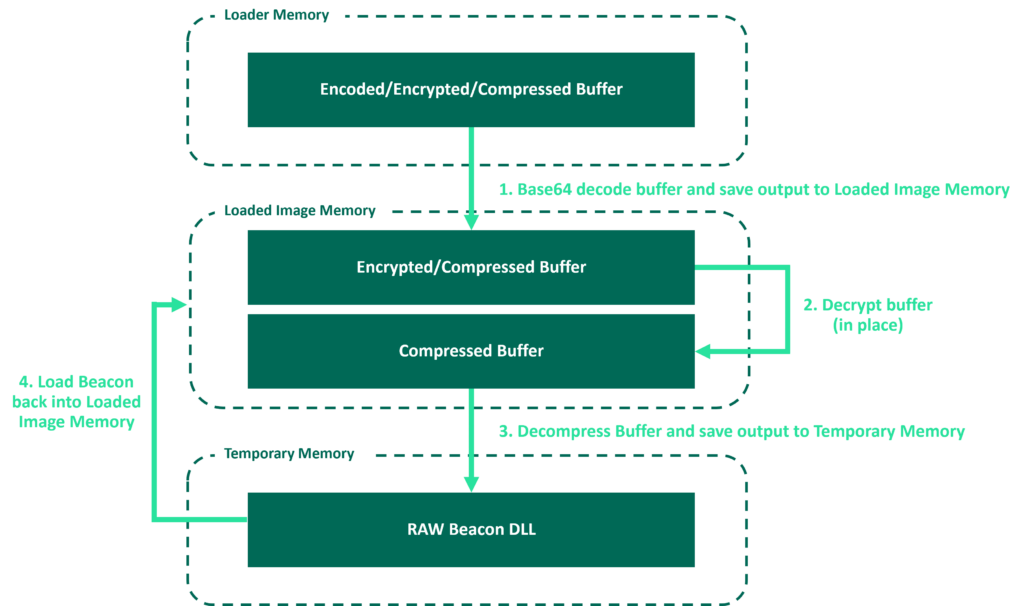
图 12.解码/解密/解压缩工作流。
Note: It is important to note that the artefact we have created will ultimately sit inside a stage0 shellcode runner of some description. As a result, we need to consider the entropy of the shellcode runner as well as the artefact itself. The default Cobalt Strike executable has a relatively high entropy which is even larger when used in combination with our obfuscation-example. This is because the Cobalt Strike client masks the shellcode with a randomly generated 4-byte key prior to stomping it into the default executable. This essentially removes the effect of the Base64 encoding. To overcome this, it is possible to either export the RAW shellcode and create a custom shellcode runner or use the artefact kit to modify the default executable. The Cobalt Strike client will not apply this masking to custom artefacts. We strongly recommend developing custom shellcode runners, the default Cobalt Strike executables are widely signatured and will likely negate any obfuscation you apply to Beacon
注意:重要的是要注意,我们创建的工件最终将位于具有某种描述的stage0 shellcode运行器中。因此,我们需要考虑shellcode运行器的熵以及工件本身。默认的Cobalt Strike可执行文件具有相对较高的熵,当与我们的混淆示例结合使用时,熵甚至更大。这是因为 Cobalt Strike 客户端在将外壳代码踩入默认可执行文件之前,会使用随机生成的 4 字节密钥屏蔽外壳代码。这基本上消除了 Base64 编码的效果。为了克服这个问题,可以导出RAW外壳代码并创建自定义shellcode运行器,或者使用工件工具包修改默认可执行文件。Cobalt Strike 客户端不会将此遮罩应用于自定义工件。我们强烈建议开发自定义shellcode运行器,默认的Cobalt Strike可执行文件是广泛签名的,并且可能会否定您应用于Beacon的任何混淆
Closing Thoughts 结语
As part of this post, we have obfuscated, compressed, encrypted and encoded Beacon to evade a set of open-source static detections. Whilst we have demonstrated one approach, we hope this post has shown that the possibilities are endless when developing your own custom obfuscation and masking routines within a UDRL.
作为这篇文章的一部分, 我们混淆, 压缩, 加密和编码 Beacon 以逃避一组开源静态检测.虽然我们已经演示了一种方法,但我们希望这篇文章表明,在 UDRL 中开发自己的自定义混淆和掩码例程时,可能性是无穷无尽的。
Once again, it is important to note that despite all of the obfuscation and masking applied above. Beacon can be trivial to detect in memory in its default state with regards to YARA scanning unless it takes evasive action. The simplest way to mask Beacon at runtime is via the Sleep Mask kit. A full description of the Sleep Mask was outside the scope of this post, however, in part 3 of this series we will demonstrate how to complete the coverage outlined above and mask the obfuscation-loader at runtime.
再一次,重要的是要注意,尽管上面应用了所有混淆和掩蔽。信标在内存中检测与 YARA 扫描相关的默认状态可能很简单,除非它采取规避操作.在运行时屏蔽信标的最简单方法是通过睡眠掩码套件.睡眠掩码的完整描述超出了本文的范围,但是,在本系列的第 3 部分中,我们将演示如何完成上述报道并在运行时屏蔽混淆加载程序。
The code is now available in the udrl-vs kit in the Arsenal Kit. To try it out, simply open the solution and compile the obfuscation-loader Release build. You can then load the ./bin/examples/obfuscation-loader/prepend-udrl.cna script into the Cobalt Strike console and export an artefact.
该代码现在可在阿森纳套件的 udrl-vs 套件中找到。要试用它,只需打开解决方案并编译混淆加载程序发布版本。然后,您可以将 ./bin/examples/obfuscation-loader/prepend-udrl.cna 脚本加载到钴打击控制台并导出工件。
Alternatively, you can start using this functionality in your own custom UDRLs. To create a custom loader, add a project to the UDRL-VS solution, apply the loader.prop properties file and add a reference the UDRL-VS library. You can then create your own loader and either use our example loader functions or write your own. More information on all of the above can be found in the kit’s README.
或者,可以在自己的自定义 UDRL 中开始使用此功能。若要创建自定义加载程序,请将项目添加到 UDRL-VS 解决方案,应用 loader.prop 属性文件并添加对 UDRL-VS 库的引用。然后,您可以创建自己的加载器,并使用我们的示例加载器函数或编写自己的加载器函数。有关上述所有内容的更多信息,请参阅该套件的自述文件。
原文始发于Robert Bearsby:Revisiting the User-Defined Reflective Loader Part 2: Obfuscation and Masking
转载请注明:Revisiting the User-Defined Reflective Loader Part 2: Obfuscation and Masking | CTF导航